Addams Family (NES)/Any%
From SDA Knowledge Base
The route discussed and shown on this page uses deaths to save time.
Route discussion
Quest items
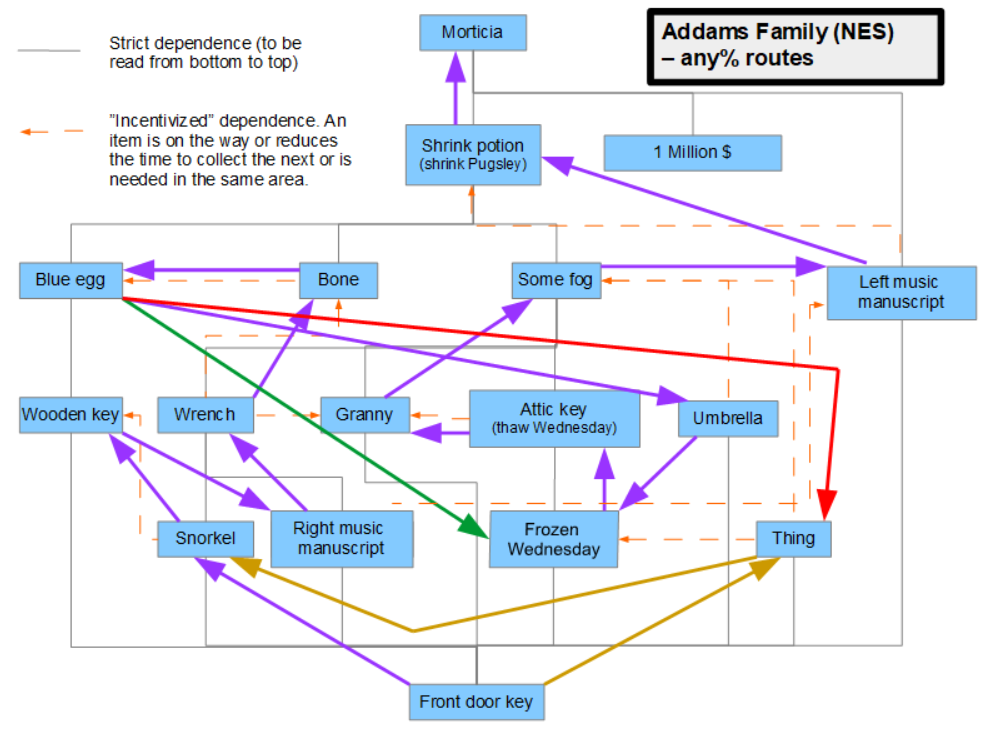
About the "incentivized" dependencies:
- Both the wooden key and the snorkel are found in rooms reached via the left landing. The wooden key is in the room further away and it's difficult to imagine a route, where it would make sense to first collect one of the items and then return again to the left landing to collect the other.
- There will be a few seconds of a splash screen when picking up the wrench if Granny has already been saved. That is skipped completely by getting the wrench before going to Granny.
- The furnace is a little out of the way and it's difficult to see a scenario, where it would end up saving time by visiting it twice. So Wednesday should be freed from the freezer before heading to the furnace and saving Granny.
- Having Thing saves time when doing the freezer and furnace. By avoiding health loss in the freezer, the furnace can be played more aggressively, saving time.
- Thing is useful on the roof to avoid losing time dodging falling tiles
- The umbrella is technically not needed to get the fog. However, unless something is found to skip the 1M$ requirement for entering the last room, the money bags in the chimney (next to the fog machine) need to be collected and the umbrella is needed for that.
- Right after the wrench has been collected in the pond, it makes very good sense to teleport to a bone room from the pond's secret room. Since the bone is found in the green bone room, it's literally on the way after the wrench.
- After death abusing in the garden after picking up the bone, you'll be at the foot of the tree and it's logic to then use the occasion to enter the tree and collect the blue egg.
The theoretically fastest route is indicated by violet arrows. By studying the item dependencies in the chart, there should only be two possibilities that are not immediately slower than the violet route (or simply incompatible).
Orange route - Collecting Thing has a few benefits.
- There are two money bags on the way to Thing that need to be replaced from elsewhere if Thing is not collected
- By activating Thing in the freezer instead of tanking damage from the snowballs near Wednesday, time can be saved in the furnace by taking more damage. Not to mention that it can be challenging in a real-time speedrun to get through the freezer and the furnace on just one lifebar.
- There are 10 falling tiles on the roof that each need to be dodged, costing up to almost half a second each (and that's the theoretical limit - losses in real-time are going to be bigger). Other than the time loss, dodging the tiles can be a challenge in its own right and the birds dropping stones on Gomez will lead to additional loss of health, which can become a problem towards the end.
In theory, it's a few seconds faster to skip Thing. However, the challenges that are introduced by skipping Thing both increase the difficulty of surviving the route and also require tighter execution to avoid additional time losses compared with the theoretical optimum.
Green route - First collect the umbrella in the conservatory and then head to the kitchen/freezer/furnace or the other way around?
Other than maybe a few pixels of difference from entering/exiting the door to the kitchen, both options are of the same distance. The difference instead lies in the health management. By first heading to the conservatory and the umbrella, you'll enter the kitchen at full health. If the kitchen/freezer/furnace is done first, the lifebar will already be somewhat reduced from the walking outside the house. Since health is a big concern in the kitchen etc area, but not for picking up the umbrella, it's better to first go to the conservatory and then to the kitchen and beyond.
