Solomon's Key (NES)/Game Mechanics
From SDA Knowledge Base
Contents
General game description
The fundamentals of the game are simple enough. Get the key in each room and go to the exit to advance to the next. The main character, Dana, can run, duck, jump and create and destroy blocks as many times as necessary. Picking up certain items will allow Dana to shoot a fireball. Touching anything dangerous is an instant kill. However, beyond the basics is some depth to the game that is next to impossible to figure out on your own without help, so this first section is to explain the mechanics that are important for speedrun categories. First of all, there are 48 regular rooms (1-48). The last room is always "Solomon's room", which contains the book called "Solomon's Key" (so paradoxically, despite chasing after keys the whole game, the name of the game refers to a book). On top of these 49 rooms that one encounters in a normal playthrough, it's possible to get to 12 bonus rooms and 3 hidden rooms. The bonus rooms are accessed by picking up the constellation icons in every fourth level (fyi, the 48 rooms are divided up in the 12 constellations, but that has no importance other than giving the game story an "esoteric" touch). The 3 hidden rooms are:
- Hidden room (upper part) - contains the page of time (torn out of Solomon's Key). To access it, pick up the first 4 Solomon's seals (see below for more info) and collect the constellation icon in room 20.
- Hidden room (lower part) - contains the page of space (torn out of Solomon's Key). To access it, pick up the first 6 Solomon's seals (see below for more info) and collect the constellation icon in room 44.
- Prinsess room (not a spelling mistake) - contains the princess. To access it, pick up all 8 Solomon's seals (see below for more info) and this room will come after room 48.
Endings
There are four endings in the game.
- The "normal" ending - finish the game without having saved the princess or having picked up the pages of space and time. The ending sequence is the bare minimum.
- The "princess" ending - save the princess and finish the game. On top of the normal ending sequence, fairies are released and some text is added at the end.
- The "pages" ending - collect both the page of space and the page of time and finish the game (collecting only one of them doesn't affect the ending). On top of the normal ending sequence, the cave sucks in all the demons and then crumbles. Some text about the constellation being destroyed appears at the end.
- The "best" ending - finish the game after having saved the princess and having collected the pages of space and time. The ending sequence is the combination of the princess and the pages endings.
Version differences
There are two versions of this game. The pal-version and the ntsc-version (ntsc-u and ntsc-j are identical). The room layout and enemies are the same between the two versions. However, as with many other games for the NES, the pal-version runs slower. Interestingly, it's not entirely slowed down by the usual 5/6 ratio. Instead, horizontal movement is ~3% faster in ntsc (both for Dana and the enemies), while vertical movement and all animations keep the same frame speed (resulting in the roughly 5/6 ratio of speed between pal and ntsc). As a consequence, most rooms with enemies have different solutions between pal and ntsc. Some rooms are harder in one version and some are harder in the other. It's not possible to make any kind of comparison of times between the two versions (not even in theory).
Like other NES-games, playing on keyboard creates a big advantage. There are even some room solutions that are only possible on emulator. It hasn't been researched if this is because of differences in lag or if the enemy behavior is slightly altered on emulator.
Important items
![]()
![]() [Bell] [Fairy] - Collecting a bell releases a fairy from the exit. 10 collected fairies give an extra life. It's better to avoid these when possible in a speedrun as the fairies move around a bit erratically and risk getting in the way when creating blocks. This is one of few random aspects of the game.
[Bell] [Fairy] - Collecting a bell releases a fairy from the exit. 10 collected fairies give an extra life. It's better to avoid these when possible in a speedrun as the fairies move around a bit erratically and risk getting in the way when creating blocks. This is one of few random aspects of the game.
![]() [Jar of Manda / "Blue jar"] - Dana can shoot a fireball after having picked up the blue jar. The fireball will stop upon impact with an enemy or disappear when it's exhausted. The number of fireballs in Dana's inventory are shown as small flames on the scroll in the top right corner of the screen. To begin with, Dana can hold at most three fireballs at once. There is an item that can extend the scroll, but it's not useful in a speedrun. These are scattered around in the rooms (less of them in the later parts of the game).
[Jar of Manda / "Blue jar"] - Dana can shoot a fireball after having picked up the blue jar. The fireball will stop upon impact with an enemy or disappear when it's exhausted. The number of fireballs in Dana's inventory are shown as small flames on the scroll in the top right corner of the screen. To begin with, Dana can hold at most three fireballs at once. There is an item that can extend the scroll, but it's not useful in a speedrun. These are scattered around in the rooms (less of them in the later parts of the game).
![]() [Jar of Magadora / "Orange jar"] - Dana can shoot a super fireball after having picked up the orange jar. The super fireball destroys all enemies in its way and only disappears when it's exhausted. A super fireball appears as a big flame on the inventory scroll. Be aware that you can't rearrange the fireballs on the scroll. You need to shoot in the order they were picked up. There are less orange jars in the game than blue ones (but like the blue jars, they are more in the early part of the game).
[Jar of Magadora / "Orange jar"] - Dana can shoot a super fireball after having picked up the orange jar. The super fireball destroys all enemies in its way and only disappears when it's exhausted. A super fireball appears as a big flame on the inventory scroll. Be aware that you can't rearrange the fireballs on the scroll. You need to shoot in the order they were picked up. There are less orange jars in the game than blue ones (but like the blue jars, they are more in the early part of the game).
![]()
![]() [Blue/Orange diamond] - By using block magic on diamonds, they will transform into other items. Blue diamonds transform into normal fireballs and orange ones into super fireballs (other items are possible by using the block magic more times, but fireballs are the ones that are relevant for a speedrun).
[Blue/Orange diamond] - By using block magic on diamonds, they will transform into other items. Blue diamonds transform into normal fireballs and orange ones into super fireballs (other items are possible by using the block magic more times, but fireballs are the ones that are relevant for a speedrun).
![]() ["Upgrade" jar] (no official name) - Transforms the next fireball in the inventory scroll to a super fireball (if the leftmost is already a super fireball, it will upgrade the next one etc). These upgrade jars can only be earned by destroying certain enemy types (~10% chance of a drop from the right enemies). Wizards (guys in hats in for example room 17), goblins (room 1) and saramandors (see description below) are the enemies that can drop upgrade jars. Under certain circumstances, it's possible to manipulate/increase the odds of getting certain drops. This is described in more detail in the route for the best ending.
["Upgrade" jar] (no official name) - Transforms the next fireball in the inventory scroll to a super fireball (if the leftmost is already a super fireball, it will upgrade the next one etc). These upgrade jars can only be earned by destroying certain enemy types (~10% chance of a drop from the right enemies). Wizards (guys in hats in for example room 17), goblins (room 1) and saramandors (see description below) are the enemies that can drop upgrade jars. Under certain circumstances, it's possible to manipulate/increase the odds of getting certain drops. This is described in more detail in the route for the best ending.
![]()
![]() [Crystal of rad, blue and orange] - The blue crystal extends the range of fireballs (both normal and super) by half a block. The orange crystal (can only be found by destroying certain enemy types with a fireball) extends the range of fireballs (both normal and super) by two blocks. This effect has to be taken into account in a run of the pal-version, but is of practically no importance in ntsc (you will need some extra fireball range, but there are so many crystals that are collected along the way anyways that no special consideration has to be taken). It should be mentioned that this effect is reset to default when you lose a life, which could have an impact in a more casual run (or possibly in a death abuse run).
[Crystal of rad, blue and orange] - The blue crystal extends the range of fireballs (both normal and super) by half a block. The orange crystal (can only be found by destroying certain enemy types with a fireball) extends the range of fireballs (both normal and super) by two blocks. This effect has to be taken into account in a run of the pal-version, but is of practically no importance in ntsc (you will need some extra fireball range, but there are so many crystals that are collected along the way anyways that no special consideration has to be taken). It should be mentioned that this effect is reset to default when you lose a life, which could have an impact in a more casual run (or possibly in a death abuse run).
![]() [Golden wing] - Finishing a room after collecting a golden wing will allow Dana to skip the next five rooms. There are golden wings in rooms 7, 15, 23, 31 and 39. Note that some of the rooms skipped by the golden wings contain items that are required for the best ending.
[Golden wing] - Finishing a room after collecting a golden wing will allow Dana to skip the next five rooms. There are golden wings in rooms 7, 15, 23, 31 and 39. Note that some of the rooms skipped by the golden wings contain items that are required for the best ending.
![]()
![]() [Medecine of Edlem] - The full grey jar resets the timer to 50000 and speeds up the countdown speed by 5. The half-full jar resets the timer to 25000 and speeds up the countdown by 2.5.
[Medecine of Edlem] - The full grey jar resets the timer to 50000 and speeds up the countdown speed by 5. The half-full jar resets the timer to 25000 and speeds up the countdown by 2.5.
![]() [Hourglass of Norm] - Resets the timer to 5000, but has no effect on the countdown speed. There is a blue variation as well that resets the timer to 10000.
[Hourglass of Norm] - Resets the timer to 5000, but has no effect on the countdown speed. There is a blue variation as well that resets the timer to 10000.
![]() [Medecine of Meltona] - Saramandors and demon heads on the screen are destroyed (but will soon start to spawn again).
[Medecine of Meltona] - Saramandors and demon heads on the screen are destroyed (but will soon start to spawn again).
![]() [Solomon's seal] - Hidden in rooms 9, 13, 17, 19, 21, 29, 46 and 47. They have no effect individually, but are required to open up the possibilities for obtaining the best ending.
[Solomon's seal] - Hidden in rooms 9, 13, 17, 19, 21, 29, 46 and 47. They have no effect individually, but are required to open up the possibilities for obtaining the best ending.
![]() [Constellation sign] - The 48 rooms in the game are divided into the 12 constellations (4 rooms in each). The last room in each constellation contains a constellation sign. Picking up the constellation sign and exiting the room will normally send Dana to a bonus room.
[Constellation sign] - The 48 rooms in the game are divided into the 12 constellations (4 rooms in each). The last room in each constellation contains a constellation sign. Picking up the constellation sign and exiting the room will normally send Dana to a bonus room.
![]() [Page of time] - If the first four Solomon's seals have been collected, finishing room 20 after having picked up the constellation sign will send Dana to a hidden room containing the page of time (instead of being sent to the normal bonus room). The page of time has been torn out of Solomon's key and must be collected to get the best ending.
[Page of time] - If the first four Solomon's seals have been collected, finishing room 20 after having picked up the constellation sign will send Dana to a hidden room containing the page of time (instead of being sent to the normal bonus room). The page of time has been torn out of Solomon's key and must be collected to get the best ending.
![]() [Page of space] - If the first six Solomon's seals have been collected, finishing room 44 after having picked up the constellation sign will send Dana to a hidden room containing the page of space (instead of being sent to the normal bonus room). The page of space has been torn out of Solomon's key and must be collected to get the best ending.
[Page of space] - If the first six Solomon's seals have been collected, finishing room 44 after having picked up the constellation sign will send Dana to a hidden room containing the page of space (instead of being sent to the normal bonus room). The page of space has been torn out of Solomon's key and must be collected to get the best ending.
![]() [Prinsess] - If all eight Solomon's seals have been collected, Dana is sent to the Prinsess' (spelling from the game) room after room 48.
[Prinsess] - If all eight Solomon's seals have been collected, Dana is sent to the Prinsess' (spelling from the game) room after room 48.
Timer
Normally, the timer ticks down by 10 alternating between 7 and 8 frames. However, the timer isn't consistent and sometimes it ticks down by 20 and sometimes it ticks down after 9 frames.
Countdown after each room is done by counting down 80 every frame.
It might look like every room starts with the timer at 10000. However, when the room starts, it immediately jumps down a couple of hundred. For a specific room, it seems to be fairly consistent what the timer starts at (this has not been researched in detail, but at least it always starts out close to the "common" starting value for that room). This is true with one exception. Room 1 has quite some variability with the starting value. This can result in a difference of 300-400 between the maximum and the minimum possible value of the timer at the end of the room. This corresponds to 0.1 seconds of countdown, so it remains minor.
Information about basic movements
Landing/take-off animations - The take-off animation costs 6 and the landing one 9 frames. Since jumping costs time, it must obviously be minimized. Landing animations can be cancelled by either using magic right before landing or by holding left or right on the D-pad.
Block magic - The animation takes 17-18 frames.
Fireball magic - Same as block magic.
Ducking - With frame perfect control, the ducking animation actually doesn't cost any time. However, in practice it's more likely to cost 10-15 frames, depending on the player.
Climbing - There are three ways to climb. The optimal one is a one-frame trick and is described below (corner landing). The other two are:
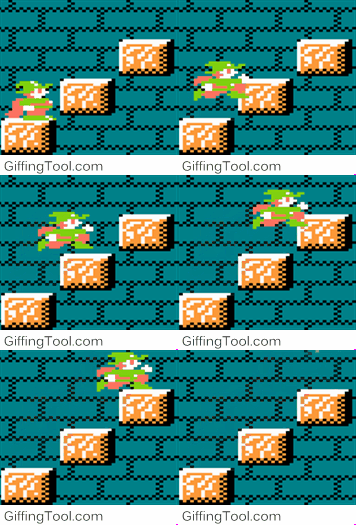
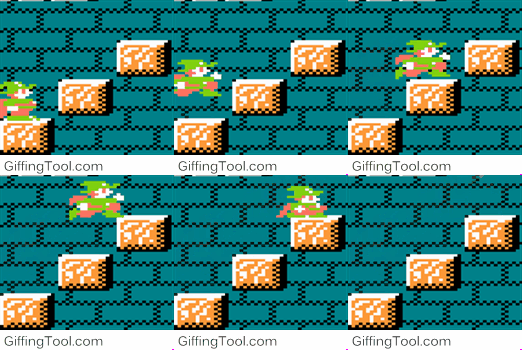
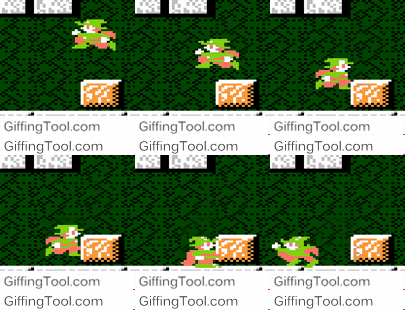
On the left, Dana bumps into the blocks at every jump (well, because of the horizontal position, every third jump during a climb will not bump into the block). Because of forced horizontal immobility frames from bumping into the block, Dana will in reality not move as soon as the block is cleared vertically. The right shows how Dana starts out by jumping vertically and then moves horizontally so not to bump into the block. If done correctly, this can save up to four horizontal movement frames per jump (five with corner landing). In average, something like two horizontal frames saved is more realistic, but it's still clearly slightly faster than by bumping into the block. If the climbing is just for the purpose of vertical movement, the two methods are identical (corner landing is 16 frames faster - one of the main reasons for a tas gaining time pretty much everywhere compared to a real-time speedrun).
Speedrun techniques
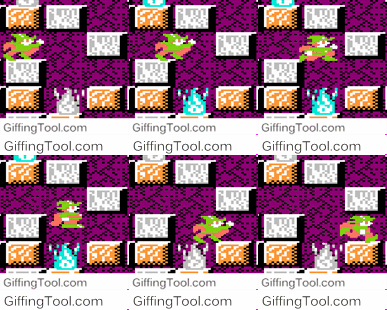
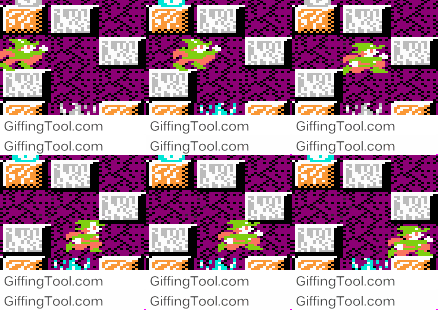
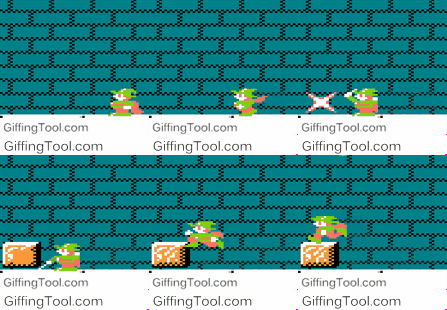
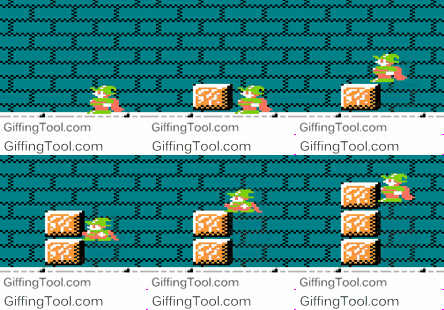
(1-space drop) - This type of drop can be made by releasing the directional pad for 2, 3 or 4 frames (ntsc, it's 3, 4 or 5 frames on pal). If it's 2 frames, Dana will bump his head as shown in the second gif (wasting 9 frames from immobilization). Hugging the opposite wall will invariably mean not entering the space. This might seem like a tight trick to perform, but it happens to correspond pretty well with "quickly releasing and re-pressing the D-pad". Drops from higher distances are tougher to execute because you need to press the D-pad within a specific 2 or 3 frame window (depending on the drop). This type of drop can be used in several rooms to save time (9, 31, 38, 47, 48 and possible other rooms as well depending on the solution).
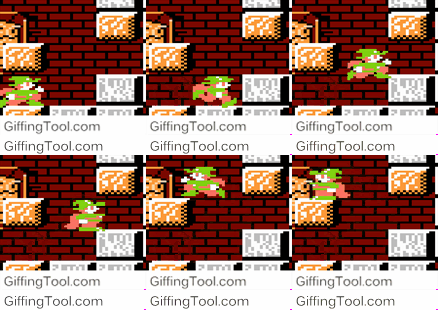
(corner landing) - If a corner of Dana's hitbox touches the corner of a block when jumping up, Dana will immediately land (without landing animation) instead of slightly overshooting the block and then falling down onto it. Since overshooting during a jump is basically a waste of time, the corner landing effect is technically a time-saving strat. In practice however, it's a 1-pixel/frame trick and therefore not really possible to perform consistently. This trick is one of the main reasons for the tas being considerably faster than a real-time speedrun will ever be. With corner landings, precious frames can be saved on the majority of jumps in the game. It also allows for room solutions that wouldn't have been possible otherwise.
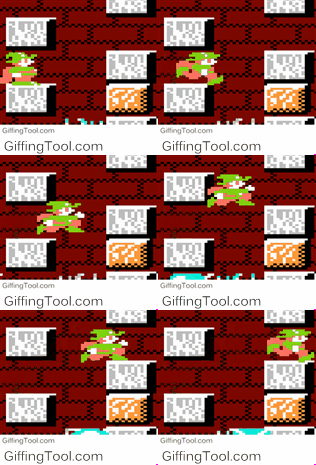
(edge jump) - By standing on the edge of a block, you can make a jump while having a block just above without bumping the head into it. The advantage is to not having to create an additional block to stand on. There are three or so valid pixels that allow you to make this jump. The timing is slightly different depending on if one uses the left or the right edge (it's maybe more accurate to say that the block hitboxes are not entirely symmetrical with respect to the center of the block). These are not so hard to do, since (with practice) it's possible to position Dana in such a way that a quick "tap" on the d-pad corresponds to the horizontal movement necessary for landing on the edge. Common trick that can be used in several rooms to save time.
(running edge jump) - Similar to above, but harder. Can be used in many places to save time.
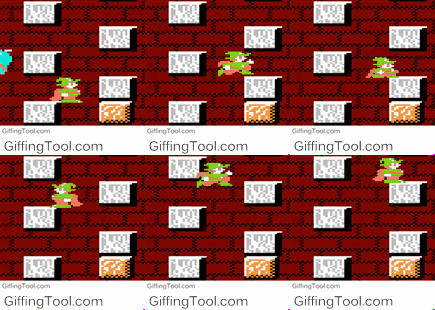
(zigzag climbing) - Just a chain of edge jumps. Risky since falling down will be a huge time loss. Rooms 31 and 35 are examples of places where time can be saved with this technique.
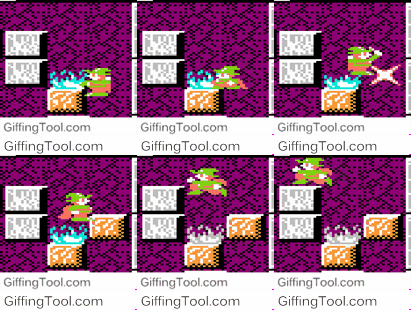
(column building) - If creating a block while standing on the edge (same tolerance as for the edge jumps), you can create a block on the same space you stand, which also means pushing you out of the same space. However, before being pushed out, you can jump. This can be used to ascend areas when diagonal block creation is not possible. It's technically possible to create a column from the bottom to the top of a room. However, for that to save time over diagonal climbing, it pretty much needs to be combined with corner landings. This is doable, but pretty advanced stuff. 2-block columns can save time in several rooms (23, 47 (best ending), ...). Larger columns could shave off time in for example room 5 and 37 (very difficult though).
(corner attraction) - If a corner of Dana's hitbox touches the corner of a block, Dana will either be turned right for a 8-9 frames and losing the horizontal momentum (if facing left) or just losing the horizontal momentum for 8-9 frames (if facing right). This is entirely a time waster... It's a one-frame/pixel trick, but still happens almost every time somewhere during a playthrough. In some rooms it can have more serious consequences than just the lost frames. For example, using the block magic while under the influence of this effect can mean creating the block to the right instead of left.
(fire block building) - Very advanced technique. The initial positioning has to be on one of two pixels. Mid-jump (two valid frames), you have to switch from left to right (or vice versa) within two frames and then create the block on the following frame. This chain of precise inputs makes the trick incredibly difficult and especially pressing in the opposite direction within two frames seems unlikely with a controller (possible on keyboard though). This technique could save time in for example rooms 21 and 48.

(buffer jump) - If up on the D-pad (=the jump action) is released during a jump or a drop and then re-pressed, Dana will buffer a jump after a landing animation of only 5 frames instead of the usual 9. A very important side effect is that this also works between rooms, meaning that one can start a room with a jump. This can be used in for example rooms 11 and 42 to save a considerable amount of time.
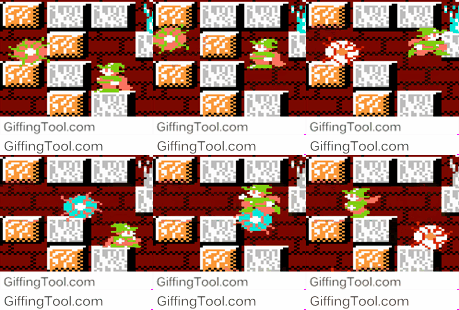
(horizontal alignment) - Because of hitboxes not exactly corresponding with the graphical sprites, it's possible to jump past enemies in spaces that are one block wide. The first jump here aligns Dana to the right side of the block. The enemy will drop down on the left, allowing Dana to jump past. Very easy to do.
[Sprite saturation]
There is a limit to the number of sprites the game wants to cope with at the same time. Getting close to the limit will slow down enemies and Dana (enemies will slow down more) and there might occur flickering effects on the screen (bad - the game will eat inputs). Enemies, items, Dana and fireballs count as sprites. So launching a fireball might slow down the game slightly, but the speed will pick up if it collides with an enemy and Dana picks up the drop. Shooting the ghost in room 13 is an example of where this pays off for a time saved of around one second.
There are also other ways to exploit the sprite limit. One method is to collect the key just before an enemy is scheduled to spawn. This will postpone the spawn until the next scheduled spawn. The exact underlying reason hasn't been investigated, but there are several valid frames (10 or so) to perform this cancellation. This can be used to save time in rooms 25 and 32.
Another method to take advantage of the sprite limit is to collect a medecine of meltona (see above in the item section). Since items dropped from enemies stay on screen longer than the spawned enemies would have, the items effectively prevent the game from spawning more enemies. Used for example in room 13 in the best ending route.
Enemies
There are several enemy types in the game. They are mostly predictable from a quick glance and will not be described below. Most enemies move in very determined patterns. However, the game does have some randomness to it. It's mostly relevant for tasing, but can also have an effect on real-time speedruns when the solutions become very tight and enemy positions have to be accurate.
![]() - Saramandors spawn in some rooms from "devil's mirrors" (look like black tiles). They walk in a straight line and stop to breath fire when close enough to Dana. When dropping down, the direction they're heading next depends on where Dana is (left if Dana is to the left and right if Dana is to the right). This obviously means that it's possible to manipulate them. Their fire-breath hitbox is disjoint from their own hitbox, meaning that it's possible to safely stay between a Saramandor and its fire-breath. This detail is very important to remember when speedrunning. The same goes for "pink dragons" that also have fire breath similar to the Saramandors.
- Saramandors spawn in some rooms from "devil's mirrors" (look like black tiles). They walk in a straight line and stop to breath fire when close enough to Dana. When dropping down, the direction they're heading next depends on where Dana is (left if Dana is to the left and right if Dana is to the right). This obviously means that it's possible to manipulate them. Their fire-breath hitbox is disjoint from their own hitbox, meaning that it's possible to safely stay between a Saramandor and its fire-breath. This detail is very important to remember when speedrunning. The same goes for "pink dragons" that also have fire breath similar to the Saramandors.
![]() - Gargoyles are interesting because they bring some randomness to the game. Sometimes they start a room walking to the right and the next playthrough (or after a death), the same gargoyle starts walking to the left. This has an impact on some of the room solutions.
- Gargoyles are interesting because they bring some randomness to the game. Sometimes they start a room walking to the right and the next playthrough (or after a death), the same gargoyle starts walking to the left. This has an impact on some of the room solutions.