Dragon's Lair (NES)/Game Mechanics(ntscu)
From SDA Knowledge Base
Contents
Items
- D - daggers, deal 1 HP of damage, 3 can be on screen at the same time
- A - Axes, deal 2 HP of damage, 2 can be on screen at the same time
- F - Fireballs, deal 3 HP of damage, 1 can be on screen at the same time
- E - restore 16 energy
- C - restore candle
- G - Add one gold to the inventory
- L - Extra life
- P - Points
Hidden item locations
The list below comes from searching with save states, but hasn't been verified by address watching, so it's possible that there are still hidden items to be found.
Level 1 (in order of appearance)
A - right before the first two gateways
P - right after the first two gateways
F - after the third prisoner
D - right before the first "bat hole"
A - right before the second set of gateways
F - after the last prisoner
Level 2 (in order of appearance)
C - in the opening in the roof between the first two moving blocks
P - two blocks to the right of the hidden C
P - after the first set of two moving blocks
A - before the first pit
L - after Singe's Dragon's Breath
Level 3 (in order of appearance)
P - under the second arc from the start
A - under the third arc from the start
G - before jumping on the ledge of the first pendulum
E - after the first set of two pendulums
L - after the axes
F - before the second ghost
E - right before the 2nd G
E - right before the 3rd G
P - before the visible daggers
A - over the first floor support after the visible daggers
E - after the hidden axes
P - under the second arc after the big skull guarding a big pit
P - under the same archway as the above P
Level 4 (in order of appearance)
There doesn't appear to be any hidden items in this level.
Movement and animations
This section looks at the cost of performing various actions. If nothing else is stated, it's compared to walking in a straight line.
- First shot - 35 frames
- Subsequent shot(s) - 20 frames (/per shot in the same "burst")
- Small jump - 30 frames
- Big jump - 35 frames
- Small vertical jump - 95 frames
- Big vertical jump - 120 frames
- Dropping down "1 height" - 35 frames (meaning that it's 5 frames faster to jump off ledges than drop down from them)
- Duck and rise - 70 frames
- Go straight into ducking position after a jump - saves 15 frames compared to performing jumping and ducking separately
- End-of-level gold countdown screen (1 gold) - 157 frames
- Countdown for each additional gold - 24 frames
- Chaining jumps together, chaining ducking and rising, "corner landing" all have no additional impact on the animation times
Dragon's Breath
The jump movements in this game don't rely on speed calculations, but instead follow pre-programmed movements and animations stored in look-up tables. In contrast to this, the section with the "Dragon's Breath" (DB) in the middle of the second level introduces different mechanics and complexity. It's not particularly intuitive from just playing the game and has therefore been analyzed in a bit more detail.
Once Dirk is above the pit with the DB, the jump mechanics will stop applying. So instead of checking in the "jump look-up table", the game will calculate the new y-position depending on the DB strength and how well Dirk floats in the upwind. With reference to RAM-addresses, the new y-position is calculated according to the following formula:
$392 = $392 + $574 + $576 + $579
- $392 - y-position (from top of the screen to bottom)
- $574 - Strength of DB (0xFC - 0), lifting Dirk up
- $576 - Downward pull (or speed component) that is countered by Dirk "flapping his arms and legs" (description from the manual) by mashing 'B'. Can either have a value of 2 (fast flapping), 3 (poor flapping) or 4 (no flapping).
- $579 - Similar to $576. An incorrect, but conceptually acceptable (?), description could be to say that this works as a kind of sub-speed component to $576.
As can be seen from the formula above, the DB strength works as the upward component, while $576 and $579 pull Dirk down towards the pit. The next sections will describe these in more detail.
Dragon's Breath (DB) strength
When the DB pit comes on screen, $572 starts to count up every 5 frames. When it resets after reaching 60/0x3C, the upwind starts and the timer in $572 is reset. In this phase, 1 is subtracted from $574 for a new value of 0xFF. $574 is the strength of the DB. When the timer resets after 10/0xA, 1 is again subtracted from $574 (new value 0xFE). This repeats until $574 contains a value of 0xFC and the DB is at its strongest. It keeps this value until the timer passes 40/0x28, at which point it reverses back to phase 0, one step at a time, and the cycle begins over again.
Dirk's flapping mechanics
While the DB pushes Dirk upwards, it's not enough to balance the downward/gravity pull unless Dirk also flaps his arms and legs. Dirk's flapping status is tracked in $57F, which is used in the calculation of $576 and $579. The lower the value of $57F, the better Dirk flaps. When 'B' is pressed, the value is reduced by one and the timer in $57E is reset. Without further action, 1 will be added to $57F when the timer resets after reaching 0x10. This continues until the max value of $57F (fluctuating between 0x10 and 0x11) is reached or if 'B' is pressed again.
It's in theory possible to mash (up to 30fps) $57F down to the ideal value of 0. However, there is an additional mechanic making this difficult to do in practice. The value of $57F will only decrease if its value is bigger than the timer in $57E, else pressing B will increase $57F by one. So the lower the value of $57F, the faster the mashing is required to maintain (or increase) the flapping.
Before talking about how $57F is linked to $576 and $579, it's worth mentioning that if 'B' is held down, $57F will stay unchanged. So a short burst of rapid mashing (can even be done during the jump from the platform to the DB!) and then holding down 'B' will produce the same result as a continuous mashing.
Dirk's flapping (= the value of $57F) will update $575 and $576. The latter providing a direct downward pull, counteracting the effect of the DB's upwind. The former will add its value to $579. Whenever $579 loops, a downward pull of one will be added to the calculation. Hence the similarity with a sub-speed component to the downward pull. The code section that translates the "flapping" into a "floating property" will not be further described here, but is fairly straight-forward and the interested reader is referred to instruction $C690 and onwards in the ROM.
Conclusion observations
- The Dragon's Breath goes through 8 phases. Phase 0 is no upwind. Phases 1-3 build up the strength of the upwind step-wise. In phase 4, the DB strength is at its max. Phases 5-7 are the reverse of 1-3.
- The faster Dirk flaps (pressing 'B'), the better he will float in the upwind. This is only about button mashing (up to 30fps). There is no pattern or rhythm that provides a better result. Remember to start mashing during the jump from the platform to the DB!
- Holding down 'B' locks Dirk's flapping pace. So a short mashing burst, followed by holding down 'B' will give the same result as continous mashing.
- The DB is only strong enough for Dirk to rise in phases 3-5. At best 2 pixels/movement frame (mf) in phase 4 and 1 pixel/mf in phases 3 and 5. In phase 1 (and 7), the DB is not strong enough to support Dirk. Even with perfect mashing, he will (at best) float down at a rate of 1 pixel/mf. In phase 2 (and 6), perfect mashing will only be able to keep Dirk level, but will in real-time result in slowly descending. The best strategy is therefore to wait a bit for the strength to build up before jumping into the upwind as jumping too early will only result in a longer climb afterwards, which overall will be a time loss.
Energy
The player energy is tracked in memory addresses 332 (big energy, BE) and 6A5 (small energy, SE). When the small energy loops, the big energy is reduced by 1. A life is lost when the big energy hits 0. Below are some observations about the energy.
- E block - +16 BE
- Getting hit by a bat, skull, the Lizard King or a bubble - -4 BE
- Shoot - -16 SE
- Start energy - 39 BE
- If the player's BE is 2, 3 or 4, getting hit by an enemy brings you down to 1 BE and whatever you had left of small energy, instead of killing you if it had inflicted the normal 4 damage.
- If an E is collected when player energy > 23, you'll end up with 39 BE and whatever you had left of small energy.
Note: There is a bug that can occur with the Lizard King. If you bump into him in the vicinity of where the first serpent was supposed to appear, you'll take damage continuously. In a speedrun setting (so walking to the right without stopping), that means a damage of 12 BE. If you stop moving while taking damage, even more energy will be lost.
RNG
This game has two RNG-addresses, $6A1 and $6A2. The calculation to update these addresses starts at instruction $C000. Input to the calculation is the previous set of RNG-addresses and if the carry is set or not. Every frame (and not just every game frame!), including screen transitions and when loading bosses, the RNG sub-routine is called. The carry is set if R is pressed (or held down). Pressing R enters the calculation through setting the carry flag. The reason for R being special is because it's read as the last input from $4016 (the address sending the controller inputs). The other buttons do set the carry in the same way, but it's then cleared and only when the carry is set by R will it impact the RNG-calculation.
The following is a list of events that are controlled by the game's RNG and trigger additional call(s) to the RNG sub-routine (note that the carry always seems to be set when making these calls):
- Checking for the Lizard King (every game frame, for the sections that the LK can appear in)
- Whether a bat is red or gray in level 2
- Calculate a new direction for the Grim Reaper to point its finger in
- Singe's smoke puffs (high or low)
The RNG-function is far from perfect and worth taking a closer look at:
C000 LDA $06A2

C003 ADC #$52

C005 ADC $06A1

C008 STA $06A2

C00B ROR $06A1

C00E ADC $06A1

C011 ADC #$B3

C013 STA $06A1

C016 RTS
Simulations for this sub-routine have been done with the following Python script as basis: File:DL RNG simulation Python.zip
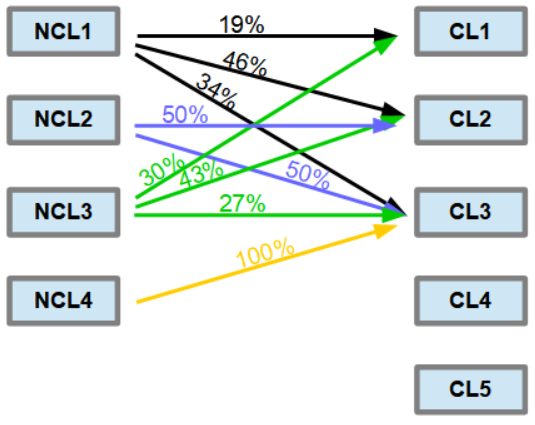
When running simulations of the RNG-calculation, the RNG-addresses quickly get stuck in a loop. This is true for all 65536 (256^2) pairs of possible start values. When the RNG-calculation runs without a carry at the start (so R not being pressed and no events triggering additional RNG-calls), there are 4 possible RNG-loops. They will be referred to as NCL1-NCL4 (No-Carry Loop):
- NCL1 - 160 pairs in total, one element being $6A1 = 0x13, $6A2 = 0x6D
- NCL2 - 4 pairs in total, one element being $6A1 = 0x27, $6A2 = 0x89
- NCL3 - 37 pairs in total, one element being $6A1 = 0x28, $6A2 = 0xA0
- NCL4 - 1 pair in total ($6A1 = 0xAE, $6A2 = 0x24)
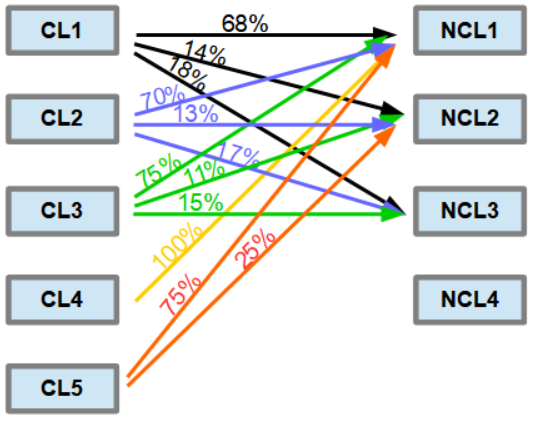
When the RNG-calculation runs with the carry set at the start (so R being held down), there are 5 possible RNG-loops. These will be referred to as CL1-CL5 (Carry Loop):
- CL1 - 95 pairs in total, one element being $6A1 = 0x00, $6A2 = 0xE4
- CL2 - 150 pairs in total, one element being $6A1 = 0x00, $6A2 = 0x4E
- CL3 - 55 pairs in total, one element being $6A1 = 0x13, $6A2 = 0x6D
- CL4 - 1 pair in total ($6A1 = 0xAD, $6A2 = 0x23)
- CL5 - 4 pairs in total, one element being $6A1 = 0x26, $6A2 = 0x89
When the RNG is in one of the NCL and R is pressed (and held down), the RNG will eventually jump to somewhere in one of the CL loops. The following chart shows the probabilities of jumping from an NCL to a CL:
The corresponding chart when jumping from a CL to an NCL:
An observation at this stage is that only the three first loops in each case are realistically accessible. One can theoretically access the other loops by repeatedly pressing (but not holding) R, which will prevent the RNG from ending up in one of the first three loops. However, this is unlikely to carry any importance when playing in real-time. It's also worth noting that NCL2 is more than 6 times more common "than it should be". With only 4 pairs in NCL2 and 201 in total for NCL1-3, one would have expected roughly 2% ending up in this loop and not the ~13%. This will likely be a cause for skewing the probabilities of RNG-dependent events.
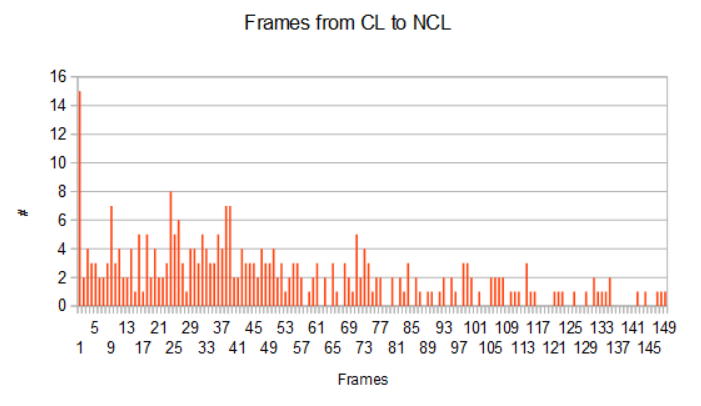
How long does it take to jump between loops? The following graphs show how many frames it takes to jump from an NCL to a CL (and vice versa). Note that only loops 1-3 were used in this simulation (and have been aggregated), since the other loops are in practice inaccessible.
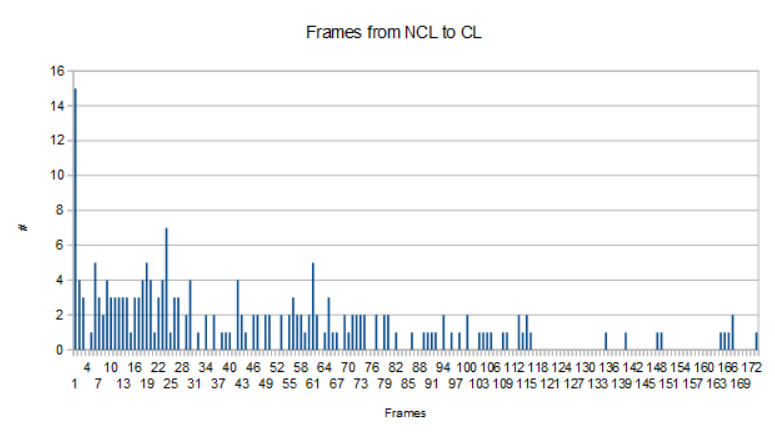
As can be seen above, it always takes less than 3s to jump from one loop to another. In the vast majority of cases, it's going to be much less.
Enemies
- Serpent - 3 HP
- Red bat - 3 HP
- Baby dragon - 4 HP
- All other regular enemies have 1 HP
- Dragon under the drawbridge - 10 HP
- Mine cart troll - 10 HP (each)
- Grim Reaper - 16 HP
- Singe - 40 HP
The Lizard King
The Lizard King guards the gold of the castle. As soon as you have collected/stole some of its gold, a random check will occur every movement frame (=5 actual frames). An outline of the RNG check that is performed to determine if the Lizard King appears or not is as follows:
- Call the RNG-function starting at $C000 (event call, so the carry will always be set)
- If the accumulator is >= #$FB, then branch (instruction $DAB1), else abort
- Call the RNG-function starting at $C000 (event call, so the carry will always be set)
- If the accumulator is <= #$20, then branch (instruction $DAB9), else abort
- $718 is loaded and will start to count down for the Lizard King to appear
If the RNG had been ideal in this game (perfect distribution between all 65536 possible RNG-pairs), each check would have a chance 1/51 * 1/16 = 1/816 ~ 0.12% to spawn the Lizard King. However, as described in the RNG section, this is far from the case. Below are some observations based on both RNG-simulations and real-time speedrun attempts:
- None of the RNG-pairs in any of the CLs (see the RNG section) will result in passing both LK checks. This means that as long as right is held long enough to enter a CL, the LK will never appear!
- Based on the observation above, one should release right whenever possible in level 1 and end of level 2 to increase the chances of the LK appearing. If done during a jump or while attacking, it can be done without time loss. One could also consider quick releases of the d-pad when walking, but then risking to stop the movement and time losses. Even releasing the d-pad for a single frame will throw the RNG out of the current loop. It should therefore not matter too much how long to release R. However, generally speaking, the longer time outside CLs, the better the chances. So e.g. releasing R at the start of a jump and re-press near landing, should be slightly better than a quick release mid-jump. This has however not been simulated, since the number of variables increases, making simulations complex.
- The RNG check that triggers the Lizard King is only done in certain areas of the game. The check isn't done in the middle section of stage 2 (before and after the dragon's breath pit) and the whole stage 3. Also, the checks aren't started at the very beginning of each stage and they are stopped a little before and under the boss fights.
- If you have no gold, no check is done and the Lizard King won't appear. In a casual playthrough, where one might be tempted to kill the Lizard King, it will therefore continuously appear until it has bumped into you and retrieved its gold.
- At the time of writing, there are no known estimates based on real-time speedrun attempts on how often the LK appears in the different sections that take into account the shortcomings of the RNG.
Singe
Singe's puffs are blown every 145 frames, but their height is based on RNG. The branch operator in $A26F determines if the puff will be high or low, based on if the accumulator (which will have the same value as $6A1) is even (low) or uneven (high). Because of the RNG's shortcomings in this game, it's possible to slightly manipulate the puffs. For more detailed comments on what can realistically be controlled in a real-time, see the routing section.
Bubbles
- $6A6/$6A7 - primary/secondary bubble timer
- $4A - reference address for bubble duration
Bubbles spawn according to the timer in $6A6 (and $6A7, which is used when necessary). The timer is local and triggered by Dirk getting close enough (in the x-direction) to its spawn point. The timer is set from a look-up table with three different values that cycle. The game uses the value in $4A as reference address for cycling through the values.
Baby dragons
The baby dragons try to align their y-position with Dirk's. The default y-speed is 3 pixels/(game) frame when moving up (and then 1p/gf if any adjustment down is needed). However, if a baby dragon is allocated to object index #1, it gets a second vertical movement of 3p/gf (or 2p/gf if adjustment down is needed).
Some of the baby dragons can be jumped over, if their y-speed is 3. This can be manipulated by making sure there is already an object occupying index #1 when the baby dragon spawns. In practice, this is by timing the bubble cycles with the spawning of the baby dragon.
Note: The second movement comes from $52/$53 being set to a non-zero value (pointing to object index #1) early in stage 4. However, $52/$53 are reset when losing a life and then instead point to object index #2 if triggered again. The baby dragon will therefore behave differently after a death in stage 4. Intentional or does the code section leading to the second y-movement ($A330) also have a different purpose?
RAM-addresses
- 390/392 - x/y, Dirk
- 386 - Dirk's x-position on screen
- 3A2/3A4 - x/y, object 1
- 3B4/3B6 - x/y, object 2
- 3C6/3C8 - x/y, object 3
- 3D8/3DA - x/y, object 4
- 3EA/3EC - x/y, object 5
- 3FC/3FE - x/y, object 6
- 3B2 - health, object 1
- 3C4 - health, object 2
- 3D6 - health, object 3
- 3E8 - health, object 4
- 3FA - health, object 5
- 40C - health, object 6
