Avs
From SDA Knowledge Base
quick link to old guide
quick link to wiki editing
Snow's new AviSynth guide. Yeah, I hope I actually finish this.
Ideas for layout
- Custom table of contents, not so linear.
- Use PNG! Lossless is cool.
- Color headings.
Ideas for guide
- No more follow-these-steps-blindly instructions this time.
- Include more pictures. Use thumbnails when necessary.
- At the start of each section, show a typical script in progress.
- Include exercises with downloadable packages containing a video and a partial script.
Stuff to do:
The script
- Loading the source files - capture card
- Appending
- Deinterlacing
- Trimming
- Resizing
- Sharpening
- Cropping / Adding borders
- Color / Brightness
- SDA StatID
- QuickTime compatibility
Extras
- Sample scripts
- Script verification
Fixes
- Fixing Constant audio desync
- Fixing Progressive audio desync
Table of contents:
- Introduction
- Setting up your work environment
- Installation
- Walkthrough
- Loading the source files
- Deinterlacing
IMPORTANT NOTE: AviSynth scripting is an advanced topic. All beginners are recommended to use Anri-chan instead.
File extensions
You'll very likely need to rename file extensions but they may be hidden by the operating system.
- open Windows Explorer
- open the Tools menu
- select Folder Options
- select the View tab
- choose to Show hidden files and folders
- uncheck Hide extensions for known file types
- click OK to apply changes.

Association of avs file extension with text editor
Now that you can see file extensions, let's associate the avs file extension with Notepad or other text editor of your choice.
- open Windows Explorer
- open the File menu
- select New
- select Text Document
- rename the new text file to New Text Document.avs. It should show up as an unknown type.
- open the avs file or right-click and select Open With. Windows will ask which program you want to use.
- select Notepad in the list
- place a checkmark in the box that says Always use the selected program to open this kind of file
- click OK

Download and install a stable release version of AviSynth
The picture below identifes a stable release.

Download and install necessary AviSynth plugins
- Go to Start menu
- [All] Programs
- AviSynth
- Plugin Directory. (This is where AviSynth stores its plugins.)
- Copy the files from inside the AviSynth plugins zip file to the Avisynth plugins directory window you just opened.
The plugins directory should look similar to what's shown in the picture. AviSynth will automatically load dll and avsi files.

Special instructions for those working with DVD sources
If you followed the instructions on the DVD page properly you should already have DGMPGDec installed. You need to copy a dll file from this directory to the AviSynth plugins directory in order for AviSynth to be able to load DVD video.
- navigate to the DGMPGDec directory. Should be C:\Program Files\DGMPGDec
- copy DGDecode.dll to the AviSynth plugins directory.
Download and install VirtualDub
This program will be useful for testing your script as you go along.
Verify that everything is installed properly
Download the following package and unzip the contents anywhere you'd like. Run VirtualDub and drag and drop the avs file into the window. You should see a frame that says "So far so good..".
Before starting your own script you should have an idea of how AviSynth operates. The following script is typical for DVD video. AviSynth will execute each line of code sequentially; in this walkthrough you will see what the video looks like after each step.
Ac3Source(MPEG2source("VTS_01_1.d2v", upconv=1),"VTS_01_1 T80 2_0ch 192Kbps DELAY 0ms.ac3")
mvbob()
trim(13801,13900)
Lanczos4Resize(640,480)
A glance at the work folder
As you can see, the VOB has already been processed by DGIndex generating the files:
- VTS_01_1.d2v
- VTS_01_1 T80 2_0ch 192Kbps DELAY 0ms.ac3

Load audio/video
I open my_AviSynth_script.avs in Notepad and add the line below to load the Ac3 audio and MPEG2 video. VirtualDub shows that both have loaded succesfully.
Ac3Source(MPEG2source("VTS_01_1.d2v", upconv=1),"VTS_01_1 T80 2_0ch 192Kbps DELAY 0ms.ac3")

Deinterlace
I've identified that the video is D1 F1 3D (will go into this later) so the appropriate deinterlacing method is mvbob. Notice how the number of frames has doubled from approximately 10000 frames to 20000.
mvbob()

Trimming the fat
I've decided, for the sake of this walkthrough, to keep only 20 frames.
trim(17451,17470)

Resize
My NTSC DVD has a resolution of 720x480. I need to resize to 640x480 resolution so that the aspect ratio is correct and everything doesn't look so wide.
Lanczos4Resize(640,480)

There are more commands you will use in your script, but the above are the essentials.
Let's start with a new AviSynth script. Remember when you created an avs text file back in Setting up your work environment? That's all an AviSynth script really is, a text file with an avs file extension. We'll create the High Quality script first and move on to the other SDA qualities later. Open mygame_HQ.avs in Notepad.
- open Windows Explorer
- open the File menu
- select New
- select Text Document
- rename the new text file to mygame_HQ.avs.
This chapter will diverge into three sections. Depending on how you recorded your video, follow the appropriate link.
- PC game recorded with Fraps / Camtasia / other screen capture software
- Console game recorded with DVD recorder / capture card using DVD settings
- Console game recorded with capture card to AVI file
PC game recorded with Fraps / Camtasia / other screen capture software
Screen capture software typically creates an AVI file containing both video and audio. All we need is the AviSource() command with your AVI file as the argument.
avisource("clip1.avi")
Simple, isn't it? What if you have more than one file and want to append them together, as is usually the case when recording for longer periods of time? Let's bring in the AlignedSplice() command with AviSource as the arguments.
a = avisource("clip1.avi")
b = avisource("clip2.avi")
namedoesntmatter = avisource("clip3.avi")

AlignedSplice(a,b,namedoesntmatter)
An example of three videos that were split by Fraps being joined together in AviSynth.

Console game recorded with DVD recorder / capture card using DVD settings
There are three main types of audio when working from a DVD source: AC3, MPA and sometimes even PCM (wav). When you indexed the VOB files with DGIndex as per the DVD guide it should have created the d2v file and an audio file. Notice how the d2v file is only 19 KB in size since it only contains data about the VOB MPEG2 video stream; you still need that VOB file!
The picture below shows that an AC3 audio file was extracted with an audio desync of 78 milliseconds.

Here are the different ways to load AC3 / MPA / PCM (WAV). The first example would work with the files in the picture above.
AC3 with a -78 ms desync.
Ac3Source(MPEG2source("VTS_01_1.d2v", upconv=1),"VTS_01_1 T80 2_0ch 192Kbps DELAY -78ms.ac3").DelayAudio(-0.078)
MPA with a +46 ms desync.
AudioDub(MPEG2source("VTS_01_1.d2v", upconv=1),MPASource("vob T01 2_0ch 192Kbps DELAY 46ms.mpa")).DelayAudio(0.046)
PCM with no desync.
AudioDub(MPEG2source("VTS_01_1.d2v", upconv=1),WAVSource("vob T01 2_0ch 192Kbps DELAY 0ms.wav"))
DVD MPEG2 in all its interlaced glory...

Console game recorded with capture card to AVI file
Write me!
Outline
- Intro, with image of interlaced / deinterlaced frame.
- What is an interlaced frame?
- Make new image with concept of the ABCD split but say "Field 1", "Field 2", etc.
- Above idea but actual game footage screens (thumbnail link to massive 3600 width pic)
- Go through each method of deinterlacing for all the qualities. Show images!!!
If you recorded a PC game with screen capture software such as Fraps or Camtasia, there is a 99.9% chance that your video does not need to be deinterlaced and you can skip this entire section. For just about everyone else, your video probably needs to be deinterlaced.
The animated picture below shows the difference between interlaced and progressive/deinterlaced.

What is an interlaced frame?
An interlaced frame has two fields. Think of it as a single frame with two smaller frames inside. Those two fields (the smaller frames) represent two different moments in time. Take the picture as an example, with four different fields numbered 1 to 4:

The fields have been separated.

Demonstrating how the top field (fields 1 and 3) is on even numbered lines, while the bottom field (fields 2,4) is on odd numbered lines.

The sequence of frames is now deinterlaced and is progressive.

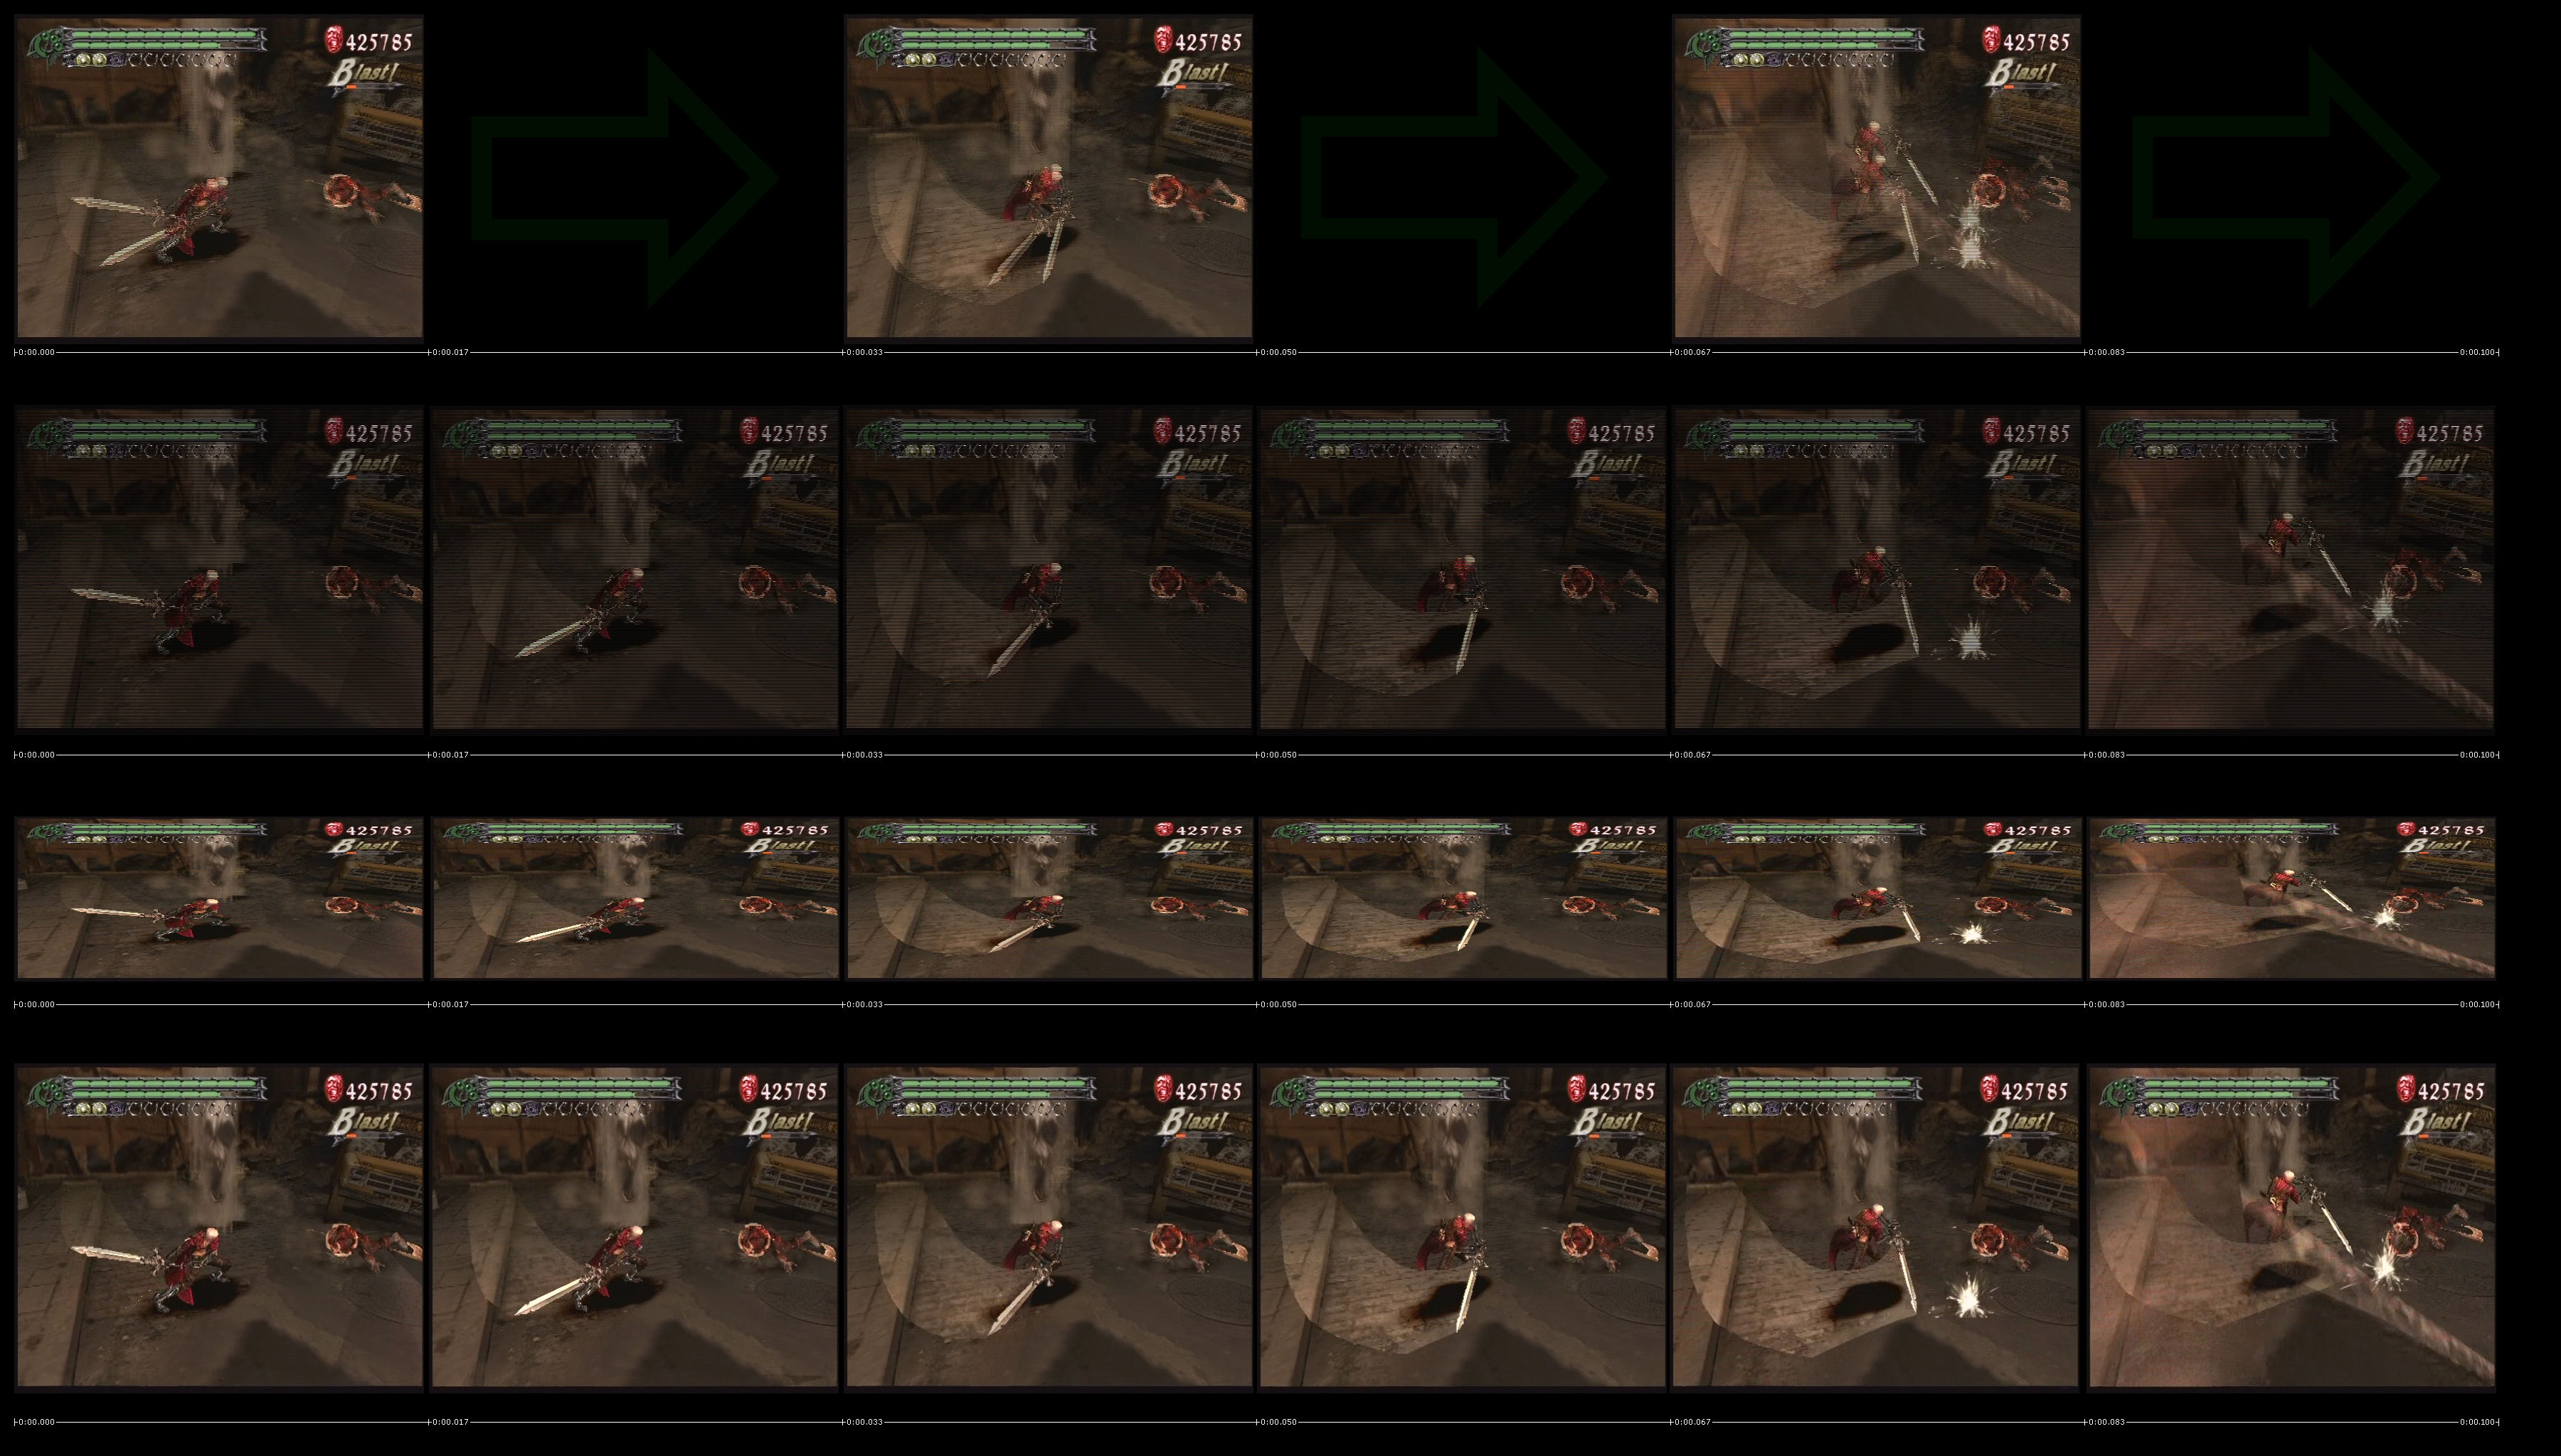
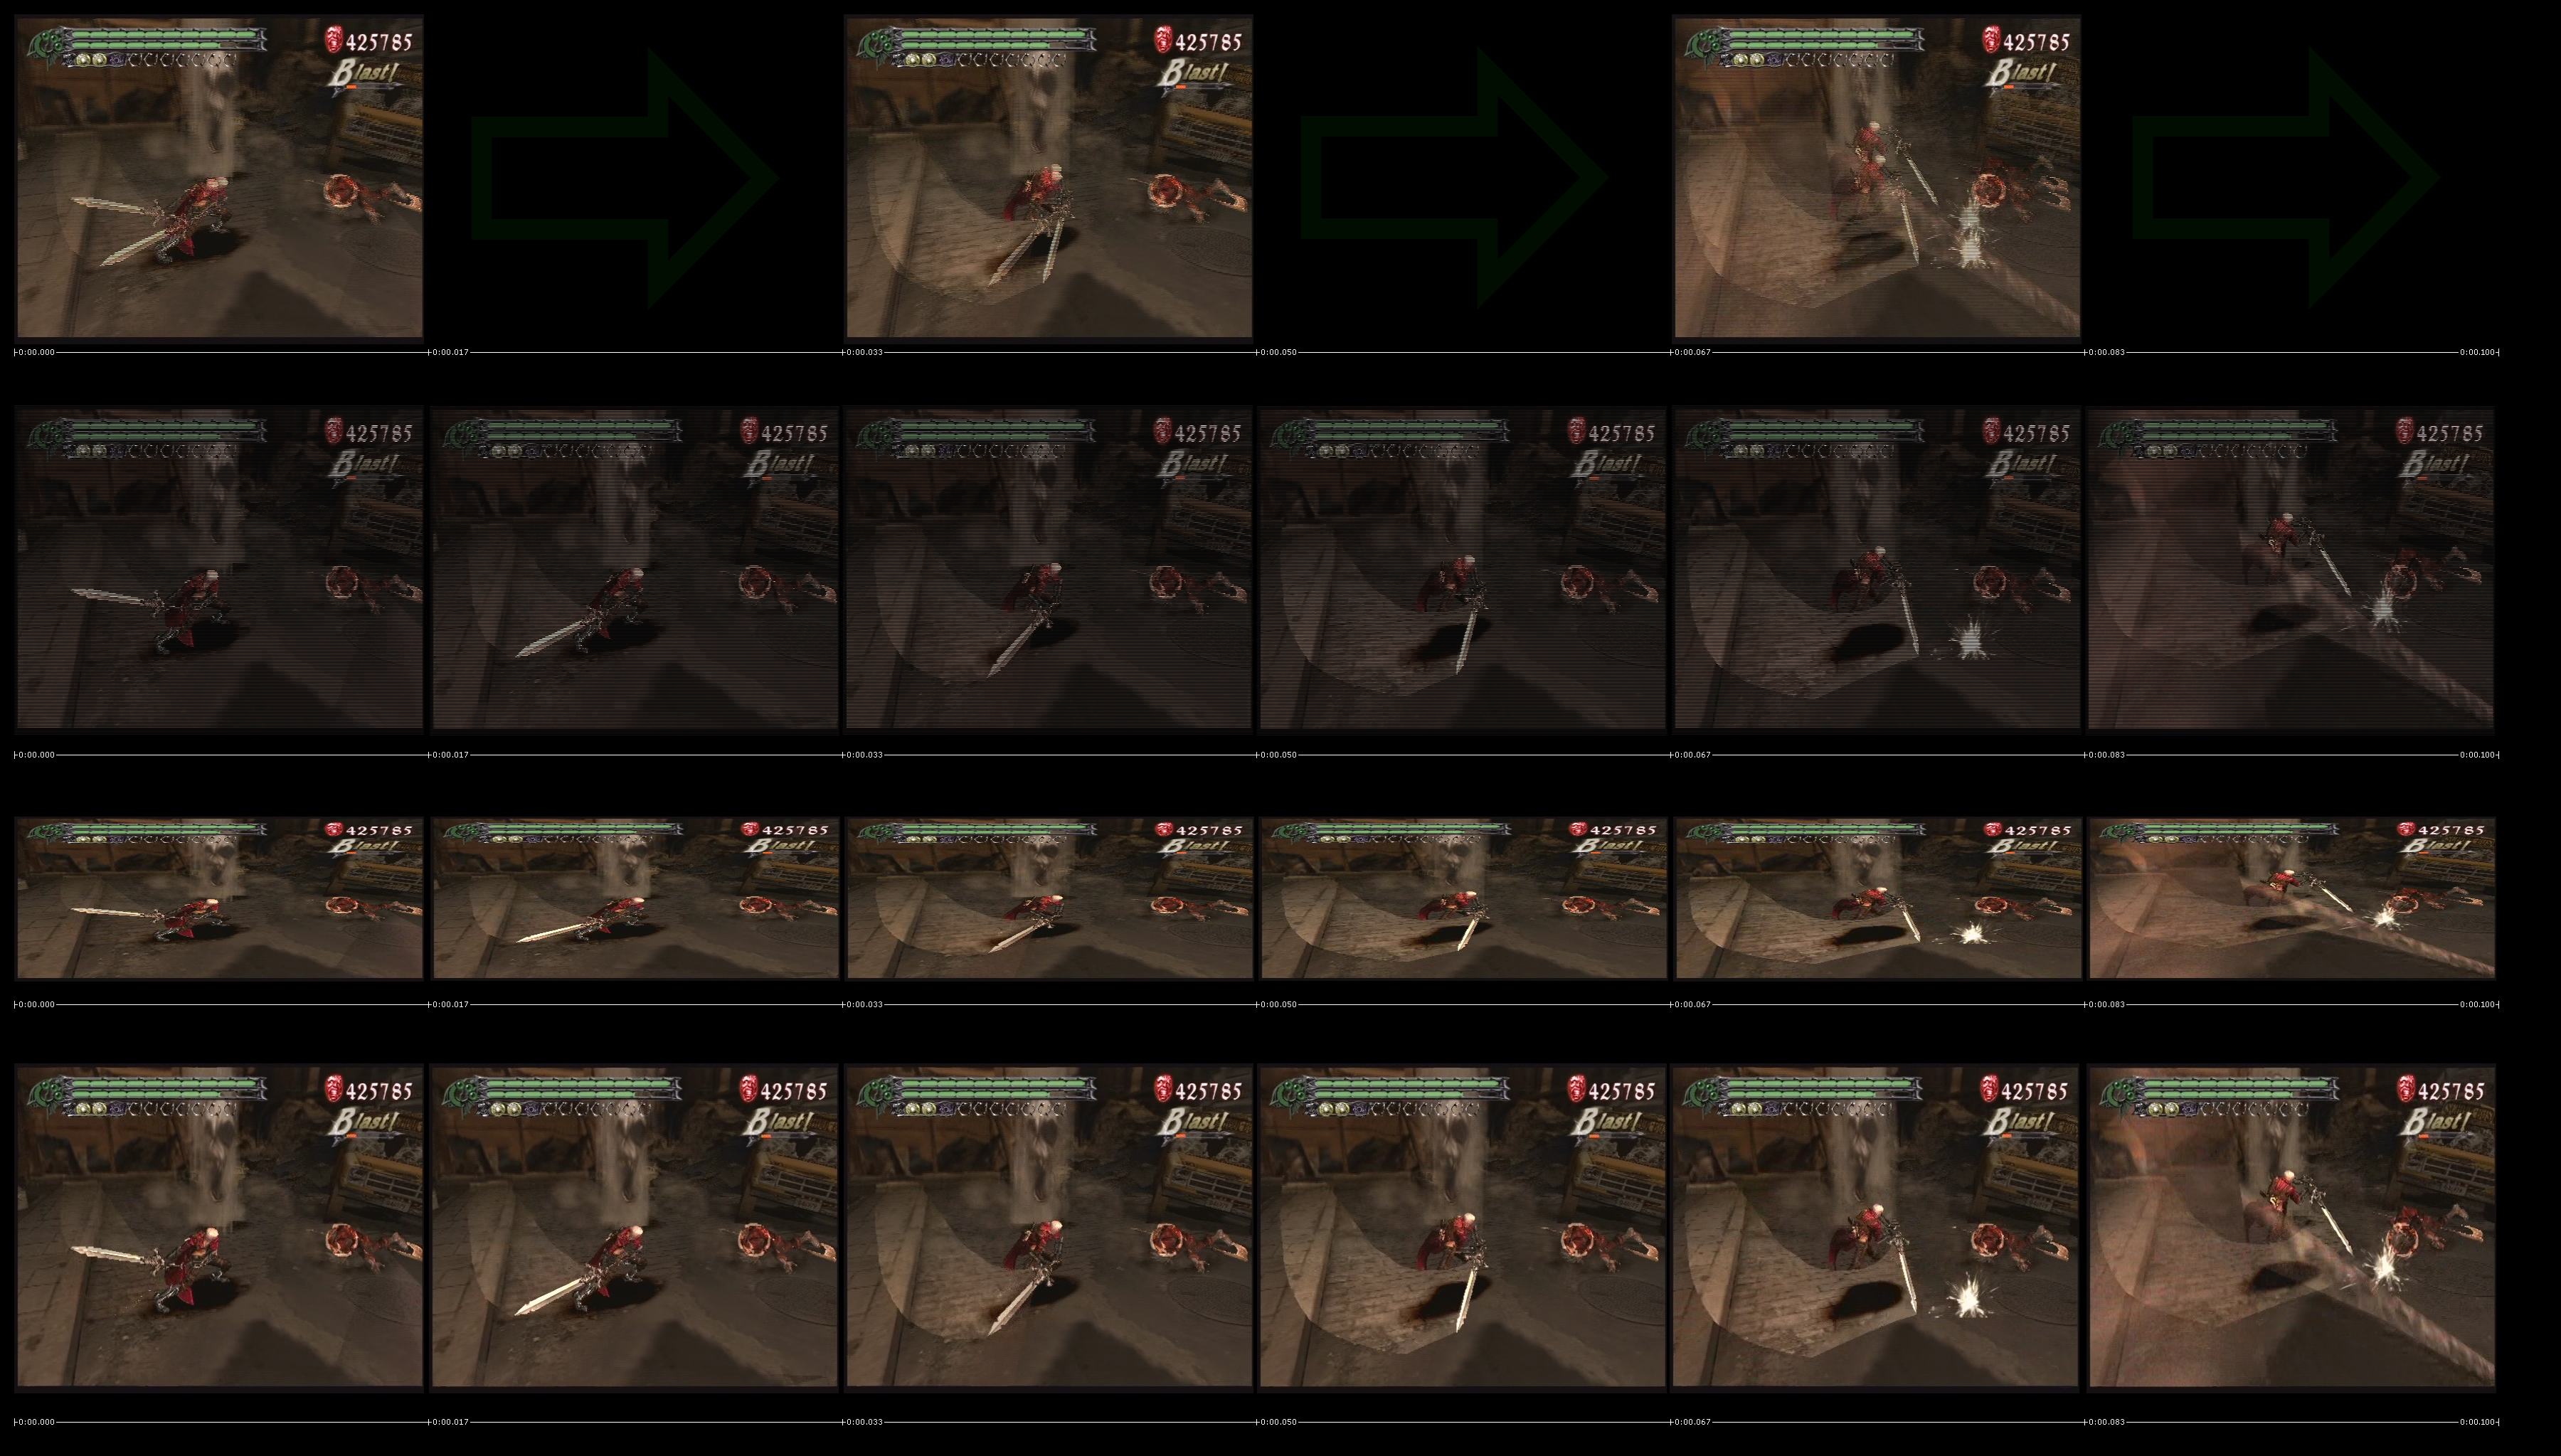
Here is an example from a game.
(a more complete version is available: jpg, 1.18 MB / png, 5.75 MB - 3600×2047)

You'll notice that the height has been cut in half and Dante looks too short (or too wide). Not to worry, we'll be fixing that later on.
Determining the framerate of the game
Right now your AviSynth script is one measly line of code, e.g.:
Ac3Source(MPEG2source("segment1.d2v",upConv=1),"segment1 192Kbps DELAY -48ms.ac3").DelayAudio(-0.048)
I'm going to temporarily add SeparateFields at the end of the script solely for the purpose of determining the framerate of the game. This will do exactly what is shown in the previous section "What is an interlaced frame?".
Ac3Source(MPEG2source("segment1.d2v",upConv=1),"segment1 192Kbps DELAY -48ms.ac3").DelayAudio(-0.048)
SeparateFields
The script is saved and loaded into VirtualDub(Mod). The amount of frames and the framerate have both doubled.

Example of a game that runs at half framerate or 29.97 frames per second

Example of a game that runs at full framerate or 59.94 frames per second
to do
Example of a game that runs at one third framerate or 19.98 frames per second
to do
Determining if the video is top or bottom field first
to do
Determining the resolution of the game
This section requires a bit of your own research. Wikipedia is a good place to start. Older consoles like the NES and Sega Genesis can only output in low resolution, however the SNES, N64 and PS1 are capable of high resolution. From the PS2 and onwards, high resolution for games is more probable.
You may find your game in our list of dimensions and framerates.
Deinterlacing scenarios
to do
Scenario 1: D1 F1
to do
Scenario 2: D1 F2
to do
Scenario 3: D1 F3
to do
Scenario 4: D4 F1
to do
Scenario 5: D4 F2
to do
Scenario 6: D4 F3
to do
use decimate() from f2 for d4 f3
Scenario 7: One pixel bob
to do
Scenario 8: Quarter pixel bob
to do