Anri-chan/Guide
From SDA Knowledge Base
Contents
How to Encode a Game Video Segment from a DVD using Anri-chan
This guide was originally written by RaneofSOTN. Big thanks go to him for all the hard work!
Introduction
This procedure involves taking a DVD-disc, pulling the digital video media off of it. Then using the video in a simple program designed to use more advanced programs and scripts to properly encode that digital video media into a standardized output. This guide uses Anri-chan 3.3.
Prior Skills Needed
- Know how to record video onto DVDs with your recorder. Also be knowledgeable of how to finalize the disc so it can be played back in other places than your recorder. Please be wary of Anri-chan's SP or higher quality required.
- Basic understanding of installation procedures in your current version of Windows.
- A small knowledge base of games, so that you can distinguish games with pixel-like graphics from 3-d rendered ones.
Materials Needed
- Computer access, in which you can install programs. Long periods of access are required.
- DVD Recorder and digital video media you wish to encode.
- DVD Disc to be written on.
- DVD Drive in the Computer that can read the type of DVD disc that was written on.
- Enough space on your computer. A recommended value of 7-8 gb. This is to allow for multiple settings of encoding, ripping space for the dvd, and installation for Anri-chan. This must be on your C: drive.
Special Conditions / Notes
- Have enough disc space for Anri-chan, Information from the DVD, and also for the encoded files. Recommended is about Seven to Eight Gigabytes minimum.
- Anri-chan is run without a GUI, careful key strokes are needed to ensure proper encoding.
- Make sure you have something to write with, or a place to mark down some necessary or relevant information to your encoding.
- You should be recording with SP or higher on your DVD-recorder as Anri-chan requires at least SP to work properly.
- Anri-chan is currently only developed for Windows.
WARNINGS
- Take care of your DVD Disc, mishandling of the disc could cause damage to the data held within, or to your DVD-drive when data is being pulled off of it.
- Be mindful of possible threats of Shocks and Surges to your computer. The final encoding process can take a VERY LONG TIME.
Working Definitions / Key Terms
Anri-chan – A program that uses others to run the encoding, and simply the process of encoding.
Encoding – The process of preparing digital video for output. This is done to meet proper formats and specifications for playback.
F – Frame rate. F1 is full frame rate, F2 is half frame rate and F3 is third frame rate. In regards to NTSC this is 60/30/20 frames per second. In Pal this is 50/25/16.666 frames per second.
D – Dimensions. This refers to the dimensions of the recording. D1 is full resolution of 640x480, and D4 is half resolution of 320x240. These values are for NTSC. 704x576 and 352x288 for Pal.
FDP – Frame decimation Paradigm. This is the problem of taking a recorded video blinking something. If the video is recorded improperly the blinking might not show within the encoding. So FDP is given in dimensions either 2d or 3d.
NTSC – A region generally defined as Americas and Japan. This is mostly Concerning video settings and at what clock speed a game is run (60 Hz).
PAL – A region generally defined as Europe. This is mostly concerning video settings and at what clock speed a game is run (50 Hz).
List of Steps
- Finalize your DVD-disc with the video data you wish to Encode.
- Install Anri-chan on the Computer. {Can be skipped if Anri-chan is already installed}
- 'Rip' the Digital Video Media data off the DVD Disc onto your Hard drive.
- Creating a Sample to determine the Digital Video Media's F D and FDP values.
- Setting up the Encoding Process
- Initializing the Encoding Process
Step 1: Finalize the DVD with the Video Data
Following the procedures outlined within your DVD Recorder's dubbing process, put as much media as you wish onto the disc. Then finalize the disc, so it can be read within a DVD drive. After the disc is ready, properly transport the DVD to the Computer that will be doing the encoding.
Please note, that Anri-chan requires that you recorded the media on a setting of SP or higher. This should be no problem for DVD Recorders, and often SP can be set as the default. At the SP setting a DVD can hold 2 hours of media.
Step 2: Installation of Anri-chan
- Download the Anri-chan Installation file from here.
- Start the Installation after the File has finished downloading. Please be mindful of your OS' quirks for installation. Such as Vista requiring you to run it as the Administrator.
- After Agreeing to the License, select your installation location. Default is "C:\Program Files\anrichan3.3" or "C:\Program Files (x86)\anrichan3.3" on a 64 bit operating system. Anri-chan also includes another software program AviSynth. AviSynth is required to encode your Digital Video Media. Continue to install this, the default settings are recommended. Below is a Picture depicting the continued install of AviSynth.
- Once AviSynth is finished installing, Depending on what else is installed on your computer, it might have to also install VirtualDub and Xvid. After all installations are complete, here should be an icon on your desktop, that looks like the following.
Picture 1

Picture 2

Step 3: 'Ripping' the Digital Video Media
- Open up Anri-chan. This can be done by double clicking the Picture noted above, or by going through your start menu.
- After opening up Anri-chan the Following should be visible:
- Select the #1 option, Rip DVD to hard drive. You will then be asked for the Drive Letter of your DVD Drive.
- After doing so, it will ask what should the Folder name of the Rip be. Please note that this will go to C:\AnrichanMPEG\[Your_Folder_Name_Here] . Make note of this Folder Name as it will be needed in steps 4 and 5.
- After making this selection Anri-chan will ask for an OK to go. Press any key, and then wait while Anri-chan 'rips' the data off of the DVD disc.
Picture 3

Note: This picture will be referred to as the 'Anri-chan Base Menu'
- Alternate Path: Anri-chan tells you that if you have a DVD source copied onto your hard-drive, you can store it at C:\VIDEO_TS\ and then select the C Drive as your option.
Step 4: Creating a Sample Video file
Before you start this step, please take a look at the DATABASE of games. If your game is listed, then you DO NOT NEED TO DO THIS STEP. Take a look at the following site, for the database of games. http://speeddemosarchive.com/kb/index.php/DF
- Start up Anri-chan, as it should have closed after ripping the Digital Video Media.
- At the Anri-chan Menu, see Picture 3, enter in the value of 3. This will start the process of extracting a sample.
- The Menu of Picture 4 should appear. Answer '1' as the source we pulled from was a DVD source.
- After the next menu appears displaying some values and Folder Names, enter in the value of folder name you made in step 3. Anri-chan will index the video file. This will take some time. After Anri-chan has indexed the video file proceed to the next step.
- Anri-chan will open up VirtualDub, with your video file completely indexed as seen in Picture 5 at the beginning of the next page. It is recommended for this section to pick a section of frames (300 to be exact, which is about 5-10 seconds of video), that includes a decent amount of action. Picture 5 has example within it of beginning of section. Please note it asks for the first FRAME. At the bottom middle of the Virtual Dub window, there is the current frame #, encircled by red. Enter that into Anri-chan after you have found a suitable section of video. Also marked is the cursor for Virtual dub with the orange arrow.
- After hitting enter, Anri-chan will encode this sample for the 'experts' to decode into its values. Once this is done, Anri-chan will make a sample folder on your desktop. Within that folder is the sample video.
- Alternate Path: If you cannot post a sample, or just do not have the time to determine such a sample then the following methods can be used to obtain what is LIKELY to be the F, D, and FDP values.
- If the game has pixel (bit) graphics, then it has a FDP value of 2d, if it is rendered in 3d, then it has a FDP value of 3d.
- If the game is from an older platform(Playstation, N64, or Sega Saturn or older), then it is probably D4. If it is newer (PS2, Gamecube, Xbox or newer) then it is probably D1.
- F is hard to tell, as it can vary. Most 16 bit or older games are F1. Most 32-bit games are F2, but can be F3. New Systems are either F1 or F2. If you are unsure, predict that it is F1.
- After obtaining your F, D, and FDP values, you are ready to go onto the next step.
Picture 4

Picture 5

The sample may look weird. This is normal as the experts can better give you your values from this sample.
Upload the sample to an online storage service, such as megaupload, and then post a link to it within the topic at http://speeddemosarchive.com/forum/index.php/topic,6416.0.html .
You can post under a “guest” tag as registration is not required. You can get to this topic by going to http://speeddemosarchive.com . Going to the Forums, then going Tech Support. Within Tech Support there is the topic “What're the d, f, and fdp for this game?” Post the sample within that topic. Then please wait for a techie to respond to you with the values of d, f, and fdp. These are important values for step 5
Step 5: Setting up the Encoding Process
- After starting up Anri-chan, enter the 2nd Menu option. This will start set-up for the encoding process. Picture 3 is displayed again for you below.
- After entering the 2nd option, it will ask you for a project name. This is independent of any other names. Name the project so you can identify it by its name. A good title would be “Seiken_Densetsu_3_Segment_7”. A bad one would be “Video_Encode”.
- Now answer '1' to the source question, as you ripped the DVD files in step 3. Then select your file from the resulting set. As seen in Picture 6 (at the beginning of the next page). The test source was ripped to D4_F1_2D_PAL-SuperMetroid.
- Wait for Anri-chan to successfully index the files. This could take a few minutes.
- Anri-chan will ask you if you wish to use the Games database or not. In the beginning of step 4, if you found your game within the database then select 'y', if not then select 'n'.
- Answer 'n' to the next question. Anri-chan is asking if it is a progressive scan source. DVD players are typically not progressive scan.
- Next Anri-chan will open up VirtualDub with two videos. One is labeled T and the other B. Scroll through the video for a bit (a minute is a good amount of time) to see which plays better. Then enter that value (t or b) into Anri-chan. You can then close VirtualDub.
- Next Anri-chan will ask you a series of question(s). This is to help Anri-chan set up any extra features that your game might require. Each one applies a filter to clean up the video for viewing after encoding.
- If you recorded the video originally on a VHS then changed it to a DVD, answer 'y' to Originally VHS.
If you used the database, skip to I; if you did not use the database, answer the next question.
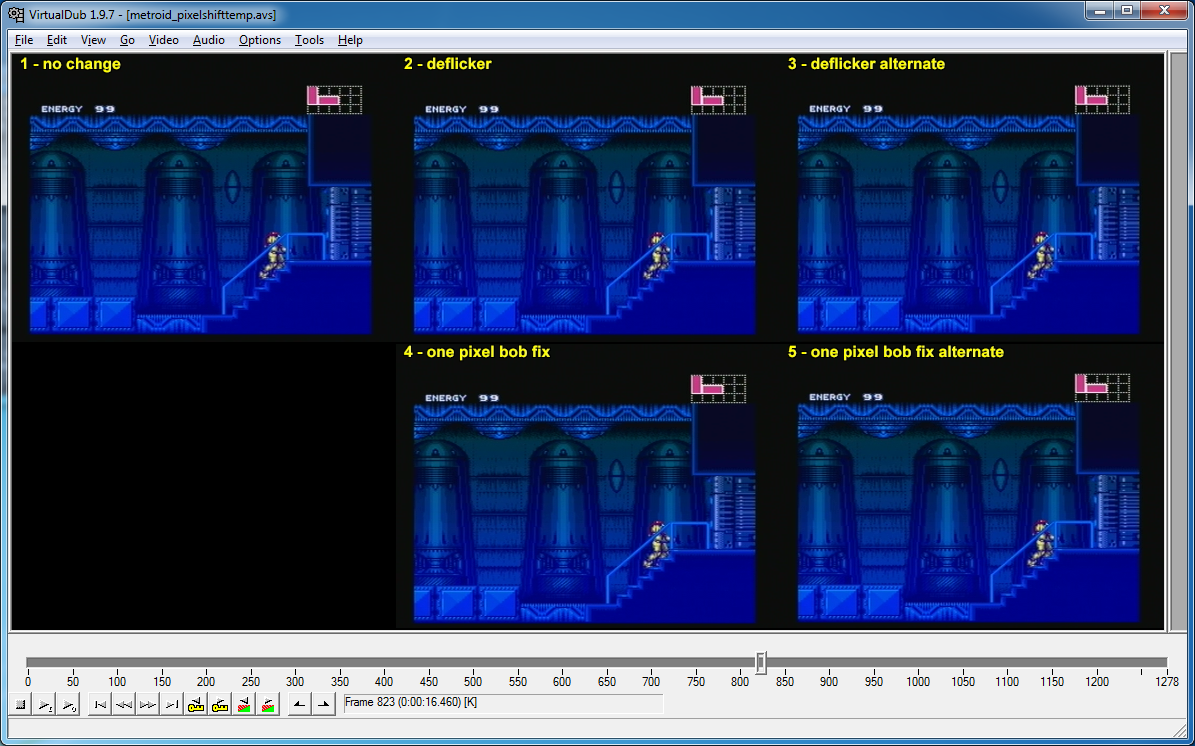
- It is recommended to check if the picture has a bobbing effect. Answer 'y' and a virtualdub window will open with 5 different options; see picture 7 below. Step through frame-by-frame using your keyboard's arrow keys to see which option has no bobbing effect. Choose the appropriate option, close the virtualdub window, and enter the value in Anri-chan.
Picture 7
- Is the Video from the NES? Answer 'y' if it was, if not answer 'n'. If you do not know what the NES is, answer 'n'.
- Is the Video from the Game Boy Advance? Answer 'y' if it was, if not answer 'n'. If you do not know what the Game Boy Advance is, answer 'n'.
- Is the Video from Game boy? Answer 'y' if it was, if not answer 'n'. If you do not know what the Game boy is, answer 'n'.
- It is recommended to check if the picture has a bobbing effect. Answer 'y' and a virtualdub window will open with 5 different options; see picture 7 below. Step through frame-by-frame using your keyboard's arrow keys to see which option has no bobbing effect. Choose the appropriate option, close the virtualdub window, and enter the value in Anri-chan.
- Anri-chan will now ask you if you want to trim unwanted content off the video, If you wish to answer 'y', if not answer 'n'. NOTE: To trim unwanted content, enter in a starting frame and an ending frame for each section. Each section is continuous. Such that if you end Range#1 at frame 1882 and start Range#2 at frame 2480, then the movie will play as if 2480 was right after 1882, cutting out the middle frames. You can have as many ranges as you need. Enter in 'n' when you are done. Virtual Dub will be opened to help you select the frames you wish for this process.
- Anri-chan will ask if you want to append a station ID. Picture 8 displays what a station ID could look like if you set it up. It is recommended to apply a station ID if you are going to distribute this over the internet. Simply answer 'y' then answer the following questions to apply a station ID. Otherwise just answer 'n'. The station ID's in order go from the top part of the ID, where you see in Picture 8 the name is. The middle part, where Metroid Prime... is in Picture 8. The last line covers where Part 1 is in picture 8.
- Answer 'y' to encoding with these settings. If you answer 'n', You will have to go through Step 5 all over again.
- If you want to start the Encoding now (Step 6) answer 'y'. If you wish to take a break or do it at another time, answer 'n'. Anri-chan will tell you the job is saved, and within the Project folder a .bat is created. Whenever you wish to start encoding, just double click that .bat.
If you selected 'n', because the game is not yet in the database or for some other reason. It will then ask you to enter in the D, F, and FDP values. FDP asks if it is 2d, this question is answered with a 'y' or a 'n'.
If you select 'y', the values will be automatically entered for you.
NOTE: After entering these values, if you had selected 'n' Anri-chan will ask if you wish to update the database. This will open an Internet browser to a thread where you can post the games values.
Picture 6


Picture 8

Note – It is recommended if you are going to distribute your video that you apply a station ID to it. There is a good chance some people might try to steal your video. If there is a station ID with your info on it, it'll be much harder to steal without crediting you. Please understand this and apply a station ID if you are going to distribute your video.
Step 6: Encoding
- If you are starting from a delayed encode (You answered 'n' to Step 5 L), then you will have to re-approve your encoding settings so answer 'y'.
- Anri-chan will then ask you which types to Encode in the following order Low Quality MP4, Medium Quality MP4 and High Quality MP4. Insane Quality MP4 and Xtreme Quality MP4 may also show as options. If you plan to submit these to SDA it is required to create the Low, Medium and High quality MP4s. Insane and Xtreme quality MP4's are optional. Low and Medium XviD avi cannot be submitted. If you just want to upload these to Youtube or some other online storage. It is recommended to do Medium Quality MP4. To view what each quality entails, and the expected final results, look here: http://speeddemosarchive.com/kb/index.php/General_advice#Expected_final_results_for_self-encoded_runs
- After entering these values the encoding will begin. This will take a long time depending on your choices.
NOTE: Because this process takes a long time, make sure that the computer will be undisturbed to make sure the process goes as fast as it can. Also, take note of any STORM warnings as power interruptions during the encoding process could cause some loss of data or damage to the data.
Example: Encoding a segment of 10 minutes can easily take 1-2 hours. This is normal and this was set to a normal setting. For higher qualities, this could take longer. Please be wary of time and environmental hazards.
Trouble Shooting
If at any time, Anri-chan has a failure, or the end video quality is not that good. Feel free to post within the Tech support section of Speeddemosarchive. Please use the Anri-chan topic and try to describe your problem to get the best possible answer. Also include the .log file that was created inside your project's folder to help the tech support pin point your problem.
Q: My video seems to be bobbing weirdly? What could be causing this?
A: See Step 5,I,1.
Q: My video appears to have a visual glitch that shouldn't be there! Why is this?
A: Sometimes a DVD-RW will have problems with media and could not properly overwrite a section of data already written. Thus a section of video could have been accidentally inserted in the area you wanted to pull from.