Zelda II: The Adventure of Link
From SDA Knowledge Base
Experience and Leveling
If you do not level properly in this game, it gets harder, and harder, and the game quickly gets out of hand. Getting Attack 4 or 5 in your first palace is very important in most categories. This requires some luck, and some practice. Know your 6 counts. Know your P bags.
It’s critical to learn how to manipulate your experience, to ensure the biggest possible payoffs at the end of each palace. Level Attack early, and make sure your “Next” level is Attack every time you put a gem into a statue at the end of a palace. Know the experience chart, and know what monsters are left to kill in each palace.
Drops and 6 Counts
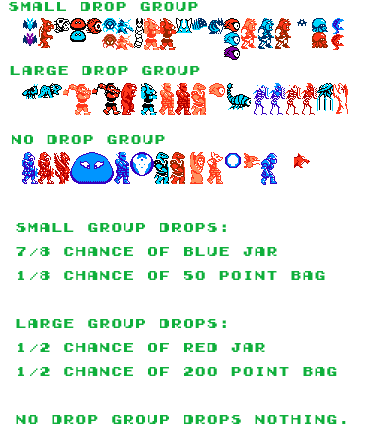
Drop Group Chart via Red Candle
There are three kinds of enemies in this game: Enemies with no drops, enemies in the “small” group, and enemies in the “large” group. This is important to know, because when the enemies drop items is not random.
Every sixth enemy you kill in a group will drop an item. Kills in one group to not affect kills in the other group. So, if you kill 5 Bots, then an Iron Knuckle, killing another bot after will cause a small drop. Likewise, killing 4 Iron Knuckles, then killing some Bots, then killing two Stalfos will cause a large drop on the second Stalfos.
The kind of drop you get, however, is random. Small drops will usually be a blue jar, but have a 1/8 chance of being a 50-point P Bag. Large drops are equally likely to be a red jar or a 200-point P Bag.
This means if you kill the same enemies, in the same order, every time you play the game, you will get drops at the same times. This is an important fact in routing the game, as well as in recovering from bad luck or mistakes.
Combat Techniques
The most important thing to know is to keep your momentum. If you’re moving forward, you can keep hitting enemies, instead of letting them hit you while staying alive. This means that generally, the worst possible attack to make is the standing sword attack. It’s slow because of the backswing, and you stop to make the attack.
Better is the crouching sword attack. It’s faster than the standing attack, but it also kills your momentum. However certain enemies are bad to crouch stab, such as the ever-annoying Tin Suits, who have top-heavy hit boxes.
Jumping is the key to combat in Zelda 2. Often a jumping crouch thrust is best. Sometimes you will want to jump, crouch, and then thrust on your way down from your jump. Against other enemies, or for a final attack, you may want to attack while you’re coming up in your jump.
Enemies like Iron Knuckles need special techniques. Jump at them, do not crouch, and then thrust on the way down to hit them in the visor. However in a two square-high corridor, there isn’t room to jump. Instead, press A then B right after, very quickly, to get attacks in.
Healer Glitch
Some quick notes about the Glitch Town and the Healer Glitch, which is a way of getting into Glitch Town without getting onto the eastern continent with Fairy.
To start off, an explanation of this and other glitches in the game is provided by Inzult, who as of this writing holds records in Zelda II TAS categories, as well as the New Game+ glitched live speedrun category.
When the game gets confused about where Link is supposed to go, it will sometimes send the player to a fall back map. In towns, that fallback map is known as Glitch Town. The first door in Glitch Town is a door to nowhere… back to Glitch town. However, entering the door corrupts Link’s position slightly (shifts it to the left). Entering it five times creates a condition known as ‘Scroll Lock,’ which lets some crazy wrong warps and other effects happen.
The existence of glitch town and out of bounds warping was known in the old days of Nintendo Power, where it was documented that a player could jump with the Jump spell off of a high building in Darunia, cast fairy when in the HUD, and get into Glitch Town. However Darunia is far enough in the game that it’s suboptimal for speed run use of Glitch Town. Enter the Healer Glitch.
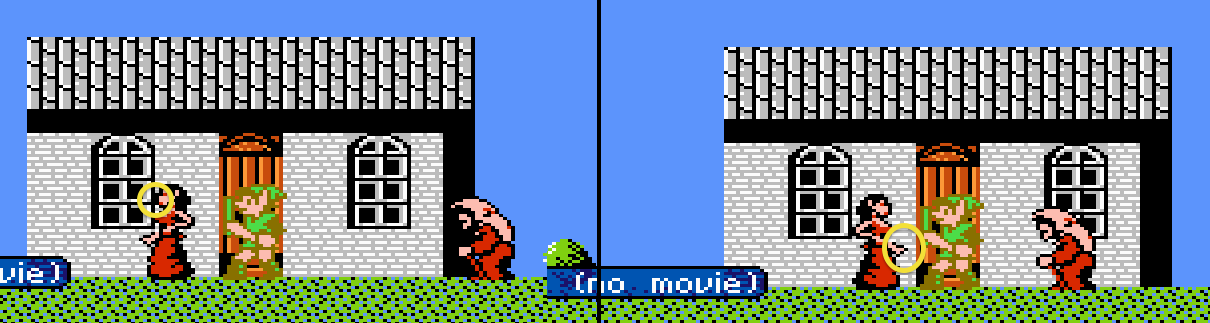
It can be done on any healer, medicine, or spell lady, but due to convenience and routing optimization, it’s usually done on the Healer lady in Rauru, hence the name. To glitch in Rauru, one must stand in right front of the door (with a few pixels of leeway), talk to the lady on the first frame her nose touches the window (she’s on each pixel for two frames), then talk to her again on the last frame before she opens the door, and cannot be talked to anymore.
The image here is an annotated version of an image by Inzult posted to the SDA Forums. It shows the pixels you need to press the talk button on, in order to trigger the glitch. First you talk to her while she is walking away from you, as her nose is hitting the window (You can look at any pixel you want, but that’s what I look at). Then you talk to her at the last frame before she opens the door. In learning the glitch, I would watch her hand as it moves on the brick background.
More images, videos, and information are available at Red Candle