R.C. Pro-Am II/Game Mechanics
From SDA Knowledge Base
Contents
Items
- 250$. If it's blinking, any car can grab it. Otherwise, only the car with the corresponding color can collect it.
- 100$. If it's blinking, any car can grab it. Otherwise, only the car with the corresponding color can collect it.
- 100$. If you're equipped with a bought weapon, this item will increase the ammo by 5.
- 100$. If you're equipped with a bought weapon, this item will increase the ammo by 1.
- No money. Collect the letters P, R, O, A, M and I (twice) to upgrade the car. The car can be upgraded twice.
- No money, one nitro. If it's blinking, any car can grab it. Otherwise, only the car with the corresponding color can collect it.
- No money, gives either missiles or bombs with unlimited ammo. You can't tell from the question mark if it's one or the other, but the same question mark always contains the same weapon.
- No money, prevents you from crashing after driving through an oil slick. If a car touches another car having the roll cage, it will start spinning and crash if hitting the border of the track. If both cars have the roll cage, nothing happens.
- No money, one continue
Speed
The speed is tracked in RAM-address 05C2.
Max speeds
The below table shows how the max speeds increase with the upgrades. The numbers in the motor rows correspond to their additional speed boost. Question marks mean these combinations haven't been tested and are only assumed.
| Default | 1st upgrade | 2nd upgrade | |
| Standard | 79 | 85 | 88? |
| Red | 6 | 6 | 6? |
| Black | 9 | 9 | 9? |
| Silver | 11 | 11 | 11 |
| Gold | 12 | 12 | 11 |
| Hyper | 12? | 12 | 12 |
| Mega | 15? | 15? | 15 |
In addition to the boost of the speed stats, each new motor also improves the acceleration. So even though Gold and Hyper don't appear to add much over Silver, they have better stats (not enough to make them good choices though).
Test of upgrade combinations
A primitive test was made by timing (in frames) one lap of track 6 with different combinations of motors and tires. Several completions were made for each combination and then the best time was noted down. The test was of course still subject to execution mistakes, but should give an idea of what time differences to expect. Due to limited money available, some combinations could not be tested for this track.
| Standard | Skinny | Nooblies | Dynafit | |
| Standard | 1500 | 1444 | 1421 | 1410 |
| Red | 1374 | 1355 | 1320 | 1313 |
| Black | 1389 | 1302 | 1273 | n/a |
| Silver | 1310 | 1273 | n/a | n/a |
Zippers
Zippers appear to give a speed boost of around 40 for 11 frames and then the speed is reduced by one or two every 5 or 6 frames until the max speed for the car upgrade/motor is achieved. The game mechanics behind the speed reduction is not known. Very roughly, a zipper saves about one second.
Boosts
The nitro and start boost effects are governed by the same game mechanics. The effect goes through 4 phases (RAM-address 061E):
- The counter in 0622 counts down from 32 (nitro) or 40 (start boost) by one every frame. When the counter reaches 0, phase 2 begins.
- RAM-address 0626 increases by 8 every frame for 8 frames (so ending at 64). 0626 is effectively what boosts the car. This value can be made to roughly correspond to a speed boost by using a multiplication factor of 0.75 and adding the result to the speed in 05C2.
- 0622 is reset to 32 and starts to count down yet again. When the counter reaches 0, phase 4 begins.
- This is a reversal of phase 2. So 0626 decreases by 8 every frame until it reaches 0. This is also the point when a new nitro can be used.
It's important to note the following things:
- The nitro boost is not affected by speed reductions from water or logs. That means they are extra useful when crossing these obstacles.
- By activating the nitro so you're in phase 2 while entering the obstacle, you can save additional time by not losing as much speed as you otherwise would have.
- A boost saves roughly half a second (of course depending on which upgrades you have).
- Both nitros and logs generate lag, so it's sometimes actually a time loss to use nitros to cross a log section.
RNG
The most important RNG-factors in the game are:
- Letters
- Traffic light timing
- Line-up at the start line
All three are determined by the frame when pressing start in the shop, which sets 043C. This works well from a save state, but unfortunately there are also other, currently unknown, factors during the race that impact the seed. So pressing start in the shop for the same value of 043C, but from two different starting conditions, will give different results. The exception is race 1, which is predictable (although requires frame-perfect inputs). Some observations about these RNG-factors are still noted down below.
Letters
In race 1, the letter you get from the different possible values of 043C are the following:
| 0 | 1 | 2 | 3 | 4 | 5 | 6 | 7 | 8 | 9 | 10 | 11 | 12 | 13 | 14 | 15 | |
| 0-15 | R | R | P | P | P | P | A | O | R | R | ||||||
| 16-31 | P | P | P | P | P | M | O | R | R | P | P | P | ||||
| 32-47 | P | P | O | O | R | R | P | P | P | P | ||||||
| 48-63 | A | O | R | R | P | P | P | P | I | O | O | |||||
| 64-79 | R | R | P | P | P | P | A | O | R | R | ||||||
| 80-95 | P | P | P | P | M | A | R | R | P | P | P | |||||
| 96-111 | P | P | M | O | R | R | P | P | P | P | ||||||
| 112-127 | A | O | R | R | P | P | P | P | I | A | O | |||||
| 128-143 | R | R | P | P | P | P | I | O | R | R | R | |||||
| 144-159 | P | P | P | P | A | O | R | R | P | P | ||||||
| 160-175 | P | P | M | P | R | R | P | P | P | P | P | |||||
| 176-191 | O | O | R | R | P | P | P | P | A | O | ||||||
| 192-207 | R | R | P | P | P | P | I | A | R | R | R | |||||
| 208-223 | P | P | P | P | M | O | R | R | P | P | R | |||||
| 224-239 | P | M | O | R | R | P | P | P | P | P | ||||||
| 240-255 | A | O | R | R | P | P | P | P | I | O | O |
Some observations:
- P is by far the most common letter (85).
- Roughly one third of the frames are not valid (= nothing happens when you press a button on these frames).
- There doesn't appear to be any structure to the letters. There are no "islands" with one letter, making it easy to get that particular one.
- The letter that's likely to be the last to collect, and therefore the most desirable, for the 1st upgrade is I is also the least likely to get. There are only 5 occurrences of I, with the first one coming at 60 (corresponding to 59 frames after the track screen appears).
- Since the same RNG appears to govern different elements, you can already from the start get an indication of the value of 043C the race began on by looking looking at the order of the cars at the line-up.
As already mentioned higher up, similar tables can be made from a save state for the other tracks as well. Unfortunately, this won't be of any value in a real-time attempt, since the RNG also changes during the races.
Traffic lights
The timing of the traffic lights can be seen in 06E2.
- The frame before the traffic lights appear on screen, 06E2 is set to 16. It then counts down by one every frame.
- At 0, 06E2 is reset to 32 and starts to count down again. The first traffic light is lit.
- At 0, 06E2 is reset to an RNG-value (observed to be between 24 to 86, but slightly smaller/bigger values might be possible as well). The second light is now lit.
- At 0 (or actually one frame after), the green light is lit.
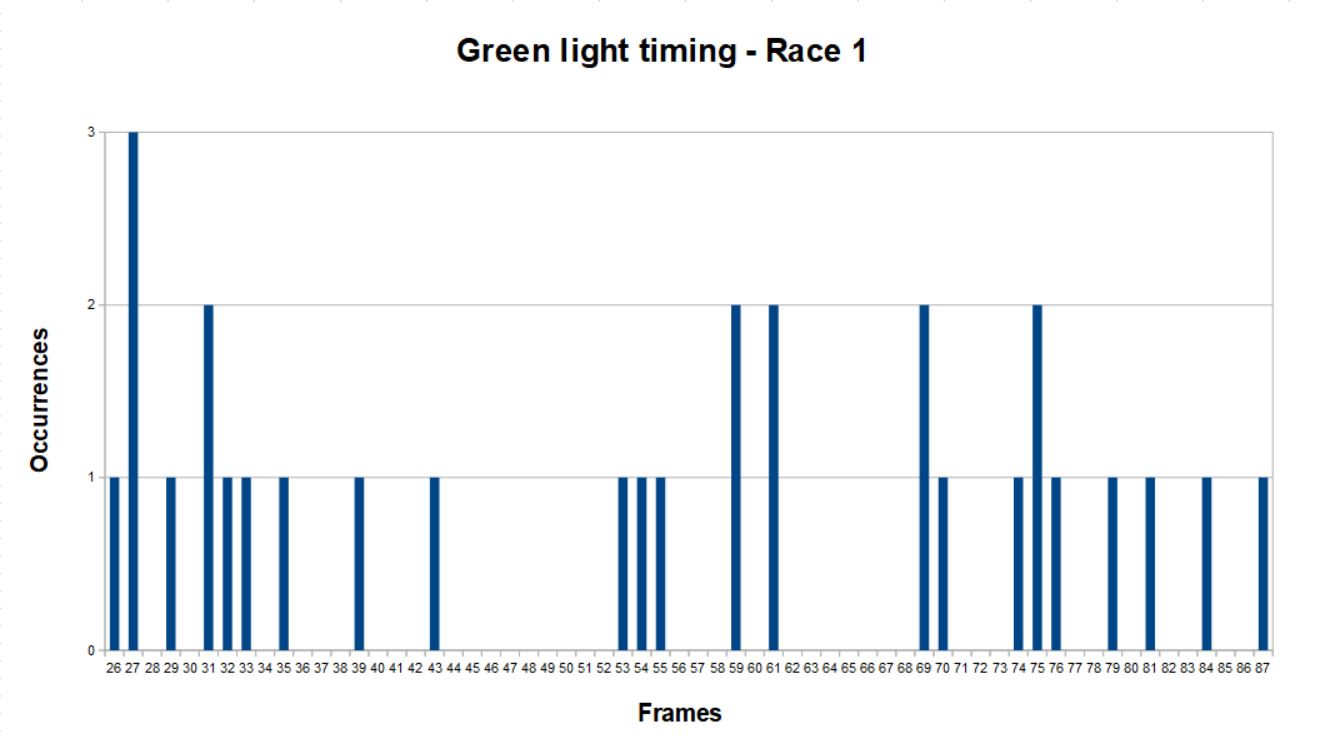
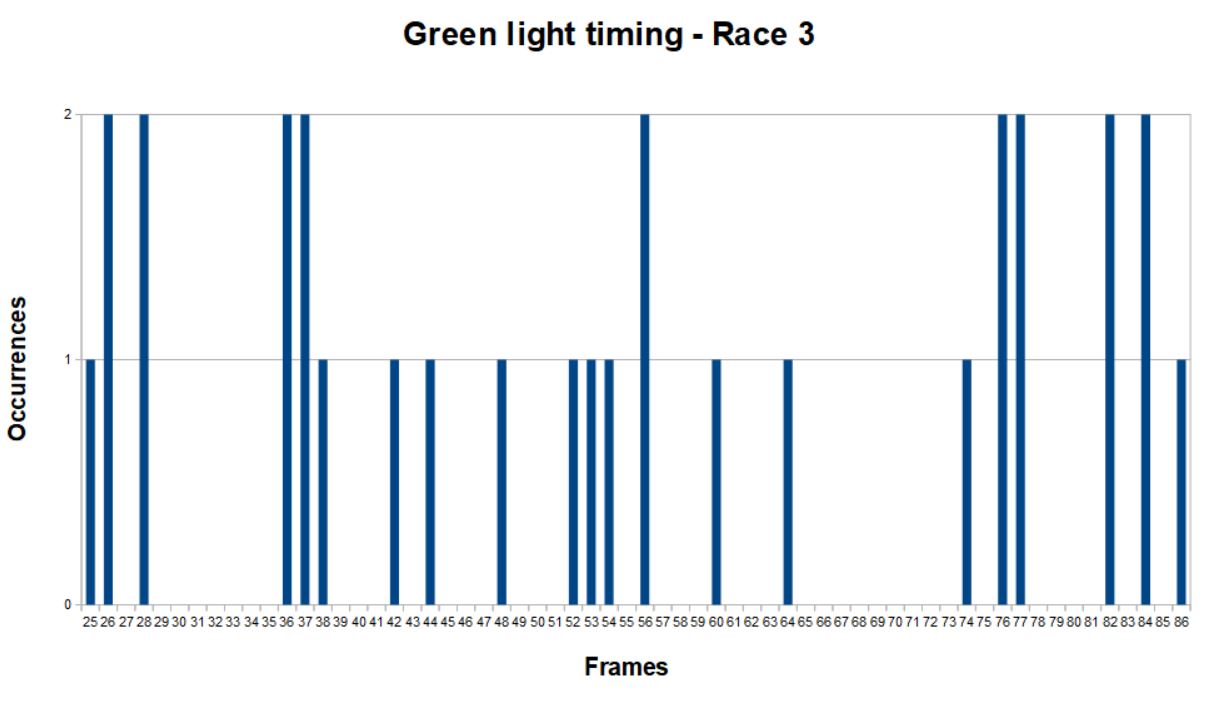
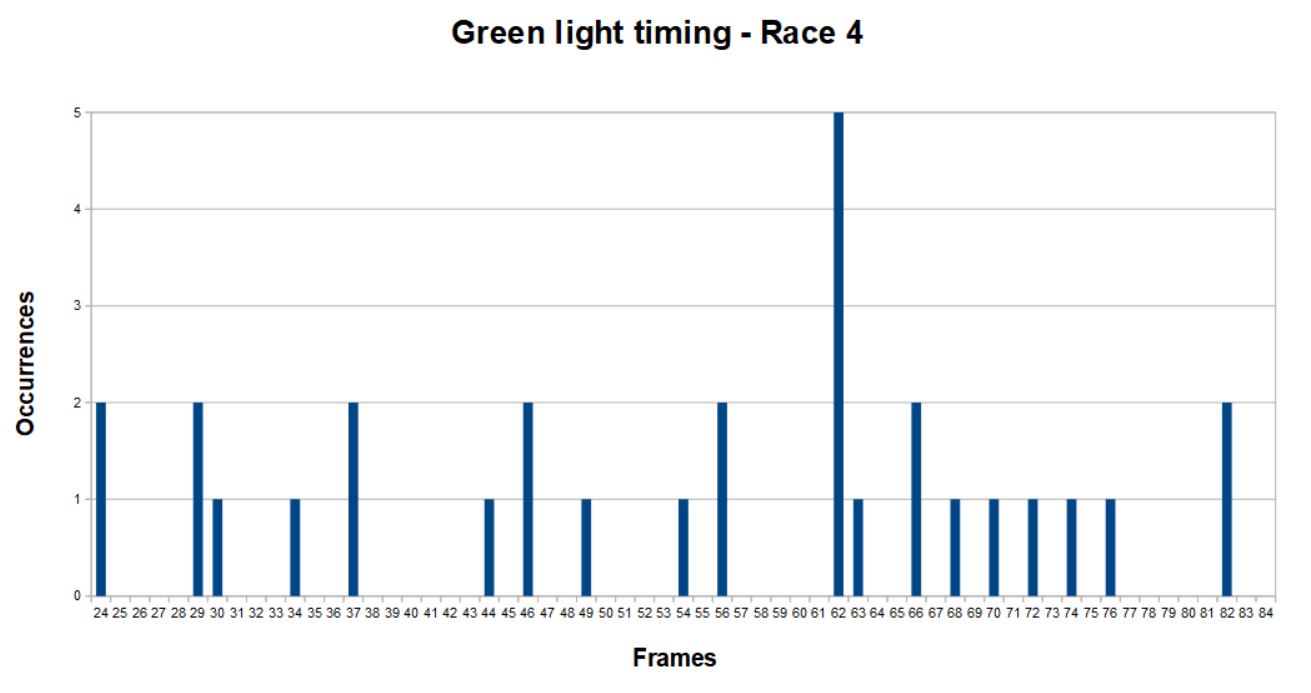
Since this follows the letter RNG, it's not possible with the current knowledge to predict the timing of the green light (other than to some extent on race 1). The start boost bonus is important at the beginning for quickly getting better equipment, some empirical tests have been made on some of the first races. The tests for each race was done from the same save state, but with 30 different values of the RNG-counter in 043C.
The first race isn't too critical, because the time window for reacting to the green light is generous enough. It's still interesting to note the gap between the early and the late times. There is some support from real-time attempts for there to be some kind preference by the game for either early or late times. That would have to be confirmed though.
It's difficult to draw any form of conclusion from this graph. The times are fairly well scattered.
The many occurrences at 62 frames is somewhat surprising, but testing during real-time attempts actually seem to support that there is indeed a fairly good chance to get a boost by starting to accelerate after around the one second mark. It would probably need to be confirmed by a deeper understanding of the underlying mechanics though.
As a final remark, the three graphs have somewhat individual appearances that could indicate that the green light times are not completely random, but are somehow linked to the individual races. More knowledge about the mechanics behind would be needed to confirm this however.
Speed boost timing
The time window for getting the start boost appears to be linked to the race you're on. The first four races, which are the most important, have the following windows:
- 15
- 15
- 14
- 12
It looks like all the races after #4 (except 25, 28 and 31, which are copies of 1, 2 and 3, respectively) also have a time window of 12 frames for getting the start boost. However, if any of the other cars accelerate before you and within the "start boost time window", they will get the boost and you will not. It seems that the cpus get better and better to react as the game progresses, so it will be more and more difficult to get the start boost for that reason.
- After a race, when the result screens are showing, you only need to press start once. This is possible as soon as the screen turns black after the race.
- Once the map screen has been shown for 10 frames, it can be clicked away by any button. Roughly every third frame is a blank though. So a good idea is to press two buttons almost at once to decrease the chances of getting stuck on blank frames.
- The drag race screen can be clicked away after 47 frames and then (roughly?) every third frame is a blank.
- The tug-o-truck screen can be clicked away after 46 frames and then (roughly?) every third frame is a blank.
- A merchandise can be selected (A or B) two frames before it's selected/shown and then every frame without blanks.
- A motor buy takes at least 55 frames (for the first one available).
- It costs an additional 28 frames for each menu jump, regardless of it's the outer or one of the inner menus.


