Difference between revisions of "Ikari Warriors 2 (NES)/any%"
From SDA Knowledge Base
| Line 1: | Line 1: | ||
[[Ikari_warriors_2]] | [[Ikari_warriors_2]] | ||
| + | ==Power-up route== | ||
| + | This section describes the items collected in the route described on this page and provides some arguments for where to use them. A description of the power-ups is found in [[Ikari_Warriors_2/Game_Mechanics#Items|Items]]. The time and health items aren't shown, since they're unlikely to play any role in an optimized speedrun. The Earthquake power is currently not used in the route, but could potentially come into play if new information about the game is found and has therefore been included. | ||
| + | {| class="wikitable" | ||
| + | | | ||
| + | |[[File:Thunder_power_ik2.png]] | ||
| + | |[[File:Earthquake_power_ik2.png]] | ||
| + | |[[File:Wing power ik2.png]] | ||
| + | |[[File:Armor_power_ik2.png]] | ||
| + | |[[File:Arrow_power_ik2.png]] | ||
| + | |Comments | ||
| + | |- | ||
| + | |Stage 1 | ||
| + | | | ||
| + | | +1 | ||
| + | | | ||
| + | | +1 -1 +1 | ||
| + | | | ||
| + | |The only sensible option is to use Armor power for the last part.<br /> This allows quickly dispatching the boss and also collecting the second Armor item. | ||
| + | |- | ||
| + | |Stage 2 | ||
| + | | +1 -1 | ||
| + | |1 | ||
| + | | +1 -1 | ||
| + | |1 | ||
| + | | +1 | ||
| + | |With movement being slowed down in water, the flying power-up saves more time in this level than elsewhere.<br /> | ||
| + | The only alternative to the Thunder quick-kill on the boss would be to use the Arrow (using the Armor power-up<br /> | ||
| + | would introduce additional movement around the exit since you can't toss grenades diagonally). This would mean <br /> | ||
| + | using the Thunder power-up on the third boss instead (since the next Thunder power-up is found in level 4,<br /> | ||
| + | the current one needs to be used before). As a result, there would be no power-up available for the fourth boss<br /> | ||
| + | (using Thunder on this boss as well would mean having to fight the last boss normally). Hence, the only reasonable<br /> | ||
| + | option is to use Thunder on the second boss. | ||
| + | |- | ||
| + | |Stage 3 | ||
| + | | | ||
| + | |1 | ||
| + | | | ||
| + | |1 -1 | ||
| + | |1 | ||
| + | |Using the Armor power-up is both helpful in avoiding taking damage and to quickly take care of the boss.<br /> | ||
| + | Using the Arrow instead is not alternative since you'd then have to fight either the fourth or the last boss<br /> | ||
| + | without any power-ups. | ||
| + | |- | ||
| + | |Stage 4 | ||
| + | | +1 | ||
| + | |1 | ||
| + | | | ||
| + | | +1 | ||
| + | |1 -1 | ||
| + | |Since this boss doesn't take damage from the Armor power, that's not an option. The only alternative would be to use<br /> | ||
| + | Thunder. However, that would mean the last boss had to be fought without power-ups, so not an option. | ||
| + | |- | ||
| + | |Stage 5 | ||
| + | |1 -1 | ||
| + | |1 (+1) | ||
| + | | +1 -1 | ||
| + | |1 -1 | ||
| + | | | ||
| + | |The only power-up that can be used on the last boss is Thunder. That leaves Armor as the only option for the second<br /> | ||
| + | to last boss. | ||
| + | |- | ||
| + | |}<br /> | ||
| + | |||
==Level-by-level description== | ==Level-by-level description== | ||
VIDEOS WITH AN ASTERISK (*) USE FASTER STRATS THAN IN THE CURRENT SDA-RUN<br /><br /> | VIDEOS WITH AN ASTERISK (*) USE FASTER STRATS THAN IN THE CURRENT SDA-RUN<br /><br /> | ||
Revision as of 08:22, 21 October 2020
Contents
Power-up route
This section describes the items collected in the route described on this page and provides some arguments for where to use them. A description of the power-ups is found in Items. The time and health items aren't shown, since they're unlikely to play any role in an optimized speedrun. The Earthquake power is currently not used in the route, but could potentially come into play if new information about the game is found and has therefore been included.
Level-by-level description
VIDEOS WITH AN ASTERISK (*) USE FASTER STRATS THAN IN THE CURRENT SDA-RUN
These videos have been recorded on emulator, but use strats that have been made with console speedruns and the use of a d-pad in mind.
Level 1
https://vimeo.com/470477993
A level that often plays out a bit differently from one time to the next. The enemy behavior in the first stretch can be difficult to control and many times enemies will run into you without possibility of dodging (without losing time). Pretty much all of the flying enemies before going into the menu can also give bad bullet patterns that are impossible to dodge or only possible to dodge with time-consuming movements. The part after the menu trip should be consistent (or at least very close to).
In the first section of the level, the success rate will be higher by firing in the "half-diagonal" direction, but firing diagonal also works for quite a lot of enemy patterns. In the same section, there are three enemies dropping small hearts that can be collected (and therefore relevant for the heart count). Anything between none up to the three hearts can be collected, depending on the enemy movements.
Adjusting the heart count can be done in the open area around the first Armor item. The enemy movements in this area are consistent and it's therefore easy to get to the correct heart count. The green enemies generally loop around on the screen if not killed, potentially creating additional lag and should be eliminated. The grey enemies quickly disappear off-screen though. The recommended way is therefore to follow the route in the video and either shoot the grey enemy at 0:47 (if an uneven number of small hearts were collected in the first section of the level) or leave it (if an even number of small hearts were collected).
The enemy that chases you in the first half of the level can't be scrolled off screen. Turning around to shoot it costs around half a second (due to how the game is controlled, turning around and shooting that enemy is quite easy to mess up though). Avoiding tanking the hit obviously makes the rest of the game a bit easier.
A consistent way of beating the boss quickly is (from when the boss appears) to move straight up. When at the same level as the "bubble" on the ground to the right, throw a grenade (to reduce the boss hp by 1). It's a big time window for this. When at the same level as the lower part of the "bubble" on the ground to the left, start walking straight horizontally to the right. This has to be done more precisely, but can be done consistently. There are methods that are a few frames faster that rely on diagonally walking up-right, but they seem to increase the risk of the boss slipping away.
Boss HP - 15
Level 2
https://vimeo.com/470478094
The small movement to the left at 0:46 consistently prevents taking damage from the flying enemy.
The enemies along the route all give "big heart" drops, which means the end-of-level tunnel should always be filled with the same content as the level 1 tunnel.
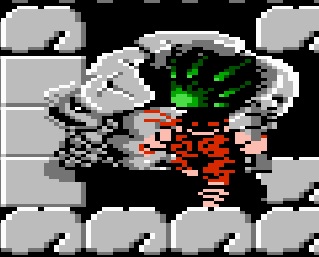
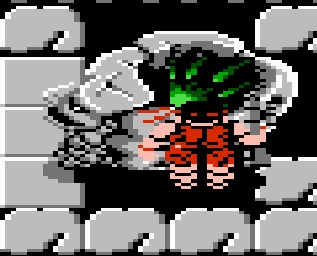
The boss quick kill has to do with dealing damage on the same frame the boss receives HP. Since the game runs at 20 fps, there is a 3-frame window for launching the thunder attack and achieving the quick kill (see screenshots below).


To the left is shown the first frame on which the boss quick kill is possible. To the right, the second and third frame on which the boss quick kill is possible. Luckily, there are some pillars appearing when it's time for the quick kill (only shown as garbage sprites here - but that has to do with the game and not the quick kill), so it's possible to get a visual indication of when the screen has scrolled far enough.
Boss HP - 15
Level 3
https://vimeo.com/470478173
Quite easy level. The last part would have been hard to get through without taking hits, so using the Armor power turns out to be very convenient.
There are only two enemies along the route that drop "small hearts". One right at the start and one after activating the Armor power-up.
It's slightly faster going through the fortress on the right side. However, it's more or less unavoidable taking several hits. The below video shows the general concept. Overall, it should be slightly faster than the solution above. However, not all possibilities have been fully explored (possible to avoid some time-consuming dodges? possible to avoid more damage?). But it still looks like fairly certain that the right route will be very risky to attempt in a real-time speedrun.
http://www.youtube.com/watch?v=5YwgMZjfXlk *
Another potential time saver would be to fly over the fortress instead of navigating through it by foot. However, there is no known location of an additional flying item, so it would then require to walk through level 2. Flying in level 2 saves ~13 seconds (and is very consistent, while walking almost always results in one or two damage), while flying in level 3 only saves ~7 seconds.
There is a trick to this boss. The boss health loops as long as the "face" is still intact. The the face has to be hit with the blast of a grenade (a direct hit won't do and the Armor power-up won't damage it either). That's the reason for starting the boss fight by walking backwards in the beginning. The boss face can also be destroyed by the bazooka. This speeds up the fight, but it doesn't compensate enough for the time loss from spending extra time in the menu (but maybe useful in a TAS with perfect menuing?).
Like all other bosses, this one can be killed by the arrow or by the thunder quick kill. However, It's 1.5-2 seconds faster to use the thunder quick kill on the second boss (plus it's an advantage to have the thunder quick kill as early as possible and it's also advantageous to go through the last part of level 3 with the Armor power-up to avoid taking damage).
Boss HP - 10
Level 4
https://vimeo.com/470478309
Especially the first part of the level can result in bullet patterns from the enemies that can't be avoided without time-costing detours. With the current knowledge, this is to be considered a random element not possible to manipulate in real-time.
Around halfway (close to the mirror), a sword upgrade item is collected from a destroyed pillar. This is a visual glitch, it's actually a thunder power (to be used on the last boss). Visual glitches of this type can be seen in other places as well. In this area, there is a also a dodge to avoid a bullet hit, that costs ~0.2 seconds. It's of course possible to just take the hit if the health is high enough and hope for good patterns in level 5, so it's up to how much risk the time gain is worth.
Pay attention to the "big" enemy killed at 0:32. This particular enemy always drops a small heart, despite being of a type that normally drops big hearts. The only other area with enemies dropping small hearts is in the open area around the Armor item. Depending on the timing of your bullets, you might or might not collect the heart from the enemy at 0:58. This is essentially not possible to control in real-time. If the heart is not collected, the enemy killed at 1:01 needs to be killed as shown in the video to guarantee collecting the heart drop. If the heart at 0:58 is collected, it's recommended to toss a diagonal grenade to the left on the last two enemies to ensure another small heart isn't collected. Note that there are three small enemies (each dropping small hearts) in between. For consistency, it's recommended to take them out with a grenade as shown in the video and thereby leaving them out of the equation for the heart count.
Boss HP - 15. The boss can't be damaged by the Armor power-up.
Level 5
https://vimeo.com/470478443
This is a very random level with a few places that can deal damage without possibility to dodge. The very beginning is the first (and biggest) trouble-spot. It's essentially a coin-toss whether to get through the section without taking damage or not. For the last stretch when in flying mode, the best success rate has been achieved by aligning so that the right wing tip is just at the edge of the screen (as shown in the video). It's still more likely than not to take a hit (or hits) during the last section though, but seems to be better than the alternative flight paths.
Boss 1 HP - 10
Boss 2 HP - 20. Just like for the other bosses, there is a 3-frame window for the quick kill (see below). Since the menu is not possible to bring up during the fight, no other special weapon can be used in this fight (and if in Armor suit when triggering the fight, it will be lost during the cut-scene).


To the left is shown the first frame on which the boss quick kill is possible and to the right the second and third frame. Notice the position of the character's head and the green stuff.