Final Fantasy
From SDA Knowledge Base
Contents
Port-specific
NES
- The RNG (random number generator) is not really random. If you power cycle (save, turn the machine off, then back on), you can predict very specifically when you'll encounter monsters and what they'll be. A good example of this is finding Kyzoku. If you power cycle, load, and board the ship, the first battle will always be against Kyzoku. This is one of the best sources of GP at the beginning of the game (only the Peninsula of Power is better). Obviously, more involving uses can be employed. The number of steps until the next battle is constant.
- The spell Heal 2 (HEL2) is bugged in battle and restores far more HP than it should. It actually gives as much as Heal 3 (HEL3) does, which means more HP for a lesser charge. Heal 2 is a level 5 spell while Heal 3 is a level 7 spell.
- When taking a critical hit, the target's ABSORB is not factored into damage. As a result, the full damage potential is taken immediately after randomness is factored in.
PS (Final Fantasy: Origins)
- The game has two difficulties you can choose from: Normal and Easy. Easy greatly reduces difficulty, most noticeably by needing less experience to level up and by capping spell charges at 99 instead of 9.
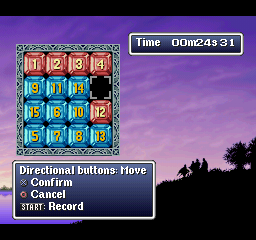
- The ship mini-game, 15 tile puzzle, can be used to get loads of Gil in a very short amount of time. Every time you break the #1 record, you get 10,000 gil, a potion, an antidote, and a gold needle.
- All four fiends (plot and final dungeon) and Chaos have double HP.
- Several bug fixes from the original, including elemental attributes on weapons, the spell "Steel," and (unfortunately) running away from battles.
- It is possible to single-segment (SS) the game and never encounter one random battle. However, because of the quirkiness of the RNG, it's only plausible in a TAS currently. However, with the addition of memosave, you can achieve similar results by pressing R2, saving, then continuing until the next memosave with no battle, or soft resetting (L1+L2+R1+R2+start+select), and load the memo file. The memo file will last until the system is turned off or reset.
- Unlike its NES predecessor, Origins' formations chosen for battle is entirely random. More research is being conducted to determine the battle, so stay tuned.
GBA (Final Fantasy: Dawn of Souls)
- Dawn of Souls is the easy version that came with Origins. You gain experience more quickly. In addition, bosses have altered HP, such as Garland's double HP. It doesn't follow any formula, so consult a bestiary guide.
- Instead of memosave you can save anywhere you wish, which also allows you to skip all random battles entirely like Origins does.
- The old "charge" MP system was replaced with a "normal" one. This allows for much freer reign on spell casting and generally makes the Mage classes really powerful. To further assist with this, the intelligence stat actually works now and all magic damage is boosted with higher intelligence.
- The game also adds four "Soul of Chaos" dungeons, each accessible after you defeat the respective element's fiend. Each dungeon holds bosses from FF3-6 who drop much more powerful equipment.
PSP (Final Fantasy: 20th Anniversary Edition)
- This game is Origins + Dawn of Souls + one new dungeon. Like Dawn of Souls, it is the easy version of Origins, following the same experience tables Dawn of Souls and Origins' easy mode used. However, battles flow slightly slower than the other two enhanced ports.
- Equipment glitch - There's two bugs at work here:
- The first allows you to equip gear you have onto members that cannot normally wear them. There are two caveats to this. First, you must have someone in your party that can wear whatever you want to put on to another character. And second, the character you want to glitch an item on to must be next to the starting character in your formation. Example, you want to put an Excalibur on a White Wizard. Go to a Knight's equipment screen, remove the Excalibur on him if he has it, and cycle left/right to get to your White Wizard. Move the cursor to the weapon slot of both characters. Now, on the Knight, you must hit confirm (X by default) and L/R (whichever direction the White Wizard is in) at the same time. If timed correctly, you should have the Excalibur pulled up to equip on the White Wizard.
- The second part of this glitch allows equipment to transform. To do this, you would set up exactly the same way as you would want to transfer a weapon/armor to another character, except you start on a weapon/armor slot and the next character is on the opposite slot (armor/weapon). One example is the Longsword that can be dropped by Garland. Start on a weapon slot for a Fighter, and swap to a character's armor slot (any of the 4 will do), and it transforms into a Ruby Armlet. The best part about this aspect of the glitch is that the original item is never used up, so you could transform 1 weapon into 16 of the same armor. For a video demonstration of this glitch, watch Sir VG's explanation. In a speedrun setting, these are the noteworthy items to consider:
- Hammer<-->Knight's Armor
- Judgment Staff<-->Leather Cap
- Mythril Hammer<-->Thief's Armlet
- Barbarian's Sword<-->Steel Gloves
- Mythril Axe<-->Black Garb
- Light Axe<-->Survival Vest
- For a full list of items utilized by the glitch, consult this FAQ.
- 15-tile Puzzle returns, but this time there's items to be had instead of gil. Each of the three placing ranks has a pool of items as rewards, plus a generic pool for finishing the puzzle. First place nets high-end items, such as Megalixirs and X-Potions. Our attention turns to the 2nd and 3rd place pools. Second place is notable for 2 items, the Emergency Exit and the Hermes's Shoes. Emergency Exit will let you escape a dungeon very quickly when you normally should not (or would not) have Exit or Warp. Notably, the Earth Cave, Waterfall, and Ice Cave. Hermes's Shoes will cast Haste on a target, which can also be handy if you should not have the spell. The third place pool has fangs, tier-2 elemental spells which would be served most notably for a non-equipment glitch run. These are the currently known items for each pool:
- 1st place (30 seconds): Megalixir, X-Potion
- 2nd place (60 seconds): Dry Ether, Elixir, Remedy, Hermes's Shoes, Emergency Exit, Turbo Ether
- 3rd place (120 seconds): Spider's Silk, White Fang, White Curtain, Red Fang, Red Curtain, Blue Fang, Blue Curtain, Vampire's Fang, Cockatrice's Claw
- 8Just finishing: 100 gil, Potion, Antidote, Gold Needle, Ether, Phoenix Down, Eye Drops, Echo Grass
General strategies
- Haste greatly increases accuracy in battle. The hit rate is increased, which raises hit count (see below point on accuracy). This leads to fewer misses. Obviously, this is best used against bosses or powerful enemies.
- Steel and Saber (TMPR and SABR in the NES version respectively, but they don't work) increase attack power in battles. These are also useful against bosses or powerful enemies.
- All buffs stack with themselves. For example, casting Blink three times will max out evade. This applies to all buffing spells except Haste, which does not stack at all.
- For every 32 points of accuracy, you gain one more hit. This greatly helps the physical damage output.
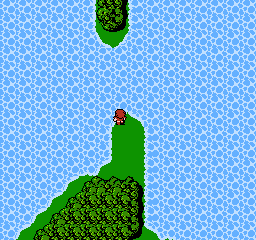
- The Peninsula of Power is the greatest source of money and experience at the beginning of the game and for a long time in. It is located northeast of Pravoka/Pravoca. To get there, go east at Pravoca until you reach a north/south fork. From there, head north until you reach the peninsula. Stay on the tip of the peninsula and the monsters from the northern continent will fight you. This is accessible the instant you get the bridge built. To quickly kill some monsters there, bring mages with FIR2/Fira and HRM2/Diara to dispose of the threats.
- Damage tiles (ice, lava, etc) do not increment the battle counter. More steps can be taken before the next battle.

