Diablo III
From SDA Knowledge Base
Basics
Skipping dialogue
There are two ways to skip dialogue. Skipping dialogue that shows up as text along with a portrait is done by pressing Esc. Skipping dialogue that has no text/portrait pop-up is done by mashing space. It's important to know what method to use for which dialogue since it will speed up some parts greatly, like the transformation of Haedrig's wife. Skipping dialogue with space will also let NPC:s perform their next action faster and some followers will even teleport to your location if you're far ahead, such as Leah teleporting to Adria's Hut to open the cellar entrance or Eirena summoning the Black Canyon Bridge quicker.
Moving during a cutscene
If you use a movement skill right before an in-game cutscene triggers, the full animation of the skill will play out and so you can move a bit further. Examples of skills are Smoke Screen and Leap.
Random areas VIP
Pretty much all of the areas in the game are random in some way, but not when it comes to the layout.
Most of the outdoor areas such as Fields of Misery and Dahlgur Oasis have the same border layout every time they spawn.
Most of the dungeons have their layout built up by blocks in a random way. While the blocks are unique for each dungeon and always have the same internal layout, it's for the most part impossible to find any helpful pattern that would be a guaranteed way to the exit of the dungeon. However, some blocks are dead ends or can't possibly lead to the exit, and some have a higher probability of getting you there, so there is still some information to take into account when exploring dungeons and finding out the blocks as you go.
A few areas will also have a set of predetermined layouts where a random one will be used each time the area is spawned, so memorizing these is a good idea.
Shrines
Equipment
Act I
Cathedral Level 1
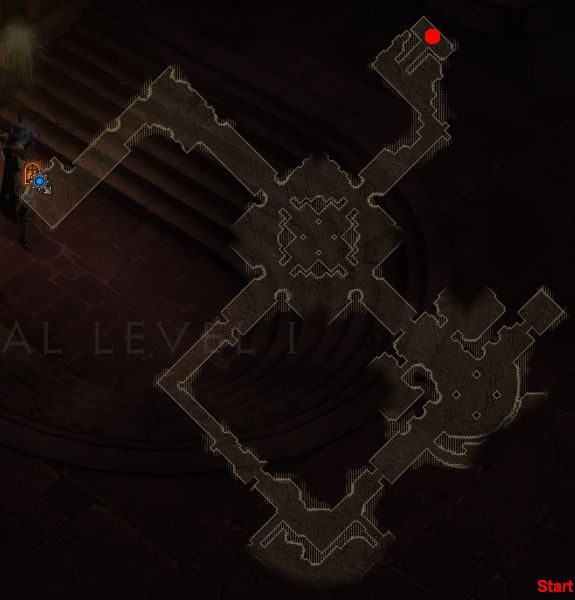
This is the first random area you'll encounter in the act. It's a mid-sized dungeon and the exit will be in one of the corners. It's possible to cancel out the falling animation at the beginning by somehow activating a skill while entering the dungeon. Image shows probably the best spawn you can get.
Leoric's Passage
Moving down the stairs will spawn three skeletons and killing these will spawn the remaining ones. With a movement skill you can get down the stairs during the cutscene, but be careful not to kill the skeletons attacking Deckard Cain while doing so since that will softlock the game. Talking to Deckard Cain and then town portal out is faster than following him out to the waypoint.
Cemetery of the Forsaken
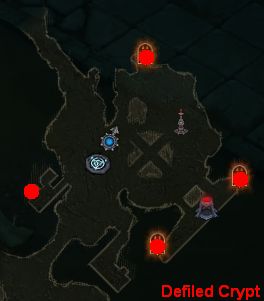
This is the most annoying area in the game when it comes to speedrunning, but thankfully it's encountered quite early on. Three Defiled Crypts will spawn at four possible locations, but only one of them is the true crypt. Check the north-western crypt first if it has spawned, and town portal out if you encounter any event.
The second level of the Defiled Crypt is often located to the southwest. There, it's possible to break down the door that leads to Chancellor's Tomb manually instead of waiting for Manglemaw to do it. When you've picked up the crown and talked to Haedrig, you don't need to wait for him to be done with his work and then talk to Deckard Cain - you can directly go to the Cathedral Garden waypoint and enter Leoric's Passage.
Cathedral Level 2
A small and linear dungeon floor that shouldn't cause any trouble. If the path splits up then just do a quick check to see if the exit is that way, since a pulsating circle on the map will show if it is, otherwise continue on. You don't need to kill the Dark Cultists on the third level, just move on and open the chest.
Cathedral Level 4
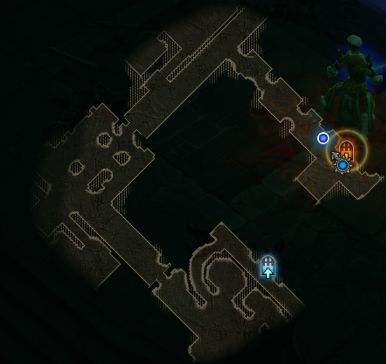
This level is a nightmare as it has the possibility of being the largest fully random area in the act. Be sure to learn the different block patterns here. Image shows probably the best spawn you can get.
Fields of Misery
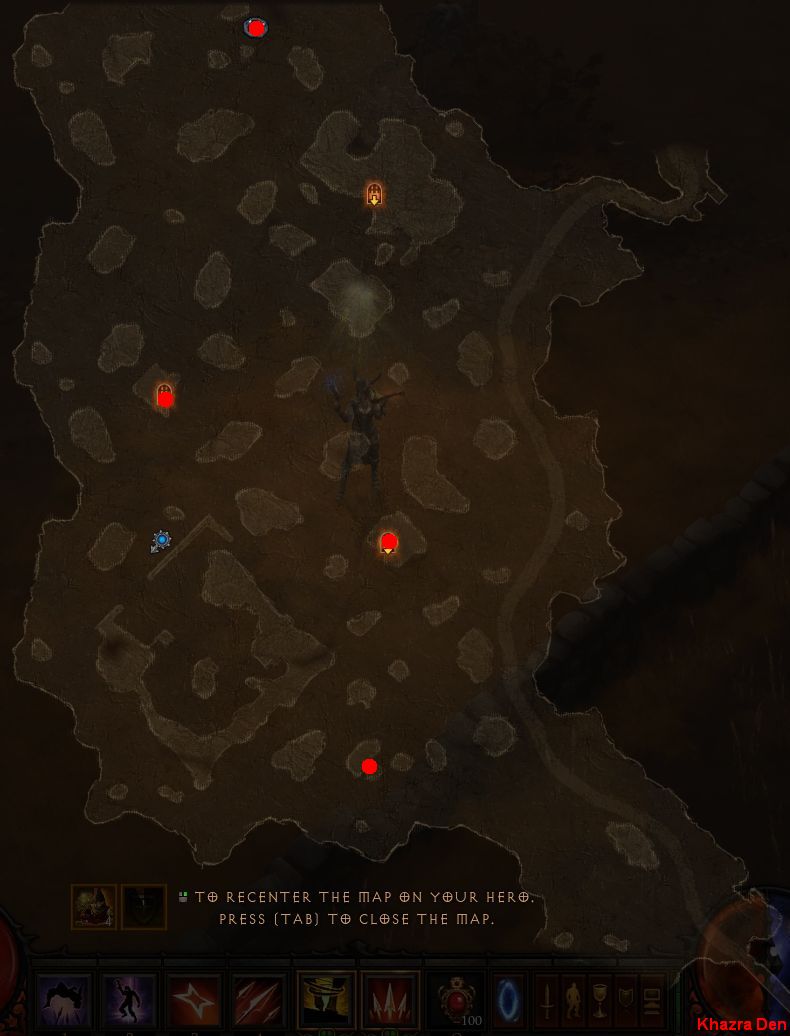
Learn the spawns and check them in a vertical manner. Knowing them by heart is very important or you will lose many seconds fumbling around. The Kazra Den battle is time based.
The Festering Woods
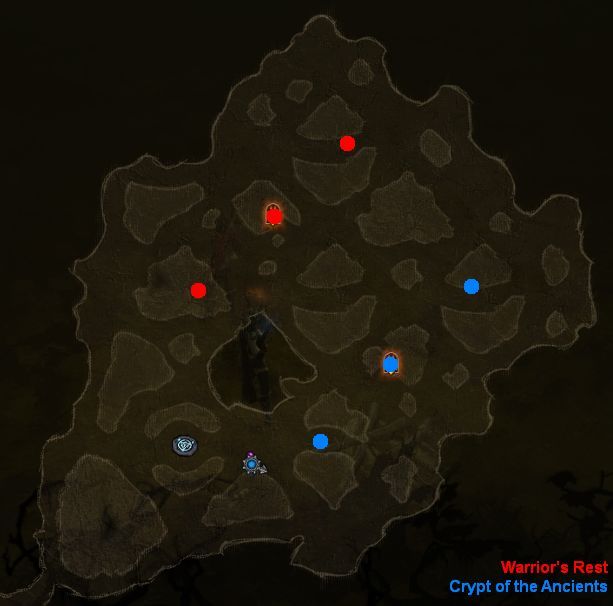
Check the Crypt of the Ancients spawns first. When finished with the quest, town portal out and waypoint to Drowned Temple. When clicking on a Pedestal to place the beacons, you can cancel out the animation by using a movement skill such as Vault. The Drowned Temple fight is time based.
Caverns of Araneae
This is a large semi-random area. The path moving forward from the starting area is either to the southwest or northeast. This next area is built up by four different blocks, two leading south and two leading north, but only one will get you to the exit. You will notice since there will be no dead end in the right one. Following this path, the exit will always be to the right.
Southern Highlands
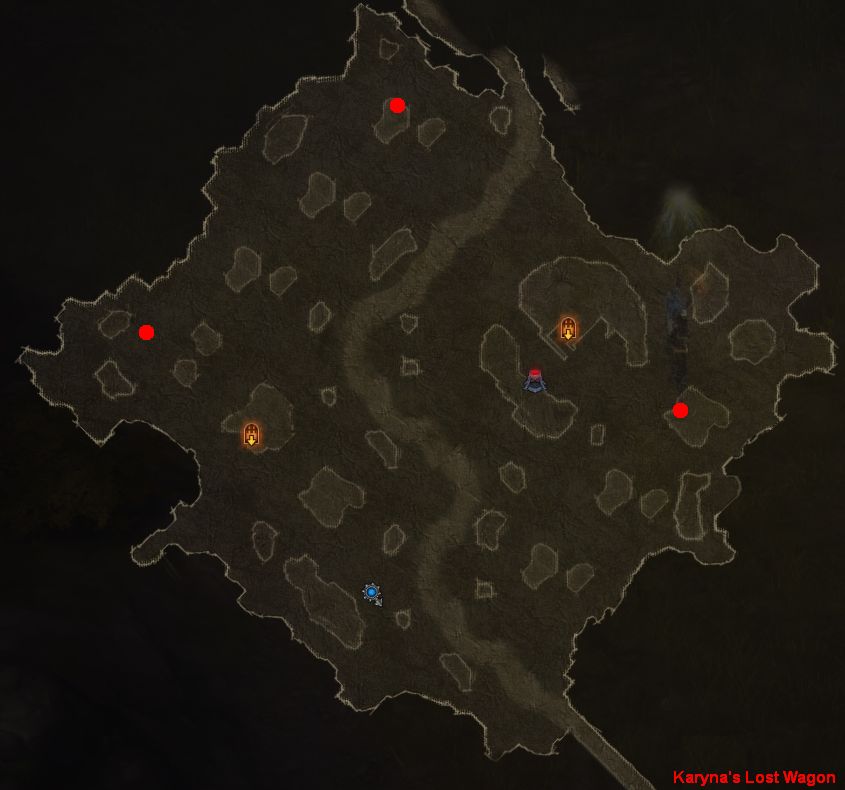
Karyna's Lost Wagon will be in one of three different spots. Start by checking the southeast spawn and then go straight north to check the other two. The pulsating circle will be displayed on the map from far away so finding the Khazra Staff is not that difficult.
Halls of Agony
Level 1 is a fully random dungeon but the exit will always be past the mechanical butcher knives. The exit in level 2 will always be to the southeast, usually in one of two paths, the other leading to the waypoint.
The Cursed Hold
There are two blocks here with prisoners that you need to free, one to the south and one to the north. The block layouts are randomized from a set of four different layouts. The prisoner spawns are completely random, it's possible to have at least four out of six spawns in one of the blocks. If you're lucky, prisoners will spawn in the starting area as well.
Act II
Howling Plateau
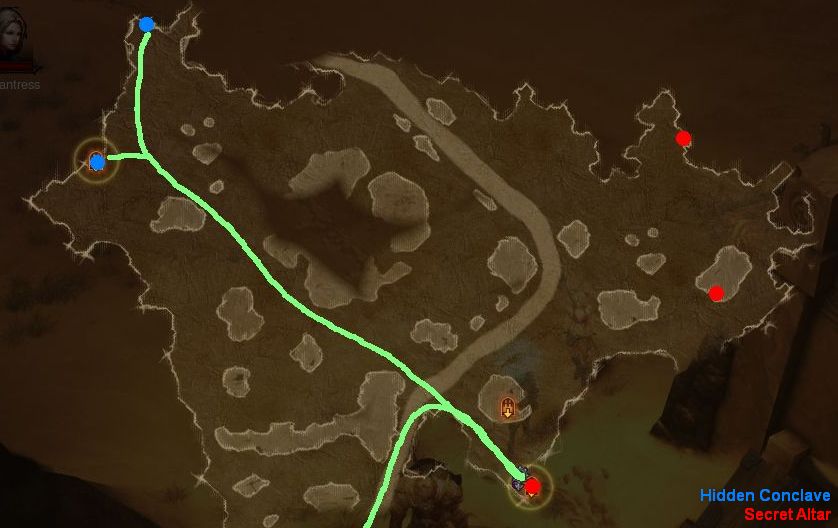
Start by checking the Secret Altar spawns then head north to the Hidden Conclave. It's enough to just kill one of the enemies inside to disrupt the rituals.
Maghda
It's not possible to kill her in less than four shots, since she has to shield up and release her minions three times. Be sure to not have any crowd control effects here like fear or freeze as that will prevent her from shielding up.
Sewers of Caldeum
The first of many random sewage areas, but the others tend to be more linear. When you've talked to Adria, town porting out is faster than waiting for her portal.
Dahlgur Oasis
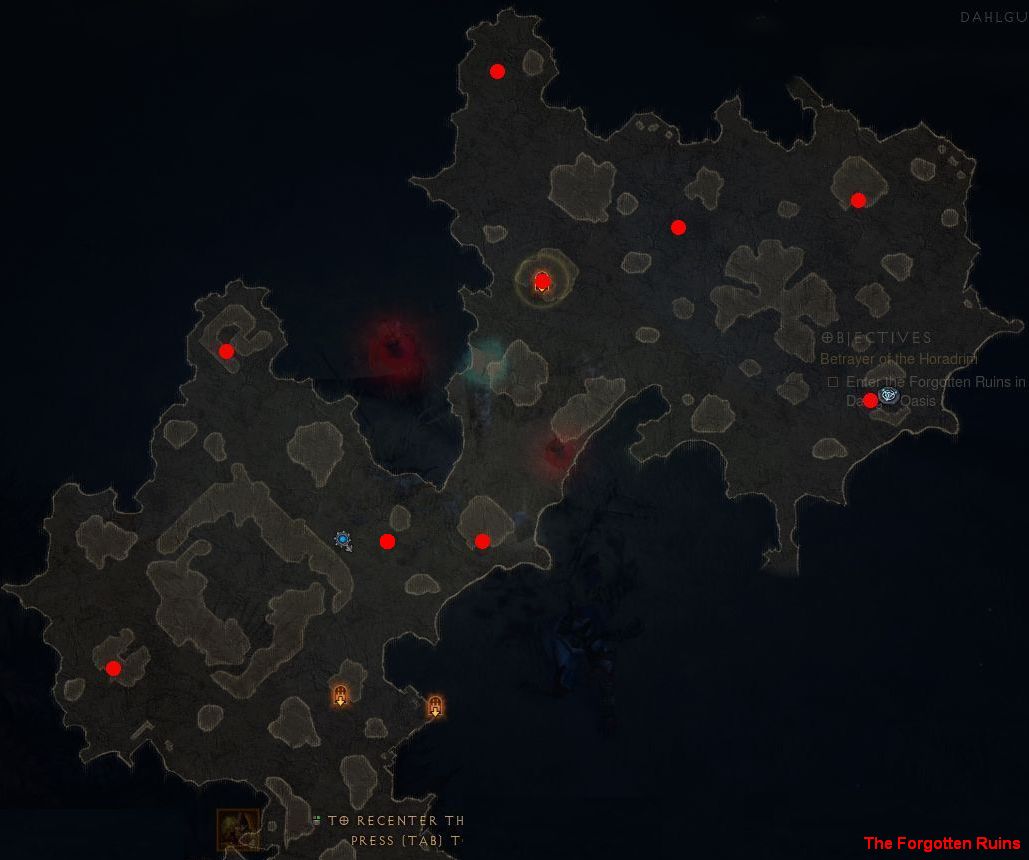
A large outdoor area where The Forgotten Ruins can spawn in many different spots. Learn them and start searching the southwest spot and keep moving clockwise. If you find the dungeon early on, it's beneficial to town portal out when you've found Kulle's head and go to the Dahlgur Oasis waypoint; if you're really lucky, the waypoint will spawn at the northeast spot. The dungeon itself is random but the layout blocks are pretty easy to figure out once you've played a bit, and the head will always be in one of three corners.
Desolate Sands
Similar in size to Dahlgur Oasis, but you need to find two dungeons. Start by checking the three western most spots and then continue counter-clockwise. If you find both dungeons early on it's beneficial to town portal out and go to the Desolate Sands waypoint in the same manner as in Dahlgur Oasis.
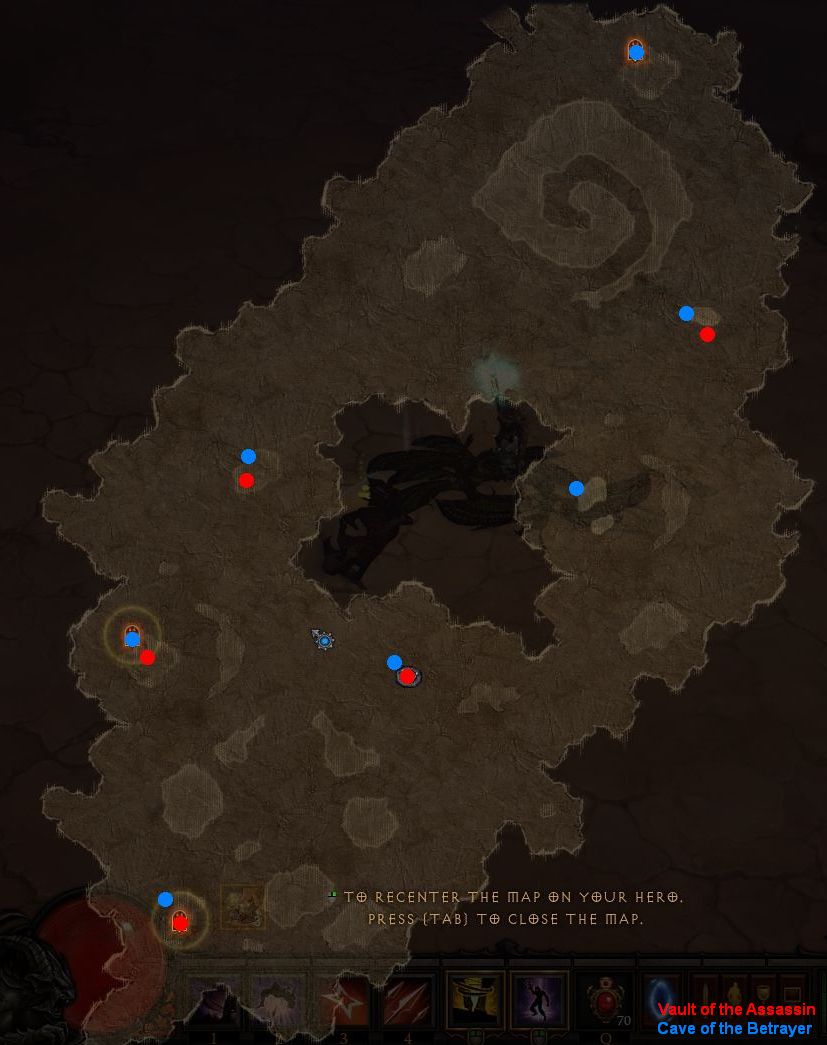
Vault of the Assassin
While Cave of the Betrayer is a pretty random dungeon, Vault of the Assassin can only spawn as one of x different layouts. The actual blood spawn however can spawn in any of the three corners of the dungeon.
The Terminus
The first two dungeons located inside The Terminus (The Storm Halls and The Unknown Depths) are not that difficult to figure out since the same specific corridor that is located at the beginning of the dungeons is also located at the exit of the dungeons. The third dungeon (Realm of Shadow) however can contain multiple four way paths that lead to dead ends, so if you're unlucky you can lose a lot of time in this dungeon.
Act III
Stonefort
The Waiting for Reinforcements event is time based. During the Raising Recruits quest when you need to help raise three catapults, you only need to cover the first catapult for a short while and then you can skip the second catapult and immediately start raising the third one, since that one takes the longest time.
The Keep Depths
On the first level the exit is already visible on the map, because the exit is always as far away as possible to the west. The level 2 exit is also always to the west and the third level is semi-random with the exit to the north.
The Bridge of Korsikk
While this is part of the overworld, it's a semi-random/random area that can be quite long if unlucky.
Fields of Slaughter
The trebuchet is always at the same spot and can actually be shot without entering through the gate with certain skills. The ballistaes are randomly spawned throughout the area.
Arreat Crater
Both levels are semi-random.
Tower of the Damned
Level 1 has a static map layout. Level 2 is semi-random.
