Difference between revisions of "Amarectv configuration"
From SDA Knowledge Base
HonorableJay (Talk | contribs) (Created page with "=Installation= This line will be updated with a page link to obtain AmarecTv. Unlike most Windows applications, AmarecTv does not need to be installed to function. Simply ext...") |
HonorableJay (Talk | contribs) |
||
| Line 1: | Line 1: | ||
=Installation= | =Installation= | ||
| − | + | The official English support page with download links can be found [http://www.amarectv.com/english/amarectv_e.htm here.] | |
| − | + | ||
Unlike most Windows applications, AmarecTv does not need to be installed to function. Simply extract the contents of the zip file into any folder and it's all set to run. There are a few recommendations that can make using the program easier. | Unlike most Windows applications, AmarecTv does not need to be installed to function. Simply extract the contents of the zip file into any folder and it's all set to run. There are a few recommendations that can make using the program easier. | ||
* Avoid 'Program Files' - Due to the way Windows handles applications installed to the 'Program Files' and 'Program Files (x86)' directories it's best to install outside of them. The easiest place to use would be the root of a hard drive (c:\amarec or d:\amarec are two commonly used places). | * Avoid 'Program Files' - Due to the way Windows handles applications installed to the 'Program Files' and 'Program Files (x86)' directories it's best to install outside of them. The easiest place to use would be the root of a hard drive (c:\amarec or d:\amarec are two commonly used places). | ||
| Line 8: | Line 7: | ||
=Basic Setup= | =Basic Setup= | ||
| − | |||
==General Tab== | ==General Tab== | ||
| − | [[File:Amarec_general.jpg|x350px]] | + | [[File:Amarec_general.jpg|x350px]] |
| + | # This section let's the user choose which folder to save recorded footage in, and also what the default name for the file should be. The folder chosen has to exist before AmarecTv can record to it, so make sure you create it before trying to save your changes here. For the file name, it is always followed by the date it was recorded. So if you choose the default file name (amarec), the resulting file will look similar to amarec(20130409-0007).avi | ||
| + | # General settings can be turned on or off (like whether or not the program emits sounds upon events like starting/stopping a recording) along with changing the program's display language. | ||
| + | # How the mouse interacts with the program can be setup here. | ||
==Graph 1(Device)== | ==Graph 1(Device)== | ||
[[File:Amarec_device.jpg|x350px]] | [[File:Amarec_device.jpg|x350px]] | ||
| − | + | # Here the user chooses the video device to grab footage from. This list not only lists all hardware capture devices, but also all software capture devices (like SCFH <link needed>). After choosing the appropriate capture device, if the device supports it, the option to choose between different capture pins (composite, s-video, component, etc) will be available. The "Use Clock" option is not fully understood at the moment, so it is recommended to leave it checked. To change advanced settings of the selected device, the "Device Setting" and "Input Setting" buttons can be used. The Audio input listbox can be left blank for most devices since it is handled by the audio section below. | |
| + | # This section allows the user to choose the desired capture resolution and framerate. For most users, this section will be the hardest to understand. (**Editor's Note*** Need a few links to advanced term glossary for video standards) To simplify things, here are a few basic rules to follow: | ||
| + | ## AmarecTv lists the options in this format: frame width, frame height, framerate, colorspace, color bit depth | ||
| + | ## Composite and S-Video send an interlaced video signal, which will be seen as 29.97fps (NTSC) or 25.00fps (PAL/Secam). | ||
| + | ## Component/HDMI can send a progressive video signal, which will be seen as 59.97fps (NTSC) or 50fps (PAL/Secam). | ||
| + | ## Component CAN send an interlaced signal if the system supports it. The Nintendo Wii, Nintendo Gamecube, and Playstation 2 are good examples. (**Editor's Note*** double-check this for accuracy) | ||
| + | ## YUY2 is the preferred colorspace to use for recording. If your capture device lists RGB as the colorspace, then that is preferred over YUY2. Every other colorspace that your device may support has a high chance of introducing artifacts into the captured footage (and artifacts are always bad). | ||
| + | ## Using anything less than a 16bit color depth will render the footage unusable. | ||
| + | # Here the user can choose which audio device to capture from. For most capture devices, the audio pin will have the same name as the video pin. However, this isn't always the case as some audio devices require workarounds to properly capture audio (Dazzle DVC100 is one known device). Therefore, it's up to the user to known what device will be capturing the audio. The "Audio Device" button will bring up the audio device's crossbar to configure advanced device settings (crossbar only comes up IF the device registers it properly, and not all devices do). The "Control Panel" button will bring up the Windows Recording Mixer to change advanced recording options for the OS. | ||
| + | # This area will list the supported audio capture formats of the chosen audio device. The format is listed as: audio sample rate, bit depth, number of channels. | ||
| + | ## A sample rate of 48000 or 44100 are the best options. Only change between the two if the recorded footage has progressive audio desync (***Note*** need a link) | ||
| + | ## A bit depth of 16 is the lowest acceptable for good quality footage. If your device supports a higher bit depth it can be used, but encoding programs might not support it. | ||
| + | ## Stereo (2 channel) audio is the default for nearly every capture card. Some can support multi-channel recording, but only on extremely expensive devices (which might not be supported by AmarecTv). Even if your device only outputs mono sound (Nintendo NES) always choose stereo to record since the final encode can be down-mixed to mono. | ||
==Graph 2(Preview)== | ==Graph 2(Preview)== | ||
[[File:Amarec_preview.jpg|x350px]] | [[File:Amarec_preview.jpg|x350px]] | ||
Revision as of 22:36, 28 May 2013
Contents
Installation
The official English support page with download links can be found here. Unlike most Windows applications, AmarecTv does not need to be installed to function. Simply extract the contents of the zip file into any folder and it's all set to run. There are a few recommendations that can make using the program easier.
- Avoid 'Program Files' - Due to the way Windows handles applications installed to the 'Program Files' and 'Program Files (x86)' directories it's best to install outside of them. The easiest place to use would be the root of a hard drive (c:\amarec or d:\amarec are two commonly used places).
- Run As Admin - For Vista/Win7/Win8, make sure to run AmarecTv with Administrator rights to avoid random crashes. Right click on amarec.exe, then click properties on the context menu. When the next window appears, click on the compatibility tab. Near the bottom you'll see a checkbox option to run as administrator. Click the checkbox to enable it, then click OK to save the changes.
- Install/Record to secondary hard drive - Running AmarecTv and recording to a secondary hard drive that Windows is not installed to will help avoid the OS from interfering with the recording process (which can lead to dropped frames and AV desync).
Basic Setup
General Tab
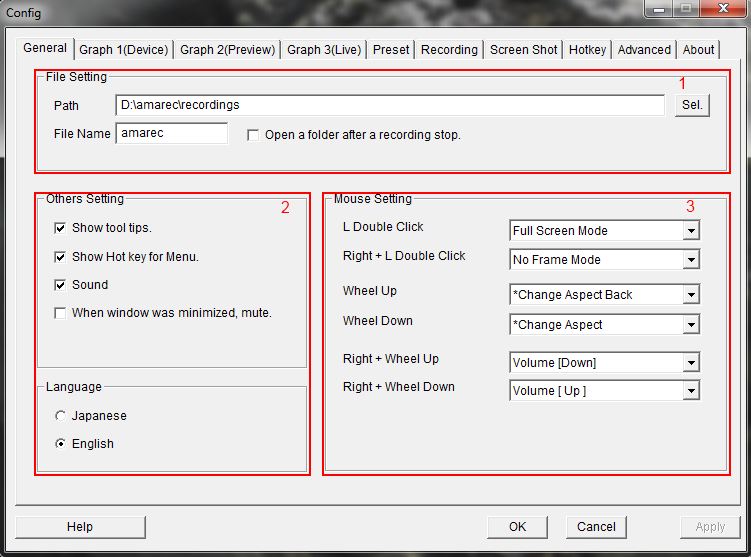
- This section let's the user choose which folder to save recorded footage in, and also what the default name for the file should be. The folder chosen has to exist before AmarecTv can record to it, so make sure you create it before trying to save your changes here. For the file name, it is always followed by the date it was recorded. So if you choose the default file name (amarec), the resulting file will look similar to amarec(20130409-0007).avi
- General settings can be turned on or off (like whether or not the program emits sounds upon events like starting/stopping a recording) along with changing the program's display language.
- How the mouse interacts with the program can be setup here.
Graph 1(Device)
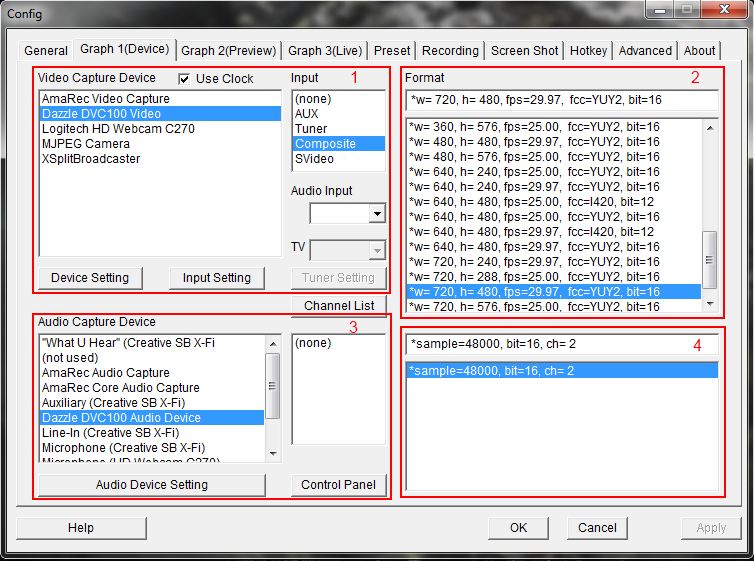
- Here the user chooses the video device to grab footage from. This list not only lists all hardware capture devices, but also all software capture devices (like SCFH <link needed>). After choosing the appropriate capture device, if the device supports it, the option to choose between different capture pins (composite, s-video, component, etc) will be available. The "Use Clock" option is not fully understood at the moment, so it is recommended to leave it checked. To change advanced settings of the selected device, the "Device Setting" and "Input Setting" buttons can be used. The Audio input listbox can be left blank for most devices since it is handled by the audio section below.
- This section allows the user to choose the desired capture resolution and framerate. For most users, this section will be the hardest to understand. (**Editor's Note*** Need a few links to advanced term glossary for video standards) To simplify things, here are a few basic rules to follow:
- AmarecTv lists the options in this format: frame width, frame height, framerate, colorspace, color bit depth
- Composite and S-Video send an interlaced video signal, which will be seen as 29.97fps (NTSC) or 25.00fps (PAL/Secam).
- Component/HDMI can send a progressive video signal, which will be seen as 59.97fps (NTSC) or 50fps (PAL/Secam).
- Component CAN send an interlaced signal if the system supports it. The Nintendo Wii, Nintendo Gamecube, and Playstation 2 are good examples. (**Editor's Note*** double-check this for accuracy)
- YUY2 is the preferred colorspace to use for recording. If your capture device lists RGB as the colorspace, then that is preferred over YUY2. Every other colorspace that your device may support has a high chance of introducing artifacts into the captured footage (and artifacts are always bad).
- Using anything less than a 16bit color depth will render the footage unusable.
- Here the user can choose which audio device to capture from. For most capture devices, the audio pin will have the same name as the video pin. However, this isn't always the case as some audio devices require workarounds to properly capture audio (Dazzle DVC100 is one known device). Therefore, it's up to the user to known what device will be capturing the audio. The "Audio Device" button will bring up the audio device's crossbar to configure advanced device settings (crossbar only comes up IF the device registers it properly, and not all devices do). The "Control Panel" button will bring up the Windows Recording Mixer to change advanced recording options for the OS.
- This area will list the supported audio capture formats of the chosen audio device. The format is listed as: audio sample rate, bit depth, number of channels.
- A sample rate of 48000 or 44100 are the best options. Only change between the two if the recorded footage has progressive audio desync (***Note*** need a link)
- A bit depth of 16 is the lowest acceptable for good quality footage. If your device supports a higher bit depth it can be used, but encoding programs might not support it.
- Stereo (2 channel) audio is the default for nearly every capture card. Some can support multi-channel recording, but only on extremely expensive devices (which might not be supported by AmarecTv). Even if your device only outputs mono sound (Nintendo NES) always choose stereo to record since the final encode can be down-mixed to mono.
