General advice
From SDA Knowledge Base
Contents
- 1 Introduction
- 1.1 Expected final results for self-encoded runs
- 1.2 Never use single-pass bitrate mode
- 1.3 VirtualDub: Blending is not the best option
- 1.4 Running VirtualDub(Mod) in low priority mode (Windows)
- 1.5 Finding frame numbers for the Trim command
- 1.6 d2v file path
- 1.7 Keep your source files
- 1.8 Never convert to YV12 colorspace before deinterlacing
- 1.9 Preview avisynth scripts in Media Player Classic
- 1.10 Save time with MvBob
- 1.11 Turn off the DivX logo
- 1.12 Check encoder settings used in mp4
- 1.13 Load H.264/AAC MP4 in VirtualDub(Mod)
Introduction
This page is for advice / tips / tricks related to everything in the knowledge base.
Expected final results for self-encoded runs
If you take a look at Nate's encoding work for SDA, you see that there are usually six different quality versions for each run (don't worry about Flash). While it is a fair amount of work, don't be intimidated; you'll probably only have to create two different AviSynth scripts: one to take care of LQ/MQ, and one for HQ/IQ. It's rare that you will need different scripts for LQ and MQ.
Editing your run will be the hardest part, but once you've got your scripts ready to go, you will see that compressing your run in MeGUI is quite easy. You can even encode the LQ/MQ XviD versions though MeGUI.
Expected final results, refer to the Glossary of terms:
- LQ - DivX/XviD/mp3 - F2/F3, D4. Video bitrate: 128 kbps, audio bitrate: 64 kbps.
- MQ - DivX/XviD/mp3 - F2/F3, D4. Video bitrate: 512 kbps, audio bitrate: 64 kbps.
- LQ - H.264/AAC - F2/F3, D4. Video bitrate: 128 kbps, audio bitrate: 64 kbps.
- MQ - H.264/AAC - Recommended F2, F1 for flickering video, D4. Video bitrate: 512 kbps, audio bitrate: 64 kbps.
- HQ - H.264/AAC - Highest achievable framerate/resolution. Video bitrate: 2048 kbps, audio bitrate: 128 kbps.
- IQ - H.264/AAC - Highest achievable framerate/resolution. Video bitrate: 5000 kbps, audio bitrate: 320 kbps.
Note: For those PC gamers recording their run at High Definition resolutions such as 1024x768 or higher, you may want to resize to 640x480 for HQ, since 2000 kbps will probably not be enough to keep the quality high.
Important: H.264 is no longer allowed inside the avi container. Use MeGUI for the mp4 container.
Never use single-pass bitrate mode
When encoding your run, never use single-pass bitrate mode. Two-pass bitrate mode is preferred because the first pass analyzes the video, seeing which parts need more bits to look good and which parts need less while still looking good. The second pass does the actual encoding. So you see, single-pass bitrate mode will produce sub-par quality because it encodes the video blindly.
Do not confuse single-pass bitrate with single-pass quantizer mode. While the former should never be used, the latter is a valid option and is sometimes used by folks at SDA. Don't worry about it though, the guides will always recommend that you use two-pass bitrate mode.
VirtualDub: Blending is not the best option
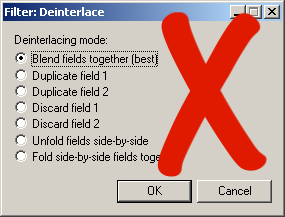
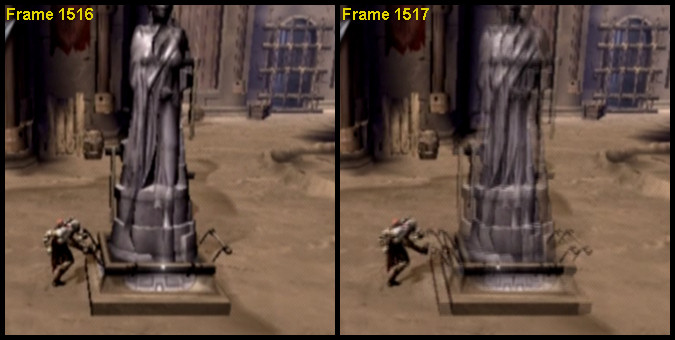
Never deinterlace your video by blending the fields together. Yes, it says "best" next to it, but that's a relative term. Blending takes each field in a frame, stretches them vertically and then applies one on top of the other at half opacity. The result is loss in vertical detail and ghosting. What is ghosting? Well think about it, field 1 happens at a certain point in time, field 2 happens a split second later. So when the fields are blended together, you can see two moments in time in the same frame. Ghosting is most obvious in scenes with lots of motion. Look at the following example where Kratos is kicking the statue to the right, the statue doesn't look too good, does it?
Running VirtualDub(Mod) in low priority mode (Windows)
One nice feature of MeGUI is that it runs by default in low priority mode. We can do the same with VirtualDub(Mod), but it must be done manually. Setting a task to low priority will allow you to run other things that run at normal priority without computer lag. Basically, you'll be able to browse the internet, play music, etc while encoding your run without any computer lag. Very convenient! There are two ways to accomplish this.
Method 1. The temporary way... With VirtualDub(Mod) running, press ctrl+alt+delete on your keyboard to bring up the Windows Task Manager. Go to the Processes tab and look for the program. Once you find it, right-click on it and set it to low priority.
Method 2. The better way... Create a shortcut to the program if one does not already exist. The following steps assume you don't have one.
- Navigate to the VirtualDub(Mod) folder, should be in "C:\Program Files\".
- Right-click on VirtualDub(Mod).exe and select the Create Shortcut option.
- Move the shortcut somewhere more convenient, the desktop is good.
- Right-click the shortcut and select properties.
- Click on the Shortcut tab.
- In the target box, type the following in:
C:\WINDOWS\system32\cmd.exe /c start "VirtualDubMod" /low "C:\Program Files\VirtualDubMod\VirtualDubMod.exe"
This example is for VirtualDubMod, remove the "Mod" for regular VirtualDub.
Finding frame numbers for the Trim command
VirtualDub(Mod) beats Avisynth in this aspect. To find the range of frames for your cut, open your avs file in VirtualDub(Mod) and look at the frame numbers at the bottom of the screen. Plug those into the Trim() command.
d2v file path
If you're working with DVD source material and have created your DGIndex project file (the d2v), you may get problems if you move your source files around. This is because the d2v file is using an absolute file path. There are two ways to solve this problem.
1. Open DGIndex, go to the Options menu and deselect Use Full Paths. Future d2v files will use relative paths.
2. Open the d2v file in Notepad or any text editor. The third line should have the path to the source file, change it to your liking.
Keep your source files
This rule should be followed especially by people new to encoding. Chances are you will mess up, not following SDA's strict standards and be asked to redo your encodes. Try as hard as possible to backup your source files somewhere, even if you've encoded your run properly and it's already up on SDA. Burning your data to DVD discs is a good idea. Use lossless compression if needed. At the very least, encode your run with a very high bitrate in Xvid/H.264, but beware that these codecs use the YV12 colorspace and could mess up your interlaced source material. The next section explains why.
Never convert to YV12 colorspace before deinterlacing
Compare the following two avisynth scripts in VirtualDub(Mod) to see why. No actual deinterlacing is done, but you can see how the color is messed up in the second script.
color1=Blankclip(pixel_type="yuy2",color=$800000).assumefieldbased()
color2=Blankclip(pixel_type="yuy2",color=$80FFFF).assumefieldbased()
interleave(color1,color2).weave
color1=Blankclip(pixel_type="yuy2",color=$800000).assumefieldbased()
color2=Blankclip(pixel_type="yuy2",color=$80FFFF).assumefieldbased()
interleave(color1,color2).weave
ConvertToYv12()
Wouldn't want to deinterlace that...
Preview avisynth scripts in Media Player Classic
When creating your avisynth script, it is possible to preview your work by playing the avs file directly in Media Player Classic, instead of encoding it first and then playing it. Of course, whether or not you can play it live without lag depends on how fast your computer is. Don't expect smooth playback if you're deinterlacing your video with mvbob. Though for the purpose of previewing you can try replacing mvbob with the faster leakkernelbob.
Save time with MvBob
MvBob is a very slow deinterlacer. When encoding the HQ and IQ versions, you typically do two-pass encodes for each. This means you'll be mvbob'ing your video four times! It only needs to be done once! You can save time by encoding a new mvbob'ed source file to lossless format (HuffYuV, Lagarith) and loading that into a new script.
Turn off the DivX logo
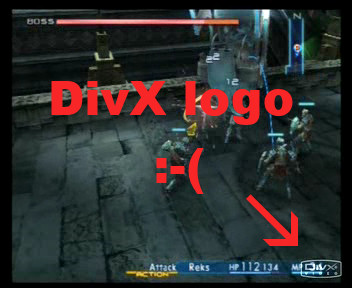
You may have noticed the DivX logo showing up in videos at the bottom right corner. This thing is ugly, and must be turned off! Navigate to where you installed DivX and look for the file named config.exe, it should be in the "C:\Program Files\DivX\DivX Codec\" directory. Run it. In the decoder tab, turn off the option "Support decoding for Generic Mpeg-4 video". In the toolbar tab, turn off the option "Show DivX logo watermark". Click ok.
(or hell.. just uninstall the damn thing. Xvid ftw!)
Check encoder settings used in mp4
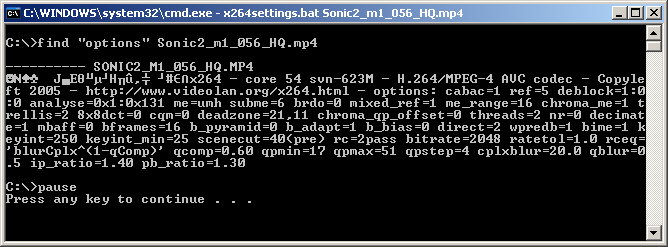
Here is a quick way to check the settings that were used in an H.264 file created by MeGUI/x264.
- Create a text file.
- Open it in Notepad or any other text editor.
- Paste the following code inside:
find "options" %1
pause
- Save and close.
- Rename the extension from txt to bat.
- Drag the mp4 onto the batch file.
- You should get something like this:
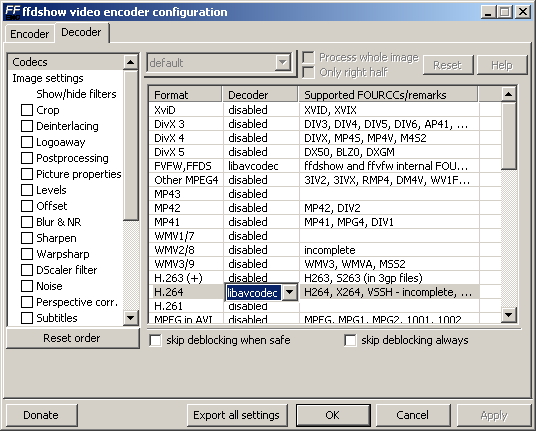
Load H.264/AAC MP4 in VirtualDub(Mod)
To import H.264/AAC video into VirtualDub(Mod) you'll need to install Avisynth and FFDShow. When installing FFDShow you can just use the default installation settings. Once installed, go to Start -> Programs -> FFDShow -> VFW configuration. In the decoder tab click on the codecs section; it's probably already selected. Look to the right for H.264 and set it from disabled to libavcodec.
