DVD
From SDA Knowledge Base
Contents
Overview
Recording with a DVD recorder will produce far superior quality than recording with a VCR, so it is well worth the investment. Also, being a digital format, it poses far less "traps" to deal with than VHS. When you record with a DVD recorder, be sure to use SP or better speed. See your DVD recorder's manual for more info about this. You will wreck the quality of your run if you record on a speed worse than SP. Before you even purchase a DVD recorder, make sure to think about recording medium. If you decide to mail your DVD(s) to me for processing, proceed to the submission guidelines for information about how to contact SDA. Otherwise, if you want to try to encode your run yourself, read here. However, there is one problem that needs to be taken care of whether or not you encode by yourself: lag.
Lag
When recording with a VCR, you hook your console's video out into the VCR, and you hook the VCR to your TV. The signal travels from the TV to the VCR, which records it, then sends it to the TV to be displayed. Because of the way the VCR writes the data on the tape, there is no lag. However, when a DVD recorder is hooked up in this fashion, it must digitize the data and, in our case, record it before outputting it. Unfortunately, no DVD recorder out on the market is able to do this instantaneously. Therefore, you will see and hear what was really happening about a half-second or so ago. Obviously, this can really mess with your ability to play the game well.
Reducing Lag
There are several ways to reduce lag and play normally.
1. Use a powered splitter. Basically, you plug in the video and audio from your console, and it sends it to two different places (your TV and your DVD recorder). This will completely eliminate lag, but costs about $45, and you won't be recording S-Video unless you use an S-Video cable to connect the console to the splitter AND the splitter to the DVD recorder.
2. Use an S-Video cable. This cable has four plugs-the three standard yellow, white, and red plugs and an S-Video plug. This lets you plug the S-Video plug and the two audio plugs (the white and red ones) into your DVD recorder and the composite video (yellow) plug into your TV. This eliminates video lag and lets you record S-Video, but you won't have audio on your TV unless you connect your DVD recorder and your TV with the white and red audio plugs. This will cause the audio on your TV to lag behind the video, which may or may not affect your playing ability. These cables are very inexpensive-they can be found for around $5.
Note: There are two kinds of S-Video cables--ones that connect your console to an S-Video in and ones that connect an S-Video out to an S-Video in. The former are usually inexpensive; the latter are quite spendy. Make sure you buy the correct kind.
3. Connect your console to a VCR, then use the RF out (a cable that sometimes has a screw on the end) of your VCR to connect it to your TV and the composite out (red, white, and yellow cables) to connect it to your DVD recorder. This won't cost anything, assuming you already own a VCR with composite in/out and RF out, but you will be recording composite video instead of S-Video.
Using Multiple Discs
It will be necessary for you to change discs mid-run if your single-segment run runs longer than 2 hours (a standard DVD holds only 2 hours of video at SP, the lowest allowable quality/speed). Simply pause the game, stop the recording, change discs, start recording again, then unpause the game and continue your run. Either you or nate can rejoin the run before the encoding phase. Be sure to record plenty of time at the pause screen on both discs (30 seconds should be sufficient) so that you don't accidentally miss recording part of your run, which is grounds for rejection.
Self Encoding
Turn on file extensions in Windows by going to Windows Explorer -> Tools -> Folder Options -> View, uncheck "Hide extensions for known filetypes".
Make sure to finalize the DVD before continuing with this guide. Finalizing is done on the DVD recorder itself. DVD-RAM and DVD+RW are the only exceptions.
You will need to install a large number of separate pieces of software to get your run off of the DVD and encode it to H.264 / DivX. All of this software only runs on Microsoft Windows, so you will need to have access to a computer running Windows to proceed.
DVD software installation
Download the latest version of DGMPGDec utilities by Donald Graft and extract the contents to "C:\Program Files\DGMPGDec". This folder contains the DGIndex.exe application and the important DGDecode.dll file. Leave this folder alone for the moment.
Extracting the DVD source files
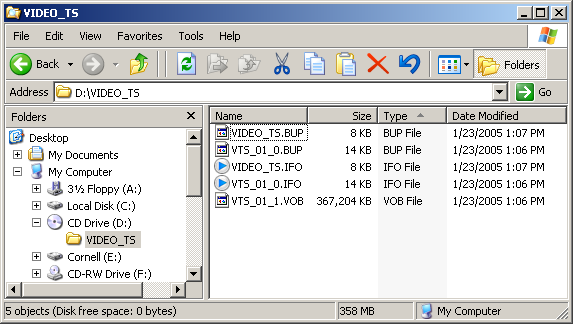
Begin by inserting the Finalized DVD into the DVD drive in your computer (if the DVD has not been Finalized in the DVD recorder, it probably won't work). Navigate to your DVD drive and select all of the .VOB or .VRO files from the VIDEO_TS folder on the DVD you inserted. Copy them to a folder where you will do your video processing.
Creating the project file (.d2v)
Open DGIndex.exe inside the DGMPGDec directory you unzipped during the software installation. Go to Audio -> Output Method and set it to demux all tracks. Now go to File -> Open, or just hit F2. Navigate to your video processing folder and select ALL (yes, ALL) of the .VOB (or .M2V, or .VRO) files. If you have more than one, use the "Add" button. For the files named something like "VTS_01_1.VOB" and "VTS_01_2.VOB," put them in order of number. If you have a file called "VIDEO_TS.VOB," put it before the others. Hit OK twice to proceed to the main screen. From here, simply go to File -> Save Project and save the file with a name you can remember.
Note: If you load up your file and get something like this, try unzipping this file and loading it into DGIndex with the rest of your vob/vro files. Move it to the top of the file list and click OK; you should see a menu-like screen and, if you move the slider at the bottom, your file.
Important: If the audio file has a name like "vob T01 2_0ch 192Kbps DELAY -84ms.ac3" MAKE SURE you do not remove the audio delay information. Even if the delay is 0, it's good to be consistent.
DGIndex will do the work of demuxing your run and, after a time, will finish and beep.
Extracting specific parts of a DVD disc
If you plan to send your DVD files to Nate over the Internet, you can save time, disk space and bandwidth by cutting out footage of failed attempts. A full disc is 4.3 GB, while your 10 minute segment may be only 700 MB.
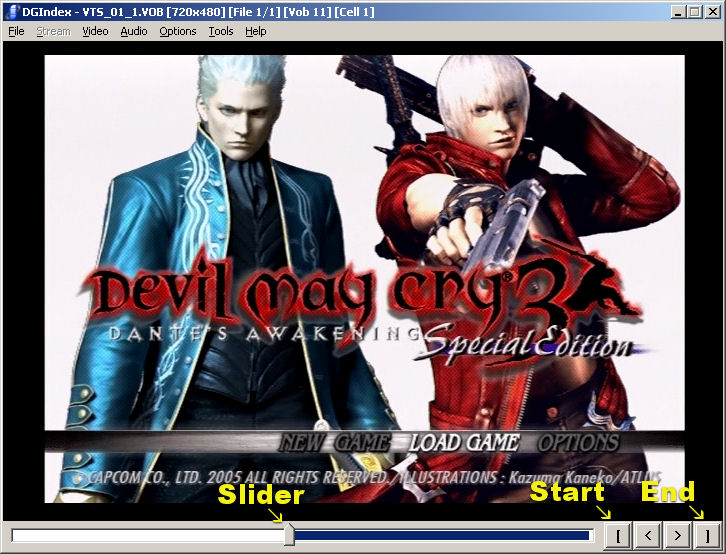
Open DGIndex, go to Audio -> Output Method and set it to demux all tracks. Load the vob files either from your hard drive or straight from the disc. Use the slider to move to the place where you want to make your starting cut and press the left bracket button. As you can see in the picture I've decided to start the cut at the menu screen, and have yet to specify an end point which I'm sure you can handle by yourself now.
Once you've done that, go to File -> Save Project and Demux Video. This will create an m2v file, an ac3 file and a d2v file. DO NOT CHANGE THE FILENAME OF THE AUDIO FILE! You can discard the d2v file. You would send the m2v and ac3 files to Nate if you don't want to encode it yourself. If you do want to encode it yourself, make sure to re-index the m2v file because the d2v file is still pointing to the vob files on your DVD drive. That means you'll have to load the m2v file into DGIndex and Save Project again.
You can now proceed to the AviSynth page.
Return to the front page.

