MeGUI
From SDA Knowledge Base
Contents
Introduction
Those who use VirtualDub will have to get used to the fact that Megui does not accept simple avi input. Avisynth scripting is required before continuing with this guide.
We will be using the H.264 video codec along with the AAC audio codec muxed inside an mp4 container. The video files must be Quicktime 7 compatible; please double-check your work before submitting to save yourself and SDA time and bandwidth.
Software and Installation
You may need to install the latest .NET Framework before installing Megui.
Download MeGUI 0.2.3.2189. Install the program and run it. You should get a message saying there are updates available. Click OK and let the program download everything it needs. To access the autoupdate feature, you can also go to Tools -> Update.
Later versions of MeGUI seem to be missing the MP4 muxer, and the adaptive muxer does not work. Do not download MeGUI from x264.nl.
You will probably get an error saying that Nero Digital Audio isn't available, so you'll have to download it separately. Download the zip file and extract the contents to "C:\Program Files\megui\tools\neroaacenc\". Important: There may be files that get extracted to a win32 folder, you need to copy those files back into the neroaacenc folder otherwise MeGUI won't be able to find neroaacenc.exe.
Importing the avisynth script
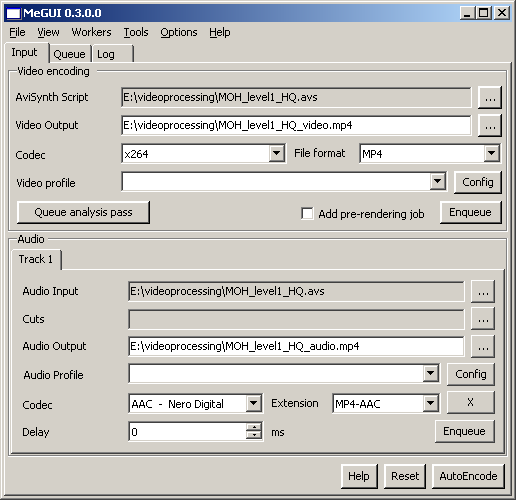
In the input tab, open the avisynth script in both video and audio boxes. You will notice that the output files have the same name... MAKE SURE THEY ARE DIFFERENT ...or you will probably end up losing your whole encode, and a whole lot of time.
Your input screen should look something like this:
Don't worry about the profiles.
Setting the video compression
Bitrate list:
- Low quality - 128 kbps
- Medium quality - 512 kbps
- High quality - 2048 kbps
- Insane quality - 5000 kbps
While still at the input screen , press the Config button for x264. I will briefly explain the settings.
Main
Mode - Automated 2-pass should be used. Look at the bitrate list above and choose the appropriate value for your encoding.
Tip: If your game is not graphically complex, you can save some time by using Constant Quantizer mode and staying under the SDA bitrates. Starcraft, for example, is typically done with Constant Quantizer and bitrates usually do not go beyond 1300, well under the 2048 limit for HQ. 17 should be used for videos with 320x240 resolution, 19 for 640x480 or higher resolution. Notice that these values correspond to the minimum quantizer values below.
Deblocking - It is recommended to leave the settings to 0/0. Use lower settings if video is too blurry, but you will risk seeing more blocks.
Number of threads - This depends on your computer. Leave it at 1 if your CPU is single-core, and 2 if it's dual-core.
AVC profiles - Since we want to be sure that the video is Quicktime 7 compatible, you should select the main profile.
Zones
Zones are used to make specific parts of your video have higher or lower quality than the rest of the video. This is rarely used.
RC and ME (Rate Control and Motion Estimation)
Rate Control - I recommend leaving these settings alone, although VBV Maximum Bitrate can be useful. It ensures that encodes using variable bitrate won't go above the maximum specified bitrate.
M.E. - These settings can make a large impact on the quality on your video, and it all depends on how much time you want to put into it. Chroma M.E. should be enabled. Range should be at least 8, I recommend 16. For the algorithm, go with either hexagon or multi hex. Do not use exhaustive, it takes way too long and has negligible results. Subpixel Refinement, go with at least #5.
Misc - Leave these on default.
Advanced
Minimum Quantizer (aka: quality can't go beyond this point...) - 17 should be used for videos with 320x240 resolution, 19 for 640x480 or higher resolution. If you are getting undersized files, this is the minimum quantizer in effect, assuming you did everything else correctly.
Trellis - Should be turned off when using Constant Quantizer mode. Otherwise it depends on you, though #2 is probably not worth the extra time.
Number of reference frames - This is how far the encoder will check for similarities between frames. A value of 5 is recommended, use higher for more quality.
Mixed - enabled.
CABAC - Should definitely be turned on. It is one of the main reasons that H.264 is a superior codec.
No Fast P-Skip - Helps to keep blocking low in scenes with gradients.
Macroblock options - All should be turned on except Adaptive DCT and I8x8.
Number of B-Frames - I recommend 3, since it is rare that you'll see more than that in a row.
Adaptive B-Frames - Should be turned on to let the encoder decide how many B-Frames to use in a row.
B-Pyramid - OFF. This will break Quicktime 7 compatibility if it is on.
RDO, Weighted, Bidirectional - More "give me more quality at lower encoding speed" settings.
B-Frame mode - Spatial tends to give better results than Temporal.
Setting the audio compression
Bitrate list:
- Low quality - 64 kbps
- Medium quality - 64 kbps
- High quality - 128 kbps
- Insane quality - 320 kbps
Tip: Use common sense when choosing the bitrate for the audio. If your dvd recorder uses 192 kbps AC3, then there's no need to go any higher, especially when considering that AAC is a newer, more advanced codec and can account for the lossy to lossy conversion.
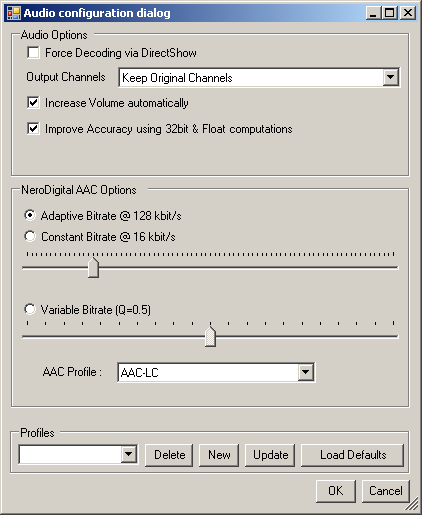
Go back to the input screen and look at the audio section. Choose ND AAC as the codec, choose MP4-AAC as the container, and then press the Config button. Use adaptive bitrate, and move the slider to select your bitrate. (Why they didn't just use an input box puzzles me.) For AAC Profile, use Low Complexity (AAC-LC).
Encoding the video and audio
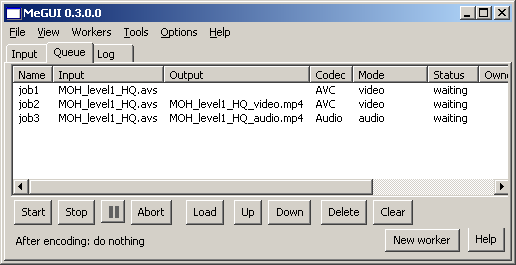
So you're back at the input screen, your configurations are all good to go. Now you just have to put those encoding jobs in the queue, so click the enqueue button for both video and audio and then click on the queue tab.
If it looks good, hit the start button.
Multiplexing the finished video and audio files
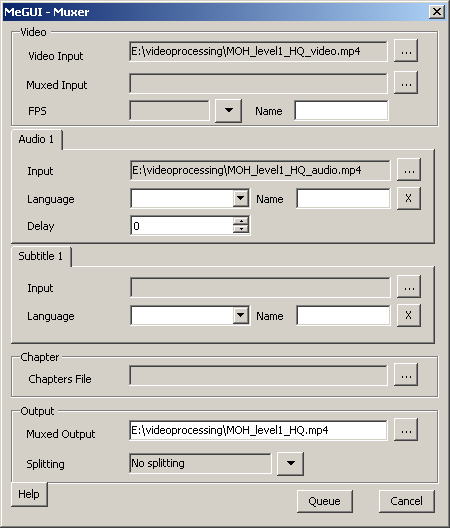
Simple enough, just go to Tools -> Muxer -> MP4 Muxer and add your video and audio files and set an output file name. Then press the queue button, go back to the queue tab and press start again.
And that's it! You should now have your final mp4 files ready for submission.
Saving your settings
You can save a lot of time by saving your settings for later. Go to the video configuration window and click "New," then type in a name corresponding to whatever quality you had your settings adjusted to. Do the same thing for audio and making videos in the future will be quick and painless.
Return to the front page.


