Difference between revisions of "Sonic the Hedgehog/Sonic"
From SDA Knowledge Base
m (→Marble 1) |
|||
| Line 29: | Line 29: | ||
*Make sure you grab the shield, otherwise it'll just get in your way later. | *Make sure you grab the shield, otherwise it'll just get in your way later. | ||
*Push against the wall on the moving platform until you're balancing inside it. From here, while the platform moves down and back up, gently tap right enough times to shift Sonic two pixels to the right. The pixel you're looking for is this one: | *Push against the wall on the moving platform until you're balancing inside it. From here, while the platform moves down and back up, gently tap right enough times to shift Sonic two pixels to the right. The pixel you're looking for is this one: | ||
| − | [[Image:M1-1.png]] | + | [[Image:M1-1.png]]<br /> |
Look particularly at Sonic's left foot - the vertical line that marks the left edge of the moving platform should basically bisect the flat part of Sonic's foot. This is kind of tricky at first, but experience will help. | Look particularly at Sonic's left foot - the vertical line that marks the left edge of the moving platform should basically bisect the flat part of Sonic's foot. This is kind of tricky at first, but experience will help. | ||
*As soon as you identify the pixel, stop pressing right. This is because the upcoming zip is subpixel-dependent: the subpixel range between 12 and 71 (out of 255) will let you go through the wall. So if you stop pressing right as soon as you identify this pixel, and your button presses are pretty short, then there's a good chance you'll fall in this range. The range 0-11 gets you stuck in the wall, though, from which you can only die. | *As soon as you identify the pixel, stop pressing right. This is because the upcoming zip is subpixel-dependent: the subpixel range between 12 and 71 (out of 255) will let you go through the wall. So if you stop pressing right as soon as you identify this pixel, and your button presses are pretty short, then there's a good chance you'll fall in this range. The range 0-11 gets you stuck in the wall, though, from which you can only die. | ||
*When Sonic reaches this height (with Sonic's left foot roughly a third of the way up the block in the left wall), hold left, and the very next frame, hold jump: | *When Sonic reaches this height (with Sonic's left foot roughly a third of the way up the block in the left wall), hold left, and the very next frame, hold jump: | ||
| − | [[Image:M1-2.png]] | + | [[Image:M1-2.png]]<br /> |
This should put you on the other side of the wall. Immediately kill both of the bats - if you don't, you won't reach the top of the spiked platform - and complete the stage.<br /> | This should put you on the other side of the wall. Immediately kill both of the bats - if you don't, you won't reach the top of the spiked platform - and complete the stage.<br /> | ||
Target time: 0:29 if everything goes right first try. Each additional attempt at the zip costs six seconds, and if you miss the spiked platform cycle, that's another three gone. | Target time: 0:29 if everything goes right first try. Each additional attempt at the zip costs six seconds, and if you miss the spiked platform cycle, that's another three gone. | ||
Revision as of 22:03, 6 July 2015
Contents
- 1 Forewords
- 2 Rules and Timing
- 3 Green Hill 1
- 4 Green Hill 2
- 5 Green Hill 3
- 6 Marble 1
- 7 Marble 2
- 8 Marble 3
- 9 Spring Yard 1
- 10 Spring Yard 2
- 11 Spring Yard 3
- 12 Labyrinth 1
- 13 Labyrinth 2
- 14 Labyrinth 3
- 15 Star Light 1
- 16 Star Light 2
- 17 Star Light 3
- 18 Scrap Brain 1
- 19 Scrap Brain 2
- 20 Scrap Brain 3
- 21 Final Zone
Forewords
The current fastest known time is 12:02 by mike89. Sonic 1 has a rich speedrunning history with lots of people contributing with strats, glitches and routes. What is presented here are not necessarily the fastest routes known, but rather what is typically thought of as reasonable in a single-segment speedrun.
If you are more interested in the fastest possible strats, for example for IL's, it's recommended to check out TeeNTee314's individual level runs.
Rules and Timing
This game uses the in-game timer as the method of timing the run. It starts in Green Hill 1 and ends during the fadeout after defeating Robotnik in Final Zone. In order to time the run this way, you can use a program such as ShitSplit made by setz, or LiveSplit by CryZe and wooferzfg1. In the instance of a death you simply add that time as you would a stage. If you respawn at a star post after dying or going to a special stage you add the delta between the death and the star post spawn time (i.e. you die at 1:00 and respawn at 0:50 by the star post, then add 10 seconds).
Since the timer is framebased, 50Hz is fine to use competitively. It is however also slower in real time and gives an unfair advantage, so 60Hz is preferred.
Green Hill 1
- The jump off the ramp after the tube is completely necessary: if you don't, the screen won't scroll down fast enough and you'll just die.
Target time: 0:25
Green Hill 2
- This stage starts off kinda tricky. The jump over the spikes needs to be short, but not too short: too high and you go back up to the platform above, and too low and you hit them instead.
- The roll through the wall is also really tight, you have just enough room to build up the speed to get through the wall in one go, but more importantly you need to hold back your jump until you've definitely seen the last piece break. If you try and do it by the timing of the five before you'll tend to jump early and not break the last block. However, you can't leave it too long because you also need to jump early enough to hit the ceiling!
- The jump after the bridge should be from about the right post, hold the jump button up to the maximum height and then let it go. A low bounce off the extra life goes straight into the invincibility above. Then piano the buttons to ensure you get a short jump off the moving platform up ahead (or the spikes, if you've been a bit slower through the stage).
Target time: 0:19
Green Hill 3
- The jump up to the spring is off a very slight incline. The kind of thing that makes all the difference in this game!
- Two ways of completing the rest of the stage: either roll through the speed shoes and play the bottom path as in the video above, or bounce off them and make a series of bounces across the top as in Naegleria's tutorial.
Target time: 0:32 on the high path, 0:35 on the low.
Marble 1
- Make sure you grab the shield, otherwise it'll just get in your way later.
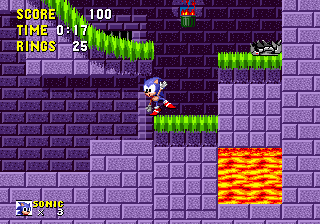
- Push against the wall on the moving platform until you're balancing inside it. From here, while the platform moves down and back up, gently tap right enough times to shift Sonic two pixels to the right. The pixel you're looking for is this one:

Look particularly at Sonic's left foot - the vertical line that marks the left edge of the moving platform should basically bisect the flat part of Sonic's foot. This is kind of tricky at first, but experience will help.
- As soon as you identify the pixel, stop pressing right. This is because the upcoming zip is subpixel-dependent: the subpixel range between 12 and 71 (out of 255) will let you go through the wall. So if you stop pressing right as soon as you identify this pixel, and your button presses are pretty short, then there's a good chance you'll fall in this range. The range 0-11 gets you stuck in the wall, though, from which you can only die.
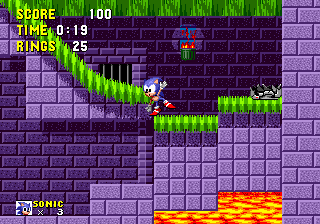
- When Sonic reaches this height (with Sonic's left foot roughly a third of the way up the block in the left wall), hold left, and the very next frame, hold jump:

This should put you on the other side of the wall. Immediately kill both of the bats - if you don't, you won't reach the top of the spiked platform - and complete the stage.
Target time: 0:29 if everything goes right first try. Each additional attempt at the zip costs six seconds, and if you miss the spiked platform cycle, that's another three gone.
Marble 2
Marble 3
Spring Yard 1
Spring Yard 2
Spring Yard 3
Labyrinth 1
Labyrinth 2
Labyrinth 3
Star Light 1
Star Light 2
Star Light 3
Scrap Brain 1
Scrap Brain 2
Scrap Brain 3
Final Zone
- Don't jump at the start of the stage, just hold right.
- When jumping for each hit, make sure you let go of any direction before hitting Robotnik.
If you do both of these things correctly, Robotnik should appear in the pistons in the following order: 4-3-2-4-2-1-4-3.
- For the third hit, make sure you stand to the left of piston 2 - this hit is a 2-3 pattern which is almost impossible to hit from the right side.