Difference between revisions of "Xvid / MP3 with MeGUI"
From SDA Knowledge Base
Ballofsnow (Talk | contribs) (Still need virtualdubmod to mux, unfortunately.) |
Ballofsnow (Talk | contribs) (→Importing the avisynth script: Output names aren't the same anymore, .avi / .mp3) |
||
| Line 17: | Line 17: | ||
==Importing the avisynth script== | ==Importing the avisynth script== | ||
| − | In the input tab, open the avisynth script in both video and audio boxes. MeGUI exports your video and audio as separate files; you later combine them | + | In the input tab, open the avisynth script in both video and audio boxes. MeGUI exports your video and audio as separate files; you later combine them. |
Your input screen should look something like this: | Your input screen should look something like this: | ||
| Line 24: | Line 24: | ||
<br> | <br> | ||
| + | |||
==Setting the video compression== | ==Setting the video compression== | ||
Revision as of 07:47, 9 November 2006
Contents
Introduction
Those who use VirtualDub(Mod) will have to get used to the fact that MeGUI does not accept simple avi input. Avisynth scripting is required before continuing with this guide.
Why use Xvid and not DivX? For one, the quality of this codec is superior, and second it's free! Since DivX is not free, it is not available in MeGUI.
Software and Installation
You may need to install Microsoft .NET framework 2.0 in order for MeGUI to run.
Download MeGUI. Install the program and run it. You should get a message saying there are updates available. Click OK and let the program download everything it needs. You can also go to Tools -> Update to access the autoupdate feature.
At the moment, the avi muxers in MeGUI do not work. Use VirtualDubMod for now.
Importing the avisynth script
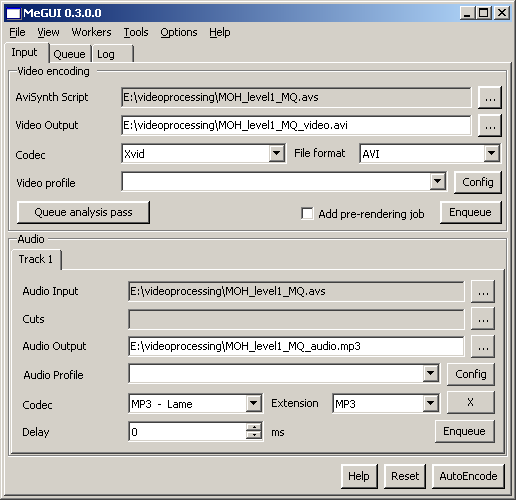
In the input tab, open the avisynth script in both video and audio boxes. MeGUI exports your video and audio as separate files; you later combine them.
Your input screen should look something like this:
Setting the video compression
Bitrate list:
- Low quality - 128 kbps
- Medium quality - 512 kbps
- High quality - 2048 kbps
- Insane quality - 5000 kbps
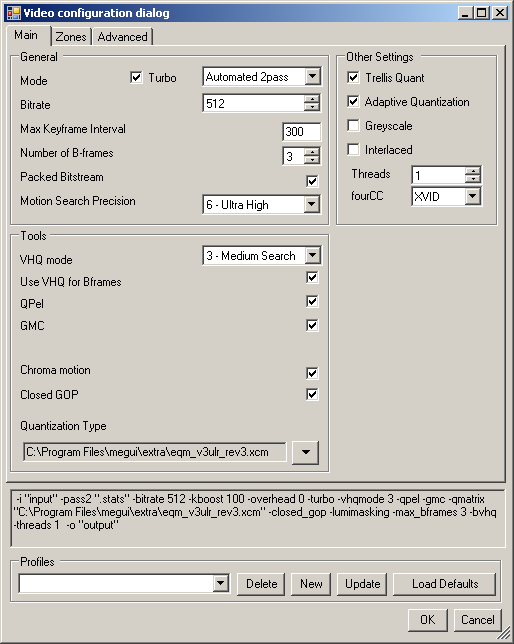
At the MeGUI input screen, select Xvid as the video codec and avi as the container. Press the Config button. These are recommended settings, use a higher Motion Search Precision and VHQ mode if you want.
One extra thing you may want to change is in the Advanced tab. Change the credits quantizer value from 20 to 2.
Setting the audio compression
Bitrate list:
- Low quality - 64 kbps
- Medium quality - 64 kbps
- High quality - 128 kbps
- Insane quality - 320 kbps
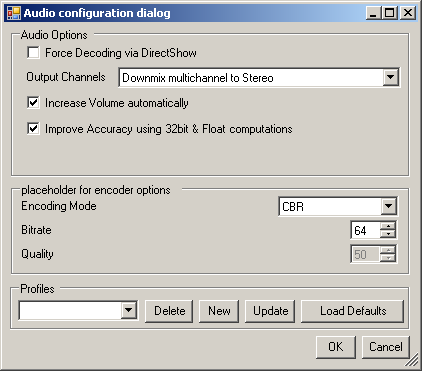
Go back to the input screen and look at the audio section. Choose mp3 as the codec, the container should automatically switch to mp3 as well. Press the Config button. Use CBR as encoding mode and choose the appropriate bitrate.
Encoding the video and audio
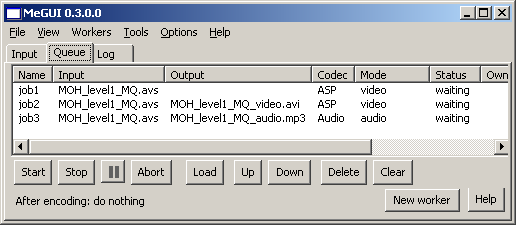
So you're back at the input screen, your configurations are all good to go. Now you just have to put those encoding jobs in the queue, so click the enqueue button for both video and audio and then click on the queue tab.
If it looks good, hit the start button.
Multiplexing the finished video and audio files
The MeGUI avi muxers don't work at the moment, so we will use VirtualDubMod. Don't worry, it's very easy...
- Start VirtualDubMod.
- Load your video file.
- In the top menu, go to Streams -> Stream List
- Press the add button and find the mp3.
- Click ok.
- Video -> Direct Stream Copy.
- File -> Save as
- Choose file name and save. Done!
Checking your quality
Before you encode your actual speed run, you should make sure you're doing everything right. If you encode your speed run incorrectly, it will be a waste of time for you and SDA. Make 10-15 second test files for each quality and upload them to a site such as http://www.yousendit.com, then make a topic on the Tech Support forum with links to the files so their quality can be verified.


