Difference between revisions of "Sonic the Hedgehog/Sonic"
From SDA Knowledge Base
(→Spring Yard 1) |
m (→Marble 1) |
||
| (7 intermediate revisions by 2 users not shown) | |||
| Line 27: | Line 27: | ||
==Marble 1== | ==Marble 1== | ||
| − | + | Make sure you grab the shield, otherwise it'll just get in your way later. | |
| − | + | ||
| − | [[Image:M1-1.png]]<br /> | + | From here there are two methods of zipping past the wall. If you push against the wall on the moving platform until you're balancing inside it you will be able to set up both depending on preference. |
| − | Look particularly at Sonic's | + | |
| − | + | *'''Subpixel-dependent Method''' | |
| − | * | + | After positioning yourself against the wall, while the platform moves down and back up, gently tap right enough times to shift Sonic two pixels to the right. The pixel you're looking for is this one:<br/><br/> |
| − | [[Image: | + | [[Image:M1-1.png]]<br/><br/> |
| − | + | Look particularly at Sonic's grounded foot - the vertical line that marks the left edge of the moving platform should basically bisect the flat part of Sonic's foot. This is kind of tricky at first, but experience will help. | |
| − | Target time: 0:29 if everything goes right first try. Each additional attempt at the zip costs six seconds, and if you miss the spiked platform cycle, that's another three gone. | + | <br/> |
| + | Wait until Sonic reaches this approximate height: <br/> | ||
| + | [[Image:M1-2.png]]<br/><br/> | ||
| + | From here: Press left, hold jump and release left as soon as possible. As soon as you identify the pixel, stop pressing right. Subpixels are counted from left to right in values between 0 and 255 and the values that work are as follows: | ||
| + | |||
| + | {| | ||
| + | |Frame# | ||
| + | | Range | ||
| + | |- | ||
| + | |1 | ||
| + | | 20-90 | ||
| + | |- | ||
| + | |2 | ||
| + | | 20-90 | ||
| + | |- | ||
| + | |3 | ||
| + | | 20-220 | ||
| + | |- | ||
| + | |4 | ||
| + | | 40-150 | ||
| + | |} | ||
| + | |||
| + | Here " Frame# " is the number of frames that left was held and " Range " are the subpixel values that allow you to go through the wall. Holding left for 5 frames or more gives no subpixel-values to allow you to go through the wall.<br/> | ||
| + | ''(Note that the values are approximate and that there might be very small ranges where going through the wall might work or not)''<br/> | ||
| + | *Pro's: Very easy to time, can be done the fastest and quick to retry.<br/> | ||
| + | *Con's: Getting the right subpixels can be hard, especially under pressure. | ||
| + | <br/> | ||
| + | |||
| + | |||
| + | *'''Timing-dependent Method''' | ||
| + | After positioning yourself when the platform is high, wait until it dips below the ground and carefully move 1 pixel left.<br/> | ||
| + | |||
| + | [[Image:Marblezipalt1.png]]<br/><br/> | ||
| + | |||
| + | From here, wait until you reach this height:<br/> | ||
| + | |||
| + | [[Image:Marblezipalt2.png]]<br/><br/> | ||
| + | |||
| + | When you do, Press right and pause at exactly the same time, which should give you this frame:<br/> | ||
| + | [[Image:Marblezipalt3.png]]<br/><br/> | ||
| + | |||
| + | Now hold left, unpause and release after 3-4 frames. As soon as you go through the wall you need to press left to avoid falling into the pit and dying. | ||
| + | |||
| + | The subpixels that work are: | ||
| + | |||
| + | {| | ||
| + | |Frame# | ||
| + | | Range | ||
| + | |- | ||
| + | |3 | ||
| + | | 20-200 | ||
| + | |- | ||
| + | |4 | ||
| + | | 20-250 | ||
| + | |} | ||
| + | |||
| + | Other frames have no values that work so the timing for releasing left is tight. | ||
| + | |||
| + | *Pro's: Basically not dependent on subpixels and easy to set up since you only need to move 1 pixel which can be easier to tell from 2 with the other method. | ||
| + | *Con's: Has a narrower frame-window for success and also puts you at risk of dying at the other side if you don't react quickly enough. Will also put you inside the wall more often than the other method if done wrong. | ||
| + | <br/><br/> | ||
| + | However you pass through the wall, remember to immediately kill both of the bats. If you don't, you won't reach the top of the spiked platform - and complete the stage.<br /><br /> | ||
| + | Target time: 0:26-0:29 if everything goes right first try. Each additional attempt at the zip costs six seconds, and if you miss the spiked platform cycle, that's another three gone. | ||
==Marble 2== | ==Marble 2== | ||
| Line 111: | Line 173: | ||
*Much like in Marble 2, you need to line up on the leftmost pixel of the platform to stand in the wall and get the zip here. What can make it harder in this stage, though, is that you only have a short time to line it up, and it's harder to use the foot as a visual cue with the wall in the way. Once you're on this pixel, though, you should wait until the platform reaches the bottom and the bomb explodes, then hold right and release it as soon as Sonic leaves the wall: | *Much like in Marble 2, you need to line up on the leftmost pixel of the platform to stand in the wall and get the zip here. What can make it harder in this stage, though, is that you only have a short time to line it up, and it's harder to use the foot as a visual cue with the wall in the way. Once you're on this pixel, though, you should wait until the platform reaches the bottom and the bomb explodes, then hold right and release it as soon as Sonic leaves the wall: | ||
[[File:SL1-1.png]] | [[File:SL1-1.png]] | ||
| − | *Getting the correct speed out of the wall is also | + | *Getting the correct speed out of the wall is also based on your subpixels. If your subpixels are between 0 and 159 (where 0 is the far "left" of the pixel), you'll get the correct speed for the level wrap, and if they're 160 or above you won't. So once you identify that you're standing on the correct pixel, tapping left once more increases your odds of being in the right position.If you don't trigger the level wrap, the platform position resets so you can attempt it again, but it costs eight seconds. |
*Taking the regular path through the stage only costs around 9-10 seconds against a first try level wrap here. It's a very simple route too, the only thing you really have to worry about is landing on the yellow spring after the first ramp, and even that is well marked by the line of five rings directly above it. | *Taking the regular path through the stage only costs around 9-10 seconds against a first try level wrap here. It's a very simple route too, the only thing you really have to worry about is landing on the yellow spring after the first ramp, and even that is well marked by the line of five rings directly above it. | ||
Target time: 0:16 with the level wrap, 0:25 without. | Target time: 0:16 with the level wrap, 0:25 without. | ||
| Line 139: | Line 201: | ||
*After going over both of the trapdoors, jump from the very edge of the yellow and black platform, like so: | *After going over both of the trapdoors, jump from the very edge of the yellow and black platform, like so: | ||
[[File:SB1-1.png]]<br /> | [[File:SB1-1.png]]<br /> | ||
| − | This should land directly on the switch. Then make three quick jumps up these platforms, wait for one cycle of the | + | This should land directly on the switch. Then make three quick jumps up these platforms, run through the first set of rotating platforms and stop, wait for one cycle of the second set, then run through the second set.<br /> |
Target time: 0:44 | Target time: 0:44 | ||
==Scrap Brain 2== | ==Scrap Brain 2== | ||
| − | *The trick with this clip here is to be at the same height as the trapdoor as it closes. The timing's a bit tricky, but you get it with practice. | + | *The trick with this clip here is to be at the same height as the trapdoor as it closes. The timing's a bit tricky, but you get it with practice. Once in the wall, hold right until you see Sonic drop, then switch to left to zip. |
| − | *After the tube, jump from the lowest part of the upslope and hold the jump all the way into the pit. It should bounce off the | + | *After the tube, jump from the lowest part of the upslope and hold the jump all the way into the pit, and tap left slightly just as you near the bottom. It should bounce off the first of the 10 ring boxes in the pit, continue to hold the jump until you get out. |
Target time: 0:35 | Target time: 0:35 | ||
Latest revision as of 10:53, 10 October 2015
Contents
- 1 Forewords
- 2 Rules and Timing
- 3 Green Hill 1
- 4 Green Hill 2
- 5 Green Hill 3
- 6 Marble 1
- 7 Marble 2
- 8 Marble 3
- 9 Spring Yard 1
- 10 Spring Yard 2
- 11 Spring Yard 3
- 12 Labyrinth 1
- 13 Labyrinth 2
- 14 Labyrinth 3
- 15 Star Light 1
- 16 Star Light 2
- 17 Star Light 3
- 18 Scrap Brain 1
- 19 Scrap Brain 2
- 20 Scrap Brain 3
- 21 Final Zone
Forewords
The current fastest known time is 11:40 by mike89. Sonic 1 has a rich speedrunning history with lots of people contributing with strats, glitches and routes. What is presented here are not necessarily the fastest routes known, but rather what is typically thought of as reasonable in a single-segment speedrun.
If you are more interested in the fastest possible strats, for example for IL's, it's recommended to check out TeeNTee314's individual level runs.
Rules and Timing
This game uses the in-game timer as the method of timing the run. It starts in Green Hill 1 and ends during the fadeout after defeating Robotnik in Final Zone. In order to time the run this way, you can use a program such as ShitSplit made by setz, or LiveSplit by CryZe and wooferzfg1. In the instance of a death you simply add that time as you would a stage. If you respawn at a star post after dying or going to a special stage you add the delta between the death and the star post spawn time (i.e. you die at 1:00 and respawn at 0:50 by the star post, then add 10 seconds).
Since the timer is framebased, 50Hz is fine to use competitively. It is however also slower in real time and gives an unfair advantage, so 60Hz is preferred.
Green Hill 1
- The jump off the ramp after the tube is completely necessary: if you don't, the screen won't scroll down fast enough and you'll just die.
Target time: 0:25
Green Hill 2
- This stage starts off kinda tricky. The jump over the spikes needs to be short, but not too short: too high and you go back up to the platform above, and too low and you hit them instead.
- The roll through the wall is also really tight, you have just enough room to build up the speed to get through the wall in one go, but more importantly you need to hold back your jump until you've definitely seen the last piece break. If you try and do it by the timing of the five before you'll tend to jump early and not break the last block. However, you can't leave it too long because you also need to jump early enough to hit the ceiling!
- The jump after the bridge should be from about the right post, hold the jump button up to the maximum height and then let it go. A low bounce off the extra life goes straight into the invincibility above. Then piano the buttons to ensure you get a short jump off the moving platform up ahead (or the spikes, if you've been a bit slower through the stage).
Target time: 0:19
Green Hill 3
- The jump up to the spring is off a very slight incline. The kind of thing that makes all the difference in this game!
- Two ways of completing the rest of the stage: either roll through the speed shoes and play the bottom path as in the video above, or bounce off them and make a series of bounces across the top as in Naegleria's tutorial. In this method, just before hitting the bug for the first bounce, switch to holding left, and continue to hold left for about a quarter of a second on the way back up before switching back to holding right. If you hit the left half of the invincibility box on the second bounce, you can continue to hold jump and right until bouncing for the fourth time, then release jump just before Sonic goes past the highest mountain in the background. Then simply tap left when you hit the right edge to bounce on Robotnik for hits.
Target time: 0:32 on the high path, 0:35 on the low.
Marble 1
Make sure you grab the shield, otherwise it'll just get in your way later.
From here there are two methods of zipping past the wall. If you push against the wall on the moving platform until you're balancing inside it you will be able to set up both depending on preference.
- Subpixel-dependent Method
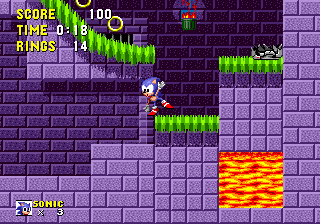
After positioning yourself against the wall, while the platform moves down and back up, gently tap right enough times to shift Sonic two pixels to the right. The pixel you're looking for is this one:
Look particularly at Sonic's grounded foot - the vertical line that marks the left edge of the moving platform should basically bisect the flat part of Sonic's foot. This is kind of tricky at first, but experience will help.
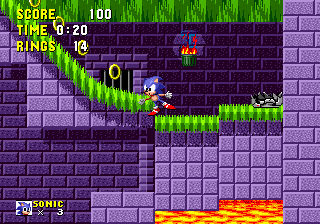
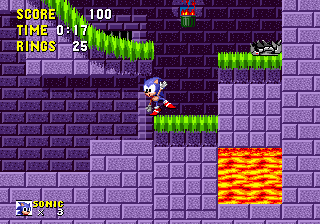
Wait until Sonic reaches this approximate height:
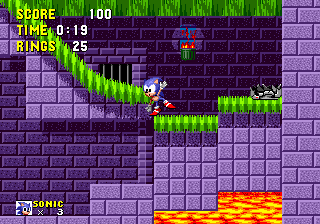
From here: Press left, hold jump and release left as soon as possible. As soon as you identify the pixel, stop pressing right. Subpixels are counted from left to right in values between 0 and 255 and the values that work are as follows:
| Frame# | Range |
| 1 | 20-90 |
| 2 | 20-90 |
| 3 | 20-220 |
| 4 | 40-150 |
Here " Frame# " is the number of frames that left was held and " Range " are the subpixel values that allow you to go through the wall. Holding left for 5 frames or more gives no subpixel-values to allow you to go through the wall.
(Note that the values are approximate and that there might be very small ranges where going through the wall might work or not)
- Pro's: Very easy to time, can be done the fastest and quick to retry.
- Con's: Getting the right subpixels can be hard, especially under pressure.
- Timing-dependent Method
After positioning yourself when the platform is high, wait until it dips below the ground and carefully move 1 pixel left.
From here, wait until you reach this height:
When you do, Press right and pause at exactly the same time, which should give you this frame:
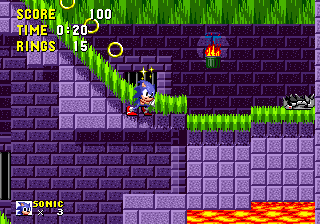
Now hold left, unpause and release after 3-4 frames. As soon as you go through the wall you need to press left to avoid falling into the pit and dying.
The subpixels that work are:
| Frame# | Range |
| 3 | 20-200 |
| 4 | 20-250 |
Other frames have no values that work so the timing for releasing left is tight.
- Pro's: Basically not dependent on subpixels and easy to set up since you only need to move 1 pixel which can be easier to tell from 2 with the other method.
- Con's: Has a narrower frame-window for success and also puts you at risk of dying at the other side if you don't react quickly enough. Will also put you inside the wall more often than the other method if done wrong.
However you pass through the wall, remember to immediately kill both of the bats. If you don't, you won't reach the top of the spiked platform - and complete the stage.
Target time: 0:26-0:29 if everything goes right first try. Each additional attempt at the zip costs six seconds, and if you miss the spiked platform cycle, that's another three gone.
Marble 2
- Line yourself up on the leftmost pixel of the moving platform, like this:
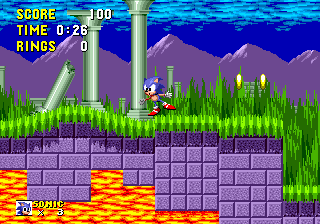
A useful way to tell that you're on it is to line up the vertical line on the left edge of the platform with the corner of Sonic's left foot.
- As the platform reaches this position, tap right for one frame, then hold jump on the next. You can use a pause buffer to separate these two inputs, but that means you have to press jump and Start on the same frame upon resumption:
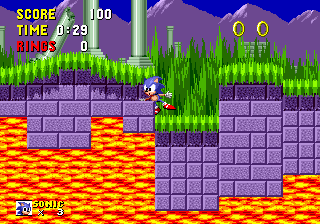
Here, the bottom of Sonic's left foot should be in line with the bottom of the square it's hidden behind. You have to extrapolate a little bit to figure out exactly where it is, but the timing is pretty lenient to start the zip.
- Hold nothing until the big wall reaches the left edge of the screen, then hold left. This should run you into the signpost as soon as it appears.
Target time: 0:11
Marble 3
- After pushing against the left wall, tap right twice and then hold up. This should put you in the right position for the buzzbomber to knock you into the ground below the platforms. If you fall to the left of the left platform, you didn't move far enough to the right, similarly if you end up on the middle platform you moved too far right.
- Once the left platform has moved to the very top of its cycle (which is more than two squares above the bottom), hold right and jump three frames later. You can't jump on the first two frames, so piano roll all three buttons and hope to get one on the right frame.
- Stay still from then until the second of the high pitched notes in the boss music plays, then jump for the first hit. There are a number of ways to do the boss fight here, depending on the amount of risk you're willing to take. A fairly simple method is to stay on the right platform for the whole fight, getting four hits before he flies over to the left and another four as he flies back.
Target time: 0:30
Spring Yard 1
- The jump off the ramp onto the red spring should be left as late as possible. Additionally, let go of all directions on the way down. Press down as you hit the ramp, then right to land on the wall.
- The jump off the wall also needs to be held back as late as possible, which is kind of tricky because you can't see where you are! If you jump too early though, you'll just fall to the bottom which takes a long time to recover from.
- Jump from the very end of the flat green platform, over the two sloped platforms. Then do a full jump from the third pole in the background, and piano roll at the height of the jump to catch the top part of the rotating platform and get another jump off it.
- Once on the upper platform, do a full size jump from just after the last post on this platform, around here:
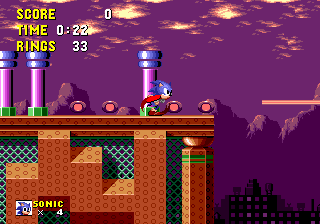
This should land you just past the spiked enemy out in front, and holding right from here gets you across both spike ball pits easily.
- It's possible to hit the tiny gap in the right wall directly, but it needs to be hit perfectly and if you miss, the spring throws you back up, costing about three seconds and potentially getting you hit.
- The speed shoes can sometimes run out on the final stretch. If you think they will, roll (and let go of right) to prevent the speed cap from kicking in.
Target time: 0:25
Spring Yard 2
- The jump over to the spring is important: hitting the left edge of the screen resets your subpixels to 0. Once you hit the edge, let all directions go until hitting the bumper - you'll always get bumped up like this.
- There's no really good cue for when to jump off the ramp, but you have to get it right near the end without going down onto the steeper part in order to skip over the pit. Once you land on the stretch here, you actually want to activate the speed cap on purpose, so as to aim your jump onto the platform with four rings.
- It's possible to clear the gap with the spike ball near the end with a single jump, but it needs a very tight jump, and it's so late that it appears that you pass through half of the green cylinder on the way! At the cost of about half a second, you can also just clear it in two jumps instead (one onto the platform in the middle of the pit).
- For the final jump, much like the upside-down ramp in SY1, leave the jump as late as you can. Ideally you hit the ceiling and carry all your momentum to the finish, although sometimes you'll get a slower finish.
Target time: 0:31
Spring Yard 3
- Run to the left first, then when you reach the left edge of the screen switch to right and jump. This sets up the two spike balls up ahead so they are just out of your way as you go past.
- A few things have to go right after you go past the spike balls: skipping over the small bump in the floor, getting enough horizontal speed on the next jump to bounce off the crab, then timing the two jumps up the moving platforms perfectly (the second, if done right, should squeeze through the gap at the top), and finally making one more jump up on top of the platform you just squeezed under and moving all the way to the right, then immediately holding down. If any of these steps fail, then don't try and make your way over there, you'll simply die. Just wait for another cycle to go past and go up there safely.
- As soon as the screen shifts right, press left to zip and then right again when the zip stops. When the ground stops you (right underneath the door), let go of right, jump, then tap right just as Sonic is about to land again, and you should be moved into the wall under the door. Simply jump from here to fall, then hold left and you'll fall again.
- From here, hold left for about half a second and then jump. What you're looking for is the two spike ball pits above you. In between the two of them, there's a brown section of the wall that's twice as wide as the other similar parts around it. Jump up against it so you're standing right next to it, but every time you land let go of the directions or you'll zip away again. From right next to the block, use short zips left and right to position yourself under it, like this (you should move into this position from the left hand side):
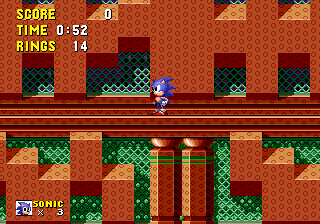
From here, you can hold right and, on the very next frame, jump and you'll drop down another level in the floor.
- As you drop, you'll see there are double brown and green columns. Hold left after landing on the lower level and, once the third set of double columns has reached the left edge of the screen, switch to holding down and you should be rolling in the halfpipe as you reappear on screen.
- As you roll up the left wall, you go through a set of 10 rings. As you make contact with the last one, do a full jump and you should land in the pocket in the wall with the invincibility and speed shoes.
- The boss isn't too hard, but occasionally you'll miss one of the hits (particularly hit 6). If you do miss a hit, Robotnik actually moves a bit higher in the air so you can't reach him with a regular jump, but if you roll before you jump you'll jump slightly higher, enough to reach him even at the high point of his cycle.
Target time: 0:54-0:58 on the early cycle at the start, 1:01-1:05 on the later cycle.
Labyrinth 1
- Hitting the switch down here is the only way to make the platform at the top appear. Make sure you hit it before the rising platform.
- When on the rising platform, just stand near enough the edge so Sonic is teetering on it and jump straight up - this will get you past the spikes, there's no need to move away from the platform.
- Wait on the left side of the small platform that takes you across the top until Sonic is standing in the middle of the large tile in the background, like so:
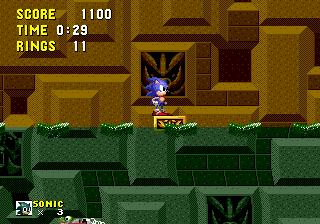
If you prefer, think of that tile as a face, and the bit Sonic's standing in front of to be the nose. Do a full jump straight up, hold right near the top of the jump so as to land back on the platform, then jump back off it. You should have enough momentum to carry you over to the other side. Immediately upon landing, hold left to slow down, then do another jump over the spikes.
- As you exit the water current, hold left for a short time, otherwise you'll be thrown straight into the enemies up ahead.
Target time: 0:47
Labyrinth 2
- After the two ball-and-chains, the jump to kill the first of the enemies up ahead is a bit earlier than you think it is. You can't do this jump short: it has to be high enough to trigger the second enemy to come out, otherwise you'll have to make an extra jump to get caught in the current.
- To do the zip here, land to the left of the switch, do as small a jump as you can into the gap on the right, then jump back onto it without being stopped by the side. Hold left until you hit the wall, then hold nothing and as soon as you stop next to the wall, you'll move into it along with the door. As soon as the whole door moves into the wall on the left, hold left and you should fly past the switch and towards the end.
- Once the edge of the wall has moved to about the middle of the screen, switch to holding right to kick the speed cap in. This should slow you down just in time to hit the signpost as it appears.
Target time: 0:30
Labyrinth 3
- It's not strictly necessary to get the rings here, but they only cost half a second and there's no others on your path for the rest of the stage. Ignore them at your peril!
- Don't hold a direction when jumping off the water slide, as this will kick in the speed cap.
- While in the water current, listen out for when the air countdown starts. If it starts before you let go of the fourth pole, you won't be able to do the strategy in the video, and should go for air first instead.
- However, the bubble cycle is actually pretty random (it certainly doesn't fit usual camera timer or universal timer criteria), so even if you've done well and given yourself a few seconds, you can still die if the game decides not to give you a bubble. Part and parcel of the game, unfortunately.
- As you climb up towards the boss, the climb is divided into three similar sections. Essentially you do two short jumps, then two full jumps, one short, one full, one short on each of the first two, and two short, two full, three short on the last. However, if you're playing on v1.1, the second section is modified so it's identical to the third one.
- Once you reach Robotnik, the rest of the jumps should go like this. Aside from the jumps that hit Robotnik, every jump is necessary (yes, even the jump straight up in the air to dodge the shot - Robotnik is blocking your landing on the platform up ahead).
- The jumps under the arrows from right to left are a bit daunting at first: they need to be tiny jumps and if you miss, you can get knocked into the pit on the left which sends you all the way back to the bottom and certain death. You can wait until the arrow retracts as a safety, but it obviously costs a bit of time.
Target time: 1:27
Star Light 1
- Much like in Marble 2, you need to line up on the leftmost pixel of the platform to stand in the wall and get the zip here. What can make it harder in this stage, though, is that you only have a short time to line it up, and it's harder to use the foot as a visual cue with the wall in the way. Once you're on this pixel, though, you should wait until the platform reaches the bottom and the bomb explodes, then hold right and release it as soon as Sonic leaves the wall:
- Getting the correct speed out of the wall is also based on your subpixels. If your subpixels are between 0 and 159 (where 0 is the far "left" of the pixel), you'll get the correct speed for the level wrap, and if they're 160 or above you won't. So once you identify that you're standing on the correct pixel, tapping left once more increases your odds of being in the right position.If you don't trigger the level wrap, the platform position resets so you can attempt it again, but it costs eight seconds.
- Taking the regular path through the stage only costs around 9-10 seconds against a first try level wrap here. It's a very simple route too, the only thing you really have to worry about is landing on the yellow spring after the first ramp, and even that is well marked by the line of five rings directly above it.
Target time: 0:16 with the level wrap, 0:25 without.
Star Light 2
- TODO: explain the level wrap method
- As in Spring Yard 2, touching the left wall before the spring will reset your subpixels to 0. In this case, holding right off the ramp will cause you to land on the steepest part of the ramp ahead every time and get a very fast roll. Sometimes this roll will actually cause you to go through the loop instead of around it, which costs a lot of time; to get around this, just tap left on the way down to it. It also has the side effect of making the jump off the upcoming ramp easier to hit, although you can't get the best possible result which is a jump that goes all the way to the top platform.
- Aim to jump near the top of that ramp, so that you launch off at about 45 degrees. If you go too early and go over the top of the screen, you need to release the jump a quarter second after going off the top, otherwise you'll be stopped in mid-air.
- Run underneath the two orbinauts and roll down the first of the sinewaves. At the steepest point of each drop, you want to jump off, holding down but not right the whole way through, to build up speed. After the third, try and get that 45 degree angle again and hold the jump all the way over the wall. Ideally, this jump should clear the dropping platform on the level below.
Target time: 0:10 with the level wrap, 0:24 without.
Star Light 3
- All the first three jumps should be full jumps. At the time the third jump would hit the ground if it continued to be flat, switch to holding left, then roll as soon as you hit the slope.
- There are a number of ways to slow down and drop down to the lower level. You can either take a hit to one of the bombs, land on the platform and jump off it into the gap, or switch to running in the loop and kick in the speed cap just before reaching the gap. The last method is quickest if it goes right.
- Hitting one of the bombs on its right hand side will cause you to get knocked right upon hitting it, saving a little time.
- The boss here is the most technical in the game. The method in the video above is fairly easy to replicate, but if any part of it goes wrong, it takes a long time to recover from. Importantly, when you follow this method, you need to delay the sixth hit a little, so that you get a decent upward bounce. This will mean that Robotnik has dropped the bomb on the left seesaw before you drop down for hit 7, after which hit 7 and 8 go exactly like 3 and 4.
- Some quick principles: If you're standing on a seesaw as Robotnik passes over it, he'll never drop a bomb.
- As in SY3, Robotnik bobs up and down as he moves across the screen, which means he won't always be within range of a jump from the centre of a seesaw. You generally only do this for the first hit.
- However, you can jump off the high end of a seesaw on the first frame you land, which will always reach. Doing a couple of these hits is potentially faster than the method in the video, but it can also result in Robotnik not dropping bombs which negates any advantage. The jump also needs to be frame-perfect or close to it, so it's a risk.
Target time: 0:57
Scrap Brain 1
- Hard to describe this in text, but just after the second of the long notes in the main melody is when you should launch a full jump onto the switch. This should minimise the time the tube takes to return to you, giving you enough time to get up onto the rotating platforms with a jump immediately after leaving the tube.
- Delay jumping up onto the disappearing platform at 15 seconds a little bit, if you're too quick with this sequence you'll be hit by a lightning bolt when you land down the bottom.
- If you've done everything right up to the conveyor belt, the disappearing platforms will appear at a high 24. Any mistake here effectively costs four seconds, because it won't appear the next time until high 28/low 29.
- This caterpillar can sometimes hit you even if you roll through it. Might be worth just jumping over it instead.
- After going over both of the trapdoors, jump from the very edge of the yellow and black platform, like so:
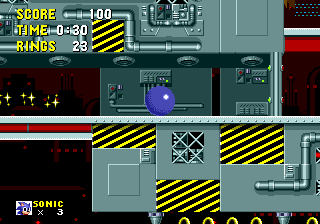
This should land directly on the switch. Then make three quick jumps up these platforms, run through the first set of rotating platforms and stop, wait for one cycle of the second set, then run through the second set.
Target time: 0:44
Scrap Brain 2
- The trick with this clip here is to be at the same height as the trapdoor as it closes. The timing's a bit tricky, but you get it with practice. Once in the wall, hold right until you see Sonic drop, then switch to left to zip.
- After the tube, jump from the lowest part of the upslope and hold the jump all the way into the pit, and tap left slightly just as you near the bottom. It should bounce off the first of the 10 ring boxes in the pit, continue to hold the jump until you get out.
Target time: 0:35
Scrap Brain 3
- A new slope glitch method has been found to complete this stage even quicker than the old glitchy method. Everything that happens is important, even though it looks a bit strange.
- First, hit the switch and run off to the right, switching back to the left roughly on the line between the two blocks you see Sonic turn around at in the video. This causes the platform to move all the way down to the bottom immediately.
- Line yourself up as close to the slope as you can and hold up until the screen has scrolled all the way up.
- Press left, then switch to right and jump as quickly as you can. Because of the way Sonic's acceleration works, this actually causes Sonic to jump a bit further than he would just by holding right.
- You may have noticed that the platform you were standing on disappeared - if it doesn't reappear on the bottom left of the screen when you land on the slope, you've succeeded in getting the slope glitch. Then simply run up into the ceiling, and hold right until you see the screen shift left. React to this, don't anticipate. As soon as it happens switch to left, and you should trigger the exit!
- If you don't want to do that, you can play the stage normally, which costs about 12 seconds but removes the risk of missing the glitch. The one thing to note on the normal route is, as you drop into the last water pit, you should roll into it, then hold one of the jump buttons so that when you land on the enemy below, you get a full bounce off it.
Target time: 0:09 with slope glitch, 0:21 without.
Final Zone
- Don't jump at the start of the stage, just hold right.
- When jumping for each hit, make sure you let go of any direction before hitting Robotnik.
If you do both of these things correctly, Robotnik should appear in the pistons in the following order: 4-3-2-4-2-1-4-3.
- For the third hit, make sure you stand to the left of piston 2 - this hit is a 2-3 pattern which is almost impossible to hit from the right side.
