Difference between revisions of "Stream 60fps"
From SDA Knowledge Base
HonorableJay (Talk | contribs) (→Method 2: OBS + AmarecTv) |
(Corrected spelling of M2 header.) |
||
| (5 intermediate revisions by one other user not shown) | |||
| Line 1: | Line 1: | ||
=Introduction= | =Introduction= | ||
| − | One of the biggest challenges to streaming from an interlaced source (primarily older game consoles) is how to properly get a | + | One of the biggest challenges to streaming from an interlaced source (primarily older game consoles) is how to properly get a full-framerate (60 for NTSC, 50 for PAL/SECAM) video feed (also known as F1). One would think that just setting the streaming app to 60/50 would do the trick, but that doesn't prep the video properly. The good news is that it's not too hard to achieve, but doing so will require a little bit of work. |
In order to understand how this all works, it's important to follow the chain of events: | In order to understand how this all works, it's important to follow the chain of events: | ||
| Line 6: | Line 6: | ||
# A proper deinterlace is applied | # A proper deinterlace is applied | ||
# The deinterlaced video is sent to the streaming app | # The deinterlaced video is sent to the streaming app | ||
| − | # The streaming app is set to run at 60 and the stream goes live | + | # The streaming app is set to run at 60/50 and the stream goes live |
At 4 steps it's not much, but knowing the order (and what goes on behind the scenes) will help when getting your own solution implemented. | At 4 steps it's not much, but knowing the order (and what goes on behind the scenes) will help when getting your own solution implemented. | ||
| Line 21: | Line 21: | ||
[[File:Amarec_preview.jpg|x350px]] | [[File:Amarec_preview.jpg|x350px]] | ||
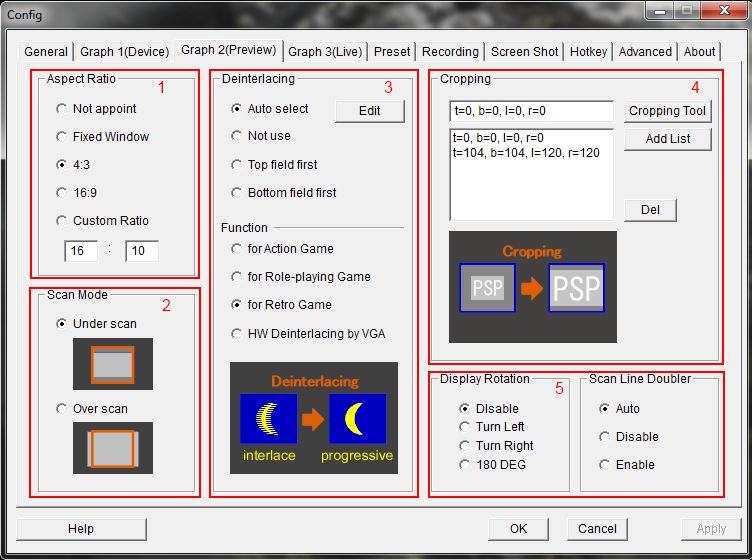
| − | Under the Preview Tab, make sure the deinterlacer is turned on. This is critical since both capturing the window and Amarec Live will not produce a | + | Under the Preview Tab, make sure the deinterlacer is turned on. This is critical since both capturing the window and Amarec Live will not produce a F1 video feed if the deinterlacer is not running. The red highlighted area, labeled 3, shows all of the standard options. For older consoles, setting the top area to Auto and the bottom to Retro Game should work fine. |
[[File:Amarec_live.jpg|x350px]] | [[File:Amarec_live.jpg|x350px]] | ||
| Line 27: | Line 27: | ||
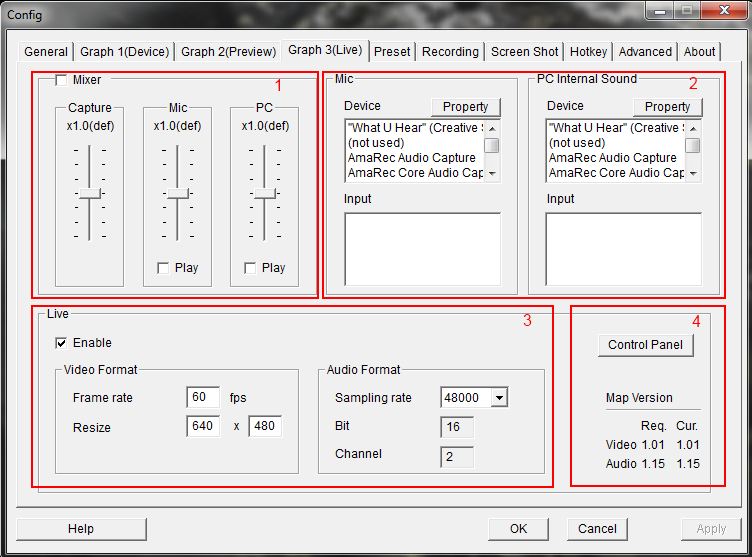
In the lower highlighted area of the Live tab, again labeled 3, make sure the Live checkbox is enabled. Once that's done, set the resolution to match your source material (720x480 or 640x480 for NTSC, 720x576 for PAL/SECAM). Next is the framerate, which should be set to 60 for NTSC or 50 for PAL/SECAM. Lastly, make sure the audio is set to either 44100/48000 sampling rate. | In the lower highlighted area of the Live tab, again labeled 3, make sure the Live checkbox is enabled. Once that's done, set the resolution to match your source material (720x480 or 640x480 for NTSC, 720x576 for PAL/SECAM). Next is the framerate, which should be set to 60 for NTSC or 50 for PAL/SECAM. Lastly, make sure the audio is set to either 44100/48000 sampling rate. | ||
| − | Once that's taken care of, AmarecTv is fully able to prep the video for your streaming app of choice. The next sections will show how to combine Amarec with both OBS and XSplit. However, the steps are pretty much the same regardless of your chosen streaming app: set the app to run at | + | Once that's taken care of, AmarecTv is fully able to prep the video for your streaming app of choice. The next sections will show how to combine Amarec with both OBS and XSplit. However, the steps are pretty much the same regardless of your chosen streaming app: set the app to run at 60/50FPS, set the video device to Amarec Video Capture, set the audio device to Amarec Audio Capture, then start streaming. |
| − | =Method 1: | + | =Method 1: XSplit + AmarecTv= |
With AmarecTv loaded and footage coming in from your capture card, load up XSplit and follow these steps: | With AmarecTv loaded and footage coming in from your capture card, load up XSplit and follow these steps: | ||
#From the main window, click Add (lower left corner) > Add Camera > Amarec Video Capture | #From the main window, click Add (lower left corner) > Add Camera > Amarec Video Capture | ||
#Back on the main window, click View (top menu) > Frame Rate > custom (the top option) | #Back on the main window, click View (top menu) > Frame Rate > custom (the top option) | ||
| − | #Enter | + | #Enter 60/50 (NTSC/PAL) in the next dialog and click Ok |
| − | One major consideration is that, while this will set XSplit to broadcast | + | One major consideration is that, while this will set XSplit to broadcast F1, the strain on your cpu will be very high. It's recommended to have at least a quad-core processor and 4GB of RAM (although that still won't guarantee your system will be able to handle the strain). |
=Method 2: OBS + AmarecTv= | =Method 2: OBS + AmarecTv= | ||
With AmarecTv loaded and footage coming in from your capture card, load up OBS and follow these steps: | With AmarecTv loaded and footage coming in from your capture card, load up OBS and follow these steps: | ||
#From the main menu, click on Settings, then Settings | #From the main menu, click on Settings, then Settings | ||
| − | #Under the Video tab (on the left side), change the framerate to 60 | + | #Under the Video tab (on the left side), change the framerate to 60/50 (NTSC/PAL) |
#Once back to the main window, right click on Sources, then 'Add > Video Capture Device' (change the name to whatever you wish) | #Once back to the main window, right click on Sources, then 'Add > Video Capture Device' (change the name to whatever you wish) | ||
#Set the device (topmost dropdown box) to Amarec Video Capture | #Set the device (topmost dropdown box) to Amarec Video Capture | ||
| Line 48: | Line 48: | ||
[[File:obs_amarec.jpg|350px]] | [[File:obs_amarec.jpg|350px]] | ||
| − | Much like with XSplit, this will add a lot more strain to your system. While it isn't as bad as with XSplit, not all systems will be able to handle streaming | + | Much like with XSplit, this will add a lot more strain to your system. While it isn't as bad as with XSplit, not all systems will be able to handle streaming F1 material. |
=Method 3: OBS by itself= | =Method 3: OBS by itself= | ||
| − | + | Follow all of the instructions to setup OBS to use AmarecTv (just don't load AmarecTv), but when adding the video device, make these changes: | |
| + | #Select your actual capture card for the video and the corresponding audio device | ||
| + | #Change the Deinterlace option to Retro/scandoubling | ||
| + | #The 'top field first' and 'bottom field first' options may differ on certain devices, but 'top field first' works for most (change to 'bottom field first' if the video jutters back and forth) | ||
| + | |||
| + | Again, this will add extra strain to your system. | ||
Latest revision as of 13:15, 31 July 2013
Contents
Introduction
One of the biggest challenges to streaming from an interlaced source (primarily older game consoles) is how to properly get a full-framerate (60 for NTSC, 50 for PAL/SECAM) video feed (also known as F1). One would think that just setting the streaming app to 60/50 would do the trick, but that doesn't prep the video properly. The good news is that it's not too hard to achieve, but doing so will require a little bit of work.
In order to understand how this all works, it's important to follow the chain of events:
- The original video is grabbed
- A proper deinterlace is applied
- The deinterlaced video is sent to the streaming app
- The streaming app is set to run at 60/50 and the stream goes live
At 4 steps it's not much, but knowing the order (and what goes on behind the scenes) will help when getting your own solution implemented.
As of 7/23/2013, the simplest methods revolve around 1 of 3 program combinations:
- XSplit + AmarecTv
- OBS + AmarecTv
- OBS by itself
Preparing AmarecTv
Since AmarecTv is at the heart of the first two solutions, it's important to make sure the program is setup properly. Head on over to the Amarec configuration page and follow the steps to get your capture card working. Once that is done and you're able to get a proper video feed (you did remember to install the Live feature right?), continue on with the next steps.
Required Settings
Under the Preview Tab, make sure the deinterlacer is turned on. This is critical since both capturing the window and Amarec Live will not produce a F1 video feed if the deinterlacer is not running. The red highlighted area, labeled 3, shows all of the standard options. For older consoles, setting the top area to Auto and the bottom to Retro Game should work fine.
In the lower highlighted area of the Live tab, again labeled 3, make sure the Live checkbox is enabled. Once that's done, set the resolution to match your source material (720x480 or 640x480 for NTSC, 720x576 for PAL/SECAM). Next is the framerate, which should be set to 60 for NTSC or 50 for PAL/SECAM. Lastly, make sure the audio is set to either 44100/48000 sampling rate.
Once that's taken care of, AmarecTv is fully able to prep the video for your streaming app of choice. The next sections will show how to combine Amarec with both OBS and XSplit. However, the steps are pretty much the same regardless of your chosen streaming app: set the app to run at 60/50FPS, set the video device to Amarec Video Capture, set the audio device to Amarec Audio Capture, then start streaming.
Method 1: XSplit + AmarecTv
With AmarecTv loaded and footage coming in from your capture card, load up XSplit and follow these steps:
- From the main window, click Add (lower left corner) > Add Camera > Amarec Video Capture
- Back on the main window, click View (top menu) > Frame Rate > custom (the top option)
- Enter 60/50 (NTSC/PAL) in the next dialog and click Ok
One major consideration is that, while this will set XSplit to broadcast F1, the strain on your cpu will be very high. It's recommended to have at least a quad-core processor and 4GB of RAM (although that still won't guarantee your system will be able to handle the strain).
Method 2: OBS + AmarecTv
With AmarecTv loaded and footage coming in from your capture card, load up OBS and follow these steps:
- From the main menu, click on Settings, then Settings
- Under the Video tab (on the left side), change the framerate to 60/50 (NTSC/PAL)
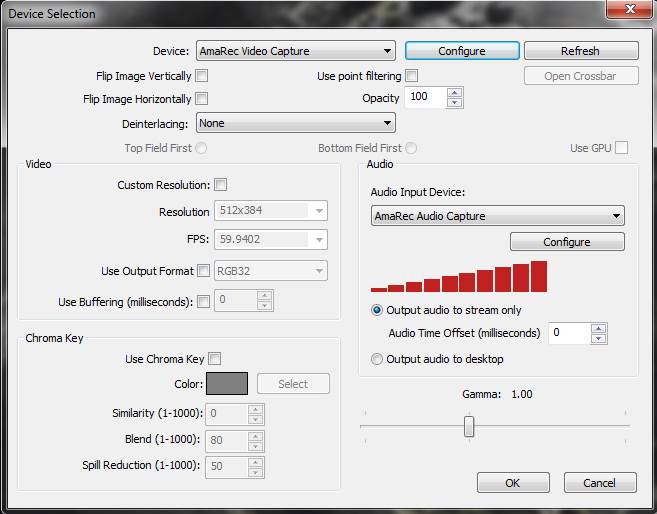
- Once back to the main window, right click on Sources, then 'Add > Video Capture Device' (change the name to whatever you wish)
- Set the device (topmost dropdown box) to Amarec Video Capture
- On the right side, set the Audio to Amarec Audio Capture
- Leave all other options (including deinterlacing) at their defaults
Much like with XSplit, this will add a lot more strain to your system. While it isn't as bad as with XSplit, not all systems will be able to handle streaming F1 material.
Method 3: OBS by itself
Follow all of the instructions to setup OBS to use AmarecTv (just don't load AmarecTv), but when adding the video device, make these changes:
- Select your actual capture card for the video and the corresponding audio device
- Change the Deinterlace option to Retro/scandoubling
- The 'top field first' and 'bottom field first' options may differ on certain devices, but 'top field first' works for most (change to 'bottom field first' if the video jutters back and forth)
Again, this will add extra strain to your system.


