Difference between revisions of "Splitting / Appending"
From SDA Knowledge Base
Ballofsnow (Talk | contribs) m (→Appending) |
Ballofsnow (Talk | contribs) (→Initial setup: ffdshow vfw -> video decoder config) |
||
| (4 intermediate revisions by the same user not shown) | |||
| Line 1: | Line 1: | ||
==Introduction== | ==Introduction== | ||
| − | The goal of this guide is to show ways to split or append videos without having to re-encode. There are inherent drawbacks which will be explained, as well as solutions to get around <i>most</i> of them. | + | The goal of this guide is to show ways to split or append videos without having to re-encode the video. There are inherent drawbacks which will be explained, as well as solutions to get around <i>most</i> of them. |
<br> | <br> | ||
| + | |||
==Tools== | ==Tools== | ||
| − | *[http://www.videohelp.com/tools/VirtualdubMOD VirtualDubMod] - for avi files. | + | * [http://www.videohelp.com/tools/VirtualdubMOD VirtualDubMod] - for avi files. |
| − | *[http://yamb.unite-video.com/ YAMB] - for mp4 files. | + | * [http://yamb.unite-video.com/ YAMB] - for mp4 files. |
| − | *[http://sourceforge.net/project/showfiles.php?group_id=57023 AviSynth] | + | * [http://sourceforge.net/project/showfiles.php?group_id=57023 AviSynth] |
| − | *Codec | + | * Codec |
| − | *FFDShow | + | * [http://www.free-codecs.com/FFDShow_download.htm FFDShow] |
<br> | <br> | ||
| + | ==Initial setup== | ||
| + | |||
| + | If you plan on importing H.264/AAC video into VirtualDub(Mod) you'll need to install Avisynth and [http://www.free-codecs.com/FFDShow_download.htm FFDShow]. When installing FFDShow you can just use the default installation settings. Once installed, go to Start -> Programs -> FFDShow -> Video Decoder Configuration. In the decoder tab click on the codecs section; it's probably already selected. Look to the right for H.264 and set it from disabled to libavcodec. | ||
| + | |||
| + | [[Image:ffdshowH264.png]] | ||
| + | |||
| + | <br> | ||
| + | |||
==Splitting== | ==Splitting== | ||
| Line 59: | Line 68: | ||
<blockquote> | <blockquote> | ||
One of the best features of AviSynth is its ability to do an aligned splice when appending video. There is usually a mismatch between the length of the video and the length of the audio, typically ranging from -50 ms to +50 ms. <b>This means that appending files in VirtualDub(Mod) will in almost all cases cause a desync</b> because the audio of clip2 will be appended right after clip1. VirtualDub(Mod) is unable to do an aligned splice. Here is an illustration: | One of the best features of AviSynth is its ability to do an aligned splice when appending video. There is usually a mismatch between the length of the video and the length of the audio, typically ranging from -50 ms to +50 ms. <b>This means that appending files in VirtualDub(Mod) will in almost all cases cause a desync</b> because the audio of clip2 will be appended right after clip1. VirtualDub(Mod) is unable to do an aligned splice. Here is an illustration: | ||
| + | <br> | ||
[[Image:append.png]] | [[Image:append.png]] | ||
| Line 72: | Line 82: | ||
I'm not going to go into the AviSynth syntax since you can learn all of that by reading the AviSynth guide. What you need to learn is how to import the video files, and how to append. So, the basic idea is that we will use AviSynth's alignedsplice() command to get the correct audio stream and reinsert it into the appended video. Follow these steps: | I'm not going to go into the AviSynth syntax since you can learn all of that by reading the AviSynth guide. What you need to learn is how to import the video files, and how to append. So, the basic idea is that we will use AviSynth's alignedsplice() command to get the correct audio stream and reinsert it into the appended video. Follow these steps: | ||
| − | + | *Create the AviSynth script, making sure to use AlignedSplice when appending. Example: | |
| − | + | <pre><nowiki> | |
| − | + | a = directshowsource("level1.mp4") | |
| − | *Import the script into VirtualDubMod. | + | b = directshowsource("level2.mp4") |
| − | *Go to Streams -> Streams List. | + | c = directshowsource("level3.mp4") |
| − | *Right click the audio stream and set it to full processing. | + | AlignedSplice(a,b,c) |
| − | *Click on Save Wav button. | + | </nowiki></pre> |
| − | *Close VirtualDubMod. | + | |
| − | *Compress the wav file to mp3 or aac with MeGUI, or an audio encoder of your choice. | + | * Import the script into VirtualDubMod. |
| + | * Go to Streams -> Streams List. | ||
| + | * Right click the audio stream and set it to full processing. | ||
| + | * Click on Save Wav button. | ||
| + | * Close VirtualDubMod. | ||
| + | * Compress the wav file to mp3 or aac with MeGUI, or an audio encoder of your choice. | ||
Now that that's done, you can forget about using anymore AviSynth. Follow the VirtualDubMod section if you're joining avi files, or the YAMB section if you're joining mp4 files. | Now that that's done, you can forget about using anymore AviSynth. Follow the VirtualDubMod section if you're joining avi files, or the YAMB section if you're joining mp4 files. | ||
| + | <br> | ||
| + | ===With VirtualDubMod=== | ||
| + | |||
| + | * Load the first video. | ||
| + | * File -> Append Segment until you have everything you want. | ||
| + | * Streams -> Stream List. | ||
| + | * The audio stream you see is an unaligned splice. Disable it! | ||
| + | * Add the audio file that you already encoded. Click ok. | ||
| + | * Video -> Direct Stream Copy. | ||
| + | * File -> Save As. | ||
| + | |||
| + | <br> | ||
| + | ===With YAMB 1.6=== | ||
| − | + | * Go to the Splitting & Joining tab | |
| + | * Join the videos you want by clicking on Add. | ||
| + | * Click Output to set the file name. | ||
| + | * Click join. | ||
| + | * Go to the Extract tab. | ||
| + | * Load the appended file. | ||
| + | * Click on the Extract Track by id to new MP4 file. Track 1 should be the video. You can verify by looking at the informations window. | ||
| + | * Click extract. This will get rid of the unaligned audio. | ||
| + | * Go to the Mux tab. | ||
| + | * Add the extracted video. | ||
| + | * Add the aligned audio that you've already encoded to AAC. | ||
| + | * Mux it! | ||
Latest revision as of 09:50, 12 January 2008
Contents
Introduction
The goal of this guide is to show ways to split or append videos without having to re-encode the video. There are inherent drawbacks which will be explained, as well as solutions to get around most of them.
Tools
- VirtualDubMod - for avi files.
- YAMB - for mp4 files.
- AviSynth
- Codec
- FFDShow
Initial setup
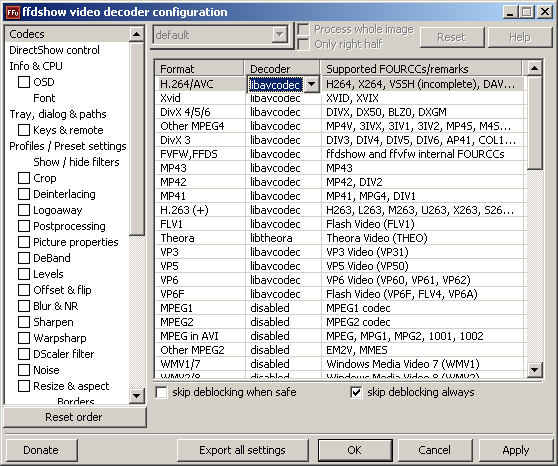
If you plan on importing H.264/AAC video into VirtualDub(Mod) you'll need to install Avisynth and FFDShow. When installing FFDShow you can just use the default installation settings. Once installed, go to Start -> Programs -> FFDShow -> Video Decoder Configuration. In the decoder tab click on the codecs section; it's probably already selected. Look to the right for H.264 and set it from disabled to libavcodec.
Splitting
The act of taking a video and creating smaller, separate videos.
With VirtualDubMod
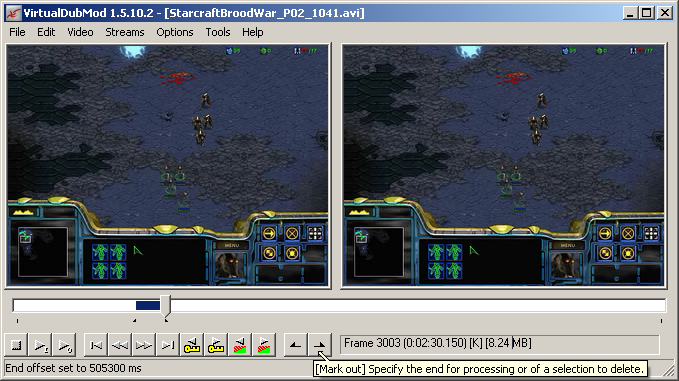
- Use the slider and the two arrow buttons next to the frame number to make your selection.
- Video -> Direct Stream Copy.
- File -> Save As.
The drawback: You can only start a cut on an I frame. In VirtualDub(Mod) this is labeled with the letter K which can be seen at the bottom center of the interface. This has to do with how videos are compressed.
Without going too in depth... you start with a full I frame followed by a sequence of P or B frames. Those P and B frames are based off that previous I frame. They ABSOLUTELY NEED that I frame or they won't display correctly, so you wouldn't want to cut out that I frame, would you? What this means is that in VirtualDub(Mod), it doesn't matter where you make your starting selection, it will search backwards until it finds that K frame. So while you may think you're starting a cut on frame 3080, which happens to be a P frame, the cut may actually start on frame 2994, a K frame. The problem is that the spacing between K frames can be very far. The video I'm looking at while writing this guide has them spaced out every 10 seconds. This does not allow me to make a precise cut. The good thing is that this drawback doesn't apply to the end of your selection.
Summary: The start of your cut will not be precise (unless you knowlingly start off a K frame), but the end of your cut will be.
Tip: You can navigate through keyframe placements by pressing the button with an arrow and a yellow key under it.
With YAMB 1.6
YAMB 1.6 is limited in that you can't see the video, so you have to pick out where you want to make your cuts beforehand. It also only accepts input in time format, not by frames. You have the option of splitting by duration, by range and by size.
Splitting is simple enough:
- Click the Splitting & Joining tab
- Load your video.
- Input the values.
- Split it!
The drawback: Same as with VirtualDub(Mod), unfortunately.
Appending
The act of joining multiple videos together to create one video.
I'll start by explaining the the drawback because it applies to both VirtualDub(Mod) and YAMB. First you should read Part 4 of the AviSynth guide which is quoted here:
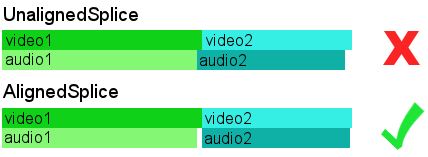
One of the best features of AviSynth is its ability to do an aligned splice when appending video. There is usually a mismatch between the length of the video and the length of the audio, typically ranging from -50 ms to +50 ms. This means that appending files in VirtualDub(Mod) will in almost all cases cause a desync because the audio of clip2 will be appended right after clip1. VirtualDub(Mod) is unable to do an aligned splice. Here is an illustration:
If you still don't understand, I'll explain again but with a larger mismatch. Let's say you have two videos, each 10 seconds long, and the first video has audio that only lasts 5 seconds. By appending directly in VirtualDubMod or YAMB, you will start hearing the audio of clip 2 halfway during clip 1. If you were to look at the file details of this appended video, you'd see that the video duration is 20 seconds, while the audio duration is only 15 seconds. That's not good.
A solution: AviSynth!
Of course, even this "solution" has its own drawback, you'll have to re-compress the audio. However, for most people this is acceptable.
I'm not going to go into the AviSynth syntax since you can learn all of that by reading the AviSynth guide. What you need to learn is how to import the video files, and how to append. So, the basic idea is that we will use AviSynth's alignedsplice() command to get the correct audio stream and reinsert it into the appended video. Follow these steps:
- Create the AviSynth script, making sure to use AlignedSplice when appending. Example:
a = directshowsource("level1.mp4")
b = directshowsource("level2.mp4")
c = directshowsource("level3.mp4")
AlignedSplice(a,b,c)
- Import the script into VirtualDubMod.
- Go to Streams -> Streams List.
- Right click the audio stream and set it to full processing.
- Click on Save Wav button.
- Close VirtualDubMod.
- Compress the wav file to mp3 or aac with MeGUI, or an audio encoder of your choice.
Now that that's done, you can forget about using anymore AviSynth. Follow the VirtualDubMod section if you're joining avi files, or the YAMB section if you're joining mp4 files.
With VirtualDubMod
- Load the first video.
- File -> Append Segment until you have everything you want.
- Streams -> Stream List.
- The audio stream you see is an unaligned splice. Disable it!
- Add the audio file that you already encoded. Click ok.
- Video -> Direct Stream Copy.
- File -> Save As.
With YAMB 1.6
- Go to the Splitting & Joining tab
- Join the videos you want by clicking on Add.
- Click Output to set the file name.
- Click join.
- Go to the Extract tab.
- Load the appended file.
- Click on the Extract Track by id to new MP4 file. Track 1 should be the video. You can verify by looking at the informations window.
- Click extract. This will get rid of the unaligned audio.
- Go to the Mux tab.
- Add the extracted video.
- Add the aligned audio that you've already encoded to AAC.
- Mux it!


