Difference between revisions of "AviSynth"
From SDA Knowledge Base
Manocheese (Talk | contribs) m (→Part 6: Trimming) |
Manocheese (Talk | contribs) m |
||
| Line 220: | Line 220: | ||
</nowiki></pre> | </nowiki></pre> | ||
| − | This method is commonly used for | + | This method is commonly used for Game Boy footage. Sharpening is probably a good idea, too, but don't go overboard. |
Revision as of 00:36, 4 January 2007
Contents
- 1 Introduction
- 2 Installation / plugins
- 3 The AviSynth script
- 3.1 Part 1: Loading the plugins
- 3.2 Part 2: Loading the source files
- 3.3 Part 3: Fixing audio delay
- 3.4 Part 4: Appending
- 3.5 Part 5: Deinterlacing / Full framerate video
- 3.6 Part 6: Trimming
- 3.7 Part 7: Resizing
- 3.8 Part 8: Sharpening
- 3.9 Part 9: Cropping / Adding borders
- 3.10 Part 10: Color / Brightness
- 3.11 Part 11: SDA StatID
- 4 Sample scripts
- 5 When you're done
Introduction
To put it briefly, AviSynth is a video editor like VirtualDub except everything is done with scripts. For details, check Wikipedia. The most important thing to learn right now is the concept of AviSynth.
Let's say you're still using VirtualDub:
- You go through the menu or drag and drop your source video inside the program.
- You load the audio.
- You use the brackets to cut off frames you don't need.
- You go to the filters section and use resize.
- Resizing has made the picture blurry, so you add the sharpen filter.
You did all that by moving your mouse, going through menus, etc. With AviSynth you're creating a text-based file (.avs) to tell it what to do with text commands. The above would be, as an example:
- avisource("myvideo.avi")
- wavsource("myaudio.wav")
- Trim(4000,7000)
- Lanczos4Resize(320,240)
- XSharpen(30,40)
You save the avs file, and load that into MeGUI or VirtualDub for final compression. The advantages are that you don't have go through as many menus, you don't have to remember which frames you want to cut out, you have access to more advanced deinterlacing filters like mvbob, and you can keep your scripts forever so that you don't have to start from scratch in case you want to re-encode them later.
How to use this guide.
Yes, AviSynth can be confusing and hard to learn, but it is very rewarding once you get the hang of it. I suggest you look at the sample scripts at the bottom of the page to get an idea of what a final script looks like. Then go through each section putting whatever you need into your own script. If you are having trouble, and you probably will >:), do not hesitate to ask for help in the Tech Support forum.
Installation / plugins
Go to http://www.avisynth.org/ or http://sourceforge.net/project/showfiles.php?group_id=57023 to download AviSynth. You should see two versions, 2.5.6a and 2.5.7 RC. The first is the stable release, while the latter is at the moment still in the testing phase so you may get problems when editing your run. Note that to complete Part 11: SDA StatID, you will need 2.5.7 RC 1 or higher, so make your choice between the wimpy road or living dangerously on the edge.
With AviSynth installed, go to Start menu -> [All] Programs -> AviSynth -> Plugin Directory. This will open the directory where AviSynth stores its plugins. Copy the files from inside the avisynth plugins zip file to the Avisynth plugins directory window you just opened.
If AviSynth complains that the MSVCR71.dll file is missing, you can download it at http://www.dll-files.com/. Place it in your "C:\WINDOWS\SYSTEM32\" directory.
The AviSynth script
Create a .txt document with a name of your choice in the same folder as your source files. Rename the extension from .txt to .avs. If you can't see the extension and are running Windows, open Windows Explorer, go to Tools -> Folder Options -> View and uncheck "Hide extensions for known filetypes".
Open the avs file in Notepad or any text editor.
Part 1: Loading the plugins
AviSynth will automatically load any dll and avsi files located in the plugins directory. If you're working with DVD source material, the only plugin that I recommend you load manually is DGDecode.dll since it's in its own folder. You can of course just copy and paste it into the plugins folder, but be sure to re-copy it if you update DGMPGDec. Change the file path if needed.
Loadplugin("C:\Program Files\DGMPGDec\DGDecode.dll") # For DVD source
Part 2: Loading the source files
There are different ways to load the source files and it all depends on what it is you're working with. Here is a list of available commands.
- avisource(video.avi)
- directshowsource(video)
- MPEG2source(video.d2v)
- Ac3source(video, sound.ac3)
- Wavsource(sound.wav)
- Mpasource(sound.mpa)
- AudioDub(video, sound)
If you used a capture card or screen capture software then it is quite simple to load the files. If avisource does not work, try directshowsource. Those using Camtasia will probably need to use the latter.
### Video and audio are already combined
avisource("video.avi")

### Video and audio are split
#AudioDub(avisource("video.avi"), wavsource("audio.wav"))
Notice the # before AudioDub. This is telling AviSynth to skip over the line. If you need to use this line, remove the # and add one before the first avisource command.
Tip: If your avs script file is in a different folder than your source files, just use relative or absolute paths, like "c:\my work folder\video.avi".
Tip: If your video is separated in multiple parts, which is usually the case when recording with Fraps, then be sure to look at part 4 since it is linked to part 2.
If you used a DVD recorder then your video and audio is most likely split. Make sure you've gone over the DVD page before continuing.
AC3source(MPEG2source("vob.d2v"),"vob T01 2_0ch 192Kbps DELAY -66ms.ac3")
#AudioDub(MPEG2source("vob.d2v"),MPASource("vob T01 2_0ch 192Kbps DELAY -66ms.mpa"))
I hope you haven't removed the delay information from the sound files. Not that it's the end of the world if you did remove it, you'll just have to listen by ear until you get a close value with DelayAudio().
Part 3: Fixing audio delay
This will only work if the audio desync is constant and not progressive. Constant desync is when the desync at the beginning of the video is the same as the desync at the end of the video. You guessed right, it's easy to fix. Progressive desync, on the other hand, can be a huge pain and may require external tools to fix.
The DelayAudio command is straightforward, but there is an extra concept worth learning. Look at the following two scripts:
Ac3Source(MPEG2source("vob.d2v"),"vob DELAY -66ms.ac3")
DelayAudio(-0.066)
Ac3Source(MPEG2source("vob.d2v"),"vob DELAY -66ms.ac3").DelayAudio(-0.066)
Is there a difference between them? Yes and no. They both get the same result, however the script with one line makes it easier for projects where you append files together. I suggest using the format of the second script.
Part 4: Appending
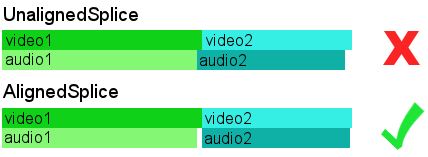
One of the best features of AviSynth is its ability to do an aligned splice when appending video. There is usually a mismatch between the length of the video and the length of the audio, typically ranging from -50 ms to +50 ms. This means that appending files in VirtualDub(Mod) will in almost all cases cause a desync because the audio of clip2 will be appended right after clip1. VirtualDub(Mod) is unable to do an aligned splice. Here is an illustration:
You will probably never use UnalignedSplice. Here are different methods for using AlignedSplice:
### Method 1
AlignedSplice(avisource("clip1.avi"), avisource("clip2.avi"), avisource("clip3.avi"))

### Method 2
a = avisource("clip1.avi")
b = avisource("clip2.avi")
c = avisource("clip3.avi")
AlignedSplice(a,b,c)

### Method 3
avisource("clip1.avi")++avisource("clip2.avi")++avisource("clip3.avi")

Ac3Source(MPEG2source("vob1.d2v"),"vob1 DELAY -66ms.ac3").DelayAudio(-0.066)++Ac3Source(MPEG2source("vob2.d2v"),"vob2 DELAY -30ms.ac3").DelayAudio(-0.030)

### Method 4
import("script1.avs")++import("script2.avs")++import("script3.avs")
Method 2 is good for when you're joining a lot of clips since it's easier to edit. Notice the double plus signs in method 3; this is the same as AlignedSplice. One plus sign would indicate UnalignedSplice. Method 4 is to join independent AviSynth scripts.
Part 5: Deinterlacing / Full framerate video
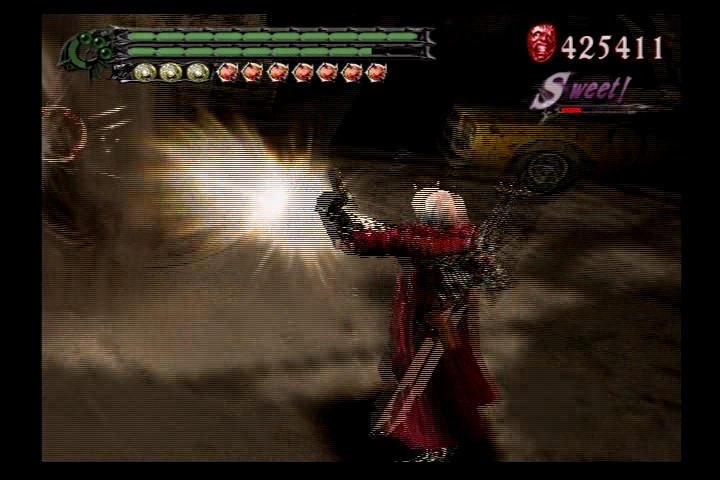
Deinterlacing isn't needed for video that is not interlaced such as computer games recorded with Fraps/Camtasia, or if your console game outputs in progressive mode and you captured in progressive mode as well. Otherwise, if your footage looks anything like the picture below with the horizontal lines, then you definitely need to deinterlace.
Tip: The SelectEven() command used in this section is still useful for those with beefy computers who recorded their computer game at 60 fps. The command will get you half framerate (30 fps) needed for LQ/MQ.
AviSynth will help you restore the full range of motion to your video. Capturing at 320 x 240 without Avisynth, as most people do, would cause you to lose half of your motion information.
Tip: You should create separate AviSynth scripts for each quality version that has differences between them. There's no sense in creating one AviSynth script, encoding it, editing the script, encoding again, etc. With separate AviSynth scripts you'll get less script errors and less headaches, and you'll be able to queue many encodes.
F1 = Full framerate. 59.94 for NTSC, 50 for PAL.
F2 = Half framerate.
F3 = One third framerate.
LQ/MQ/HQ/IQ = Low/Medium/High/Insane quality.
| DivX (2D) | DivX (3D) | H.264 (2D) | H.264 (3D) | |
| LQ | F3/F2 | F2 | F3/F2 | F2 |
| MQ | F3/F2 | F2 | F1 | F1/F2 |
| HQ | F1 | F1 | F1 | F1 |
| IQ | F1 | F1 | F1 | F1 |
These values are meant to be used as a guide. The framerate of your video will be limited by the framerate of the game you're recording. Final Fantasy and Kingdom Hearts are examples of games that run at 30 fps, and therefore there is no point in deinterlacing to 60 fps. You'll just end up with sets of duplicate frames.
Determining the framerate of the game.
It's actually very easy to do, the important thing was to make you aware that games aren't always made to run at 60 fps. Basically, just follow the next section about full framerate, then at some point (the earlier the better) open the script in VirtualDub(Mod) or Media Player Classic and move frame by frame to check for duplicate sets.
F1 - Full framerate
- Low resolution
If the game you recorded outputs in low resolution then there's no reason to deinterlace with full resolution. The NES, SNES and Sega Genesis are examples of systems that output video in low resolution.
Method 1 - Pros: Easy and fast. Cons: You'll notice a bobbing effect which is unpleasant to the eye. Harder for the encoder, bitrate usage is higher.
### Use complementparity if the motion of the video seems to go back and forth.
#ComplementParity()
separatefields()
Method 2 - Pros: Zero bobbing. Great for the encoder, bitrate usage is lower. Cons: Slightly blurry image from resizing. Slow because of the mvbob filter (don't even think about using leakkernelbob).
### Use complementparity if the motion of the video seems to go back and forth.
#ComplementParity()
mvbob()
(RESIZE FILTER GOES HERE, check part 7)
(SHARPENING FILTER GOES HERE, check part 8)
This method is commonly used for Game Boy footage. Sharpening is probably a good idea, too, but don't go overboard.
- Full resolution
For full resolution deinterlacing leakkerneldeint or mvbob come into play. If you notice too many "lines," or interlacing artifacts, as we like to call them, then lower the threshold value. The negative effect to lowering this is that you end up with more jaggedy edges, and loss of details. Use what you think is best.
### You may have to set order to 0. Try both to see which one works.
LeakKernelBob(order=1,threshold=10,sharp=true,twoway=true,map=false)
Those who want more quality at the cost of encoding speed can use mvbob instead of leakkernelbob. Nate uses this himself, so if you want to go the SDA way, go with mvbob. Beware; this thing is very, very slow. But it comes with a free Frogurt!
### Use complementparity if the motion of the video seems to go back and forth.
#ComplementParity()
mvbob()
F2 - Half framerate
- High resolution
This section is for games that run at 30 fps such as Final Fantasy and Kingdom Hearts.
In certain cases gameplay will be in 30 fps(25 for PAL), but you still end up with interlaced video. This is because the fields shifted out of order, and in this case it's called combing. All you need to do is shift the fields back with their proper frame and it'll be deinterlaced, or decombed. Sounds simple, but usually these games just seem to be progressive at one point, and combed at another; almost as if it were random. This is fixed by using the Decomb filter with the Telecide() command.
### Use complementparity if the motion of the video seems to go back and forth.
#ComplementParity()
Telecide()
An easy way to check to see if your game runs at 30 fps is to separate the fields and look a section of gameplay frame by frame. Simply use separatefields() in your script. If the game flows frame by frame as if it were normal(except squashed), then it's at full framerate. If movement only occurs every other frame, then it is at 30 fps.
With games that run at half framerate, there might be certain small parts in the game that are actually at full framerate such as menu screens. Since they are usually just a small part of gameplay, you can just ignore it and let the Decomb filter deinterlace it.
You can also manually tell the Decomb filter to decomb certain parts. You can do so by creating a file called decomb.tel in the same directory as the avs file. First change your Telecide() command.
Telecide(ovr="decomb.tel")
Now open up decomb.tel and tell it what frames you want matched. For example:
100,200 n
500,600 n
This says frames 100-200 and 500-600 will be matched with the next. Use p for the previous frame and c for the current frame. If you're not sure, just try them all out.
- Low resolution
This is the easiest kind of deinterlacing. You barely even have to think about it. Looking at the picture above, notice all the individual horizontal lines. These show the fields. Every even numbered line is one field, while every odd numbered line is the other field. With half framerate we simply remove one of the fields. This reduces the height of the video by half, we'll take care of the width later on when resizing.
separatefields()
selecteven()
F3 - One third framerate.
Used for games that have problems with flickering sprites, typically what you see in older games. This is probably the trickiest kind of deinterlacing, so you may want to consult with others in the Tech Support forum.
### Use complementparity if the motion of the video seems to go back and forth.
#ComplementParity()
separatefields()
selectevery(3)
http://www.avisynth.org/SelectEvery
Part 6: Trimming
Trim is used to cut out frames. The numbers inside the brackets represent the range of frames you want to keep. You should have the Trim command somewhere after deinterlacing to avoid any confusion. To make it easier to find the frame range numbers, load the avs file into VirtualDub(Mod) since it displays the current frame number.
Trim(100,50000)

#Trim(100,35000)++Trim(36000,50000)
Warning: If you are using the selecteven() command, you will only have half as many frames in your video, so you must divide the values in your Trim() command by two to compensate. If this sounds confusing, load your avs file into VirtualDub with all your final scripting, then find the frame numbers from there.
Part 7: Resizing
Rule 1: Never resize to a resolution greater than that of the original source video. This is called "stretching" and does nothing to increase the quality of your video.
Rule 2: As mentioned in part 5, there's no point deinterlacing to full resolution when the game itself plays in low resolution. Obviously, do not resize videos of these games to full resolution.
Be sure to read Part 8: Sharpening since resizing can possibly make the picture too blurry.
Resizing for HQ/IQ full resolution:
The only time you should be resizing for HQ/IQ is if the aspect ratio is incorrect. People with NTSC DVD recorders will end up with video at 720x480 resolution, an aspect ratio of 1.5:1. This is a problem since the game you're recording probably plays at an aspect ratio of 1.33:1, or more commonly reffered to as 4:3. In this case you would resize the video to 640x480. PAL DVD video will come at 720x576 and needs to be resized to 704x576.
### NTSC
lanczos4resize(640,480)

### PAL
lanczos4resize(704,576)
Resizing for MQ/LQ low resolution:
This step is required to meet SDA standards.
### NTSC
lanczos4resize(320,240)

### PAL
lanczos4resize(352,288)
http://www.avisynth.org/Resize
http://www.avisynth.org/ReduceBy2
Part 8: Sharpening
When a picture or video has gone through significant resizing you usually end up with a blurry image. This is where sharpening comes in. Those who recorded their computer game with screen capture software are pretty much guaranteed a blurry image when resizing to the MQ resolution. Same with those who chose to deinterlace their video to the MQ resolution with the mvbob + resize method. Do not go overboard with the sharpening, play with the values until it looks right.
Since XSharpen works in the YV12 colorspace, you will have to convert it first.
ConvertToYV12()
### Defaults are 30,40
XSharpen(30,40)
Part 9: Cropping / Adding borders
You may be tempted to crop out the black border of console recorded footage. It's best to leave them in, otherwise you're going to make more work for yourself dealing with strange resolutions, encoders not accepting them, and possibly using the resize command later only to get an incorrect aspect ratio. Cropping should be used sparingly.
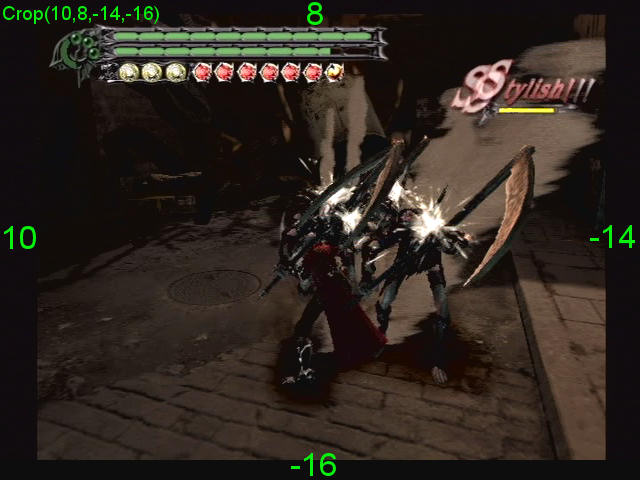
The following code corresponds to the illustration.
Crop(10,8,-14,-16)
You will probably not use the crop and add border commands. A good example of its combined use is if you want to get rid of some noise at the bottom of the video. You would crop it away, then add the border back. Only do this if the noise is along the black border of the video, since you don't want to crop away gameplay footage.
Crop(0,0,0,-10)
Addborders(0,0,0,10)
Part 10: Color / Brightness
Be very careful when playing around with color and brightness. If your video is too bright and looks greyish it will be rejected. Feel free to ask others in the Tech Support forum for their opinions about your video.
http://www.avisynth.org/Levels
http://forum.doom9.org/showthread.php?t=93571
Part 11: SDA StatID
Tip: This should be the last thing you do in your script. Make sure the script works without the StatID before continuing.
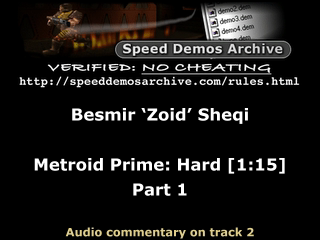
SDA uses Station ID's to protect the runner's and the site's identities. StatID's are placed at the beginning of a video and shown for a few seconds. They are the next best thing to watermarks. Below is an example:
SDA realizes that those who encode their own runs and need manual timing can't show the time in the StatID, since final encodes are sent to Radix and then timed. Until a solution is found, just make one without the time. A partial StatID is better than none.
You will need to install Avisynth 2.5.7 RC 1 or later in order for the script to work. You also need to download the SDA logo and place it in the same folder as your avisynth script, or make sure the paths are correct in the script.
The script is designed to work with any source file at any resolution and at any framerate. The only thing you need to change is the subtitle. The \n indicates a new line. Place the code at the end of your script.
#StatID version 1.1
clip=last

SDAlogo = (clip.width < 468 ? ImageSource("SDAlogo.png").lanczos4resize(clip.width,round(108.0*clip.width/468.0)) : ImageSource("SDAlogo.png"))
FontSize = (clip.width < 640 ? 20 : 36)
StatID = Blankclip(clip,length=round(clip.framerate*5))
StatID = Overlay(StatID,SDAlogo,x=(clip.width-SDAlogo.width)/2,y=10)
StatID = Subtitle(StatID,"Besmir ‘Zoid’ Sheqi\nMetroid Prime: Hard [1:15]\nPart 1",font="Verdana",size=FontSize,text_color=$FFFFFF,align=5,lsp=40)

StatID++clip
ConvertToYV12()
One thing you should watch out for is the line "clip=last" in the script. Depending on how you do your script, it may be written out differently. Take sample script #2 as an example.
Sample scripts
1. DVD source, one segment, for HQ and IQ, deinterlacer: leakkerneldeint, gamma correction, no statid
Loadplugin("C:\Program Files\DGMPGDec\DGDecode.dll")

Ac3Source(MPEG2source("segment3.d2v"),"segment3 192Kbps DELAY -66ms.ac3").DelayAudio(-0.066)
LeakKernelBob(order=1,threshold=10,sharp=true,twoway=true,map=false)
Trim(588,37648)
Lanczos4Resize(640,480)
Levels(0, 1.2, 255, 16, 235)

ConvertToYV12()
2. DVD source, two segments appended, for LQ and MQ DivX/Xvid, statid
Loadplugin("C:\Program Files\DGMPGDec\DGDecode.dll")

seg1 = Ac3Source(MPEG2source("segment1.d2v"),"segment1 192Kbps DELAY -66ms.ac3").DelayAudio(-0.066)
seg1.separatefields().selecteven()
seg1 = seg1.Trim(76,109763)
seg1.lanczos4resize(320,240)

seg2 = Ac3Source(MPEG2source("segment2.d2v"),"segment2 192Kbps DELAY -32ms.ac3").DelayAudio(-0.032)
seg2.separatefields().selecteven()
seg2 = seg2.Trim(143,76875)
seg2.lanczos4resize(320,240)

#StatID version 1.0
clip=seg1

SDAlogo = (clip.width < 468 ? ImageSource("SDAlogo.png").lanczos4resize(clip.width,round(108.0*clip.width/468.0)) : ImageSource("SDAlogo.png"))
FontSize = (clip.width < 640 ? 20 : 36)
StatID = Blankclip(clip,length=round(clip.framerate*4))
StatID = Overlay(StatID,SDAlogo,x=(clip.width-SDAlogo.width)/2,y=10)
StatID = Subtitle(StatID,"Besmir ‘Zoid’ Sheqi\nMetroid Prime: Hard [1:15]\nPart 1",font="Verdana",size=FontSize,text_color=$FFFFFF,align=5,lsp=40)

StatID++seg1++seg2
ConvertToYV12()
3. Fraps source, split parts, one segment, for LQ and MQ, statid
avisource("seg7_part1.avi")++avisource("seg7_part2.avi")++avisource("seg7_part3.avi")
Trim(439,60938)
lanczos4resize(320,240)

ConvertToYV12()
XSharpen(35,40)  # A little sharper than default 30,40

#StatID version 1.0
clip=last

SDAlogo = (clip.width < 468 ? ImageSource("SDAlogo.png").lanczos4resize(clip.width,round(108.0*clip.width/468.0)) : ImageSource("SDAlogo.png"))
FontSize = (clip.width < 640 ? 20 : 36)
StatID = Blankclip(clip,length=round(clip.framerate*4))
StatID = Overlay(StatID,SDAlogo,x=(clip.width-SDAlogo.width)/2,y=10)
StatID = Subtitle(StatID,"Besmir ‘Zoid’ Sheqi\nMetroid Prime: Hard [1:15]\nPart 1",font="Verdana",size=FontSize,text_color=$FFFFFF,align=5,lsp=40)

StatID++clip
ConvertToYV12()
4. Fraps source, split parts, segmented run, all appended into one video, for HQ and IQ, no statid
a = avisource("seg1_1.avi")++avisource("seg1_2.avi")++avisource("seg1_2.avi")
b = avisource("seg2_1.avi")++avisource("seg2_2.avi")
c = avisource("seg3_1.avi")++avisource("seg3_2.avi")

a = a.trim(100,20877) ++ a.trim(21000,30000)
b = b.trim(16,10988)
c = c.trim(875,13000)

AlignedSplice(a,b,c)  # Same as a++b++c

ConvertToYV12()
5a. DVD source, one segment, for HQ and IQ, deinterlacer: mvbob, brightness tweak, no statid
Loadplugin("C:\Program Files\DGMPGDec\DGDecode.dll")

Ac3Source(MPEG2source("segment1.d2v"),"segment1 192Kbps DELAY -48ms.ac3").DelayAudio(-0.048)
mvbob()
Tweak(bright=10,cont=1.0)
Trim(600,38000)
Lanczos4Resize(640,480)

ConvertToYV12()
5b. DVD source, one segment, for MQ and LQ, brightness tweak, no statid
Loadplugin("C:\Program Files\DGMPGDec\DGDecode.dll")

Ac3Source(MPEG2source("segment1.d2v"),"segment1 192Kbps DELAY -48ms.ac3").DelayAudio(-0.048)
separatefields()
selecteven()
Tweak(bright=10,cont=1.0)
Trim(300,19000)
Lanczos4Resize(320,240)

ConvertToYV12()
6. DVD source, one segment, for HQ and IQ, deinterlacers: mvbob and telecide, brightness correction, no statid
Loadplugin("C:\Program Files\AviSynth 2.5\plugins\DGDecode.dll")

Ac3Source(MPEG2source("SEG7_5155.d2v"),"SEG7_5155_DELAY-73ms.ac3").DelayAudio(-0.073)
Tweak(bright=10,cont=1.0)

assumetff()

# MvBob is used for gameplay moments where the game runs at 60 fps.
# Telecide is used for cutscenes running at 30 fps. Framerate is
# doubled to match video "a". There are three cutscenes in this segment.
# "last" refers to the ac3source line above.

a=last.Trim(0,1720).mvbob()
b=last.Trim(1721,4080).telecide().changefps(a)
c=last.Trim(4081,11480).mvbob()
d=last.Trim(11481,12455).telecide().changefps(a)
e=last.Trim(12456,13485).mvbob()
f=last.Trim(13486,16680).telecide().changefps(a)
g=last.Trim(16681,17200).mvbob()

AlignedSplice(a,b,c,d,e,f,g)

Lanczos4Resize(640,480)

ConvertToYV12()
When you're done
After you have your AviSynth script ready to go, you are ready to compress to H.264 and XviD. Note that you will need both if you plan on submitting to SDA.


